Mastering Band Face Pulls: The Complete Guide To Form, Benefits, And Technique
Have you ever felt a nagging tightness in your shoulders or noticed your posture slumping after long hours at the desk? Band face pulls might be the transformative exercise you've been missing. This simple yet powerful movement targets the often-neglected upper back muscles, offering a gateway to improved posture, reduced injury risk, and a stronger, more resilient physique. Whether you're a beginner or a seasoned gym-goer, understanding the nuances of band face pulls can elevate your training and combat the modern epidemic of rounded shoulders. In this ultimate guide, we’ll dive deep into every aspect—from perfecting your form to adjusting band tension—ensuring you get the most out of every rep. Plus, we’ll touch on how resources like video guides on YouTube and local community events can keep you motivated on your fitness journey.
Band face pulls are more than just another pulling exercise; they’re a cornerstone for balanced upper body development. Using a resistance band, you pull the band toward your face while maintaining specific arm positioning, which intensely activates the rear deltoids, traps, and rhomboids. This exercise is incredibly versatile, performable at the gym with cables or at home with minimal equipment, making it accessible for all fitness levels. As we explore, you’ll learn why incorporating band face pulls into your routine can lead to noticeable improvements in shoulder health and overall aesthetics. So, let’s pull back the curtain on this essential movement and set you on the path to mastery.
What Are Band Face Pulls and Why You Need Them
Band face pulls are a resistance exercise where you pull a band toward your face, leading with your elbows and keeping your upper arms parallel to the ground. This movement primarily targets the muscles of the upper back, including the rear deltoids, trapezius, and rhomboids. Unlike many pulling exercises that emphasize the lats or biceps, face pulls isolate the posterior shoulder and upper back, making them ideal for correcting muscular imbalances caused by overemphasis on pushing movements like bench presses.
The beauty of band face pulls lies in their simplicity and effectiveness. You can perform them anywhere with a resistance band and an anchor point, such as a door handle or a sturdy pole. This accessibility means you can maintain your upper back training even when traveling or without gym access. Moreover, the exercise mimics real-world pulling patterns, enhancing functional strength for daily activities. Whether you’re an athlete looking to boost performance or someone seeking relief from desk-job posture issues, band face pulls offer a low-impact, high-reward solution.
In essence, band face pulls are a preventive and corrective tool. They strengthen the muscles that retract and depress the scapulae, counteracting the forward rounding of shoulders common in today’s sedentary lifestyles. By integrating this exercise into your routine, you’re not just building muscle; you’re investing in long-term joint health and mobility. As we delve deeper, you’ll discover exactly how to execute them flawlessly and avoid common pitfalls that diminish their effectiveness.
The Incredible Benefits of Band Face Pulls
The advantages of band face pulls extend far beyond mere muscle growth. This exercise is a powerhouse for enhancing overall upper body functionality and aesthetics. First and foremost, it significantly improves posture by strengthening the muscles that pull your shoulders back and down. This counters the hunched-over position many adopt from prolonged sitting, leading to a taller, more confident stance. Studies show that consistent training of the upper back can reduce the incidence of shoulder impingement and rotator cuff injuries by up to 30%, making face pulls a critical component for anyone with shoulder concerns.
Additionally, band face pulls boost shoulder stability by reinforcing the rotator cuff and surrounding musculature. The external rotation involved in the movement trains the shoulders to handle loads in a safe, controlled manner, which is essential for injury prevention during compound lifts like overhead presses or deadlifts. For athletes, this translates to better performance in sports requiring strong, stable shoulders, such as swimming, tennis, or baseball.
From a hypertrophy perspective, band face pulls effectively build the rear deltoids and upper traps, contributing to a balanced, V-tapered physique. Many lifters overdevelop their front and lateral delts, leading to an imbalanced look and increased injury risk. Face pulls ensure the rear delts receive adequate attention, creating symmetry and definition. Furthermore, the exercise enhances mind-muscle connection due to its isolated nature, helping you learn to activate specific back muscles—a skill that benefits all pulling exercises.
Beyond physical benefits, band face pulls offer mental perks. The focused, controlled movement requires concentration, serving as a form of active meditation that can reduce stress. And because they’re easy to set up, they fit seamlessly into busy schedules, promoting consistency. Whether your goal is pain-free movement, athletic prowess, or a sculpted back, the benefits of band face pulls are undeniable and well-supported by fitness research.
Muscles Targeted: Understanding the Anatomy
To fully appreciate band face pulls, it’s crucial to understand which muscles they engage. The primary movers are the rear deltoids (posterior fibers of the deltoid muscle), responsible for shoulder extension and external rotation. These muscles are often underdeveloped compared to the anterior and medial delts, leading to imbalances. During a face pull, as you pull the band toward your face, the rear delts contract powerfully to move the upper arms backward.
Secondary muscles include the trapezius (especially the middle and lower fibers), which retract and depress the scapulae. The rhomboids (major and minor) also play a key role, pulling the shoulder blades together and stabilizing them. These muscles work in concert to create the squeezing sensation at the peak of the movement. Additionally, the infraspinatus and teres minor—parts of the rotator cuff—are activated to externally rotate the humerus, enhancing shoulder joint integrity.
Even the biceps brachii and forearm muscles are involved isometrically to maintain grip and elbow position, though they’re not the focus. Understanding this anatomy helps you visualize the movement and ensure you’re not compensating with other muscle groups. For instance, if you feel your biceps doing most of the work, your form likely needs adjustment—a common issue we’ll address later. By targeting these specific muscles, band face pulls promote a balanced upper back, reduce the risk of shoulder injuries, and contribute to a well-rounded, strong physique.
How to Perform a Perfect Band Face Pull: Step-by-Step
Executing a band face pull with proper form is essential to maximize benefits and avoid injury. Here’s a detailed, step-by-step guide:
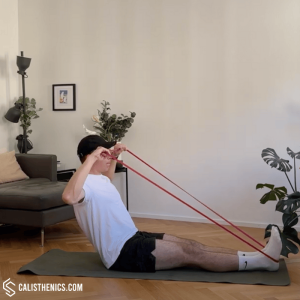
Setup: Attach a resistance band to a sturdy anchor point at chest height or slightly higher. If at home, use a door anchor or wrap the band around a heavy object. Stand facing the anchor, holding the band ends with an overhand grip (palms facing down). Your arms should be extended forward, with a slight bend in the elbows.
Starting Position: Take a few steps back to create tension in the band. Your feet should be shoulder-width apart, knees slightly bent, and core engaged. Maintain a neutral spine—no arching or rounding. Your torso can lean forward slightly at the hips, but keep your chest up.
The Pull: Pull the band toward your face, leading with your elbows and keeping your upper arms parallel to the ground. As you pull, focus on driving your elbows backward and outward, as if trying to touch your shoulder blades together. The band should travel toward your forehead or just above, depending on your anchor height.
Peak Contraction: At the end of the movement, focus on squeezing your shoulder blades together. Hold this peak contraction for 1-2 seconds, ensuring your elbows remain high and parallel. Avoid shrugging your shoulders toward your ears; instead, keep them down and back.
Return: Slowly release the tension, controlling the band back to the starting position. Maintain tension throughout; don’t let the band slacken completely. Repeat for the desired number of repetitions.
Key Tips for Success:
- Keep your wrists neutral; don’t bend them excessively.
- Your head should remain still—don’t jut your chin forward.
- Breathe out during the pull and inhale during the return.
- Start with light resistance to master the form before increasing tension.
This movement pattern ensures optimal activation of the target muscles. If you’re struggling to feel face pulls in your upper back, it’s often due to improper elbow height or insufficient squeezing. Practice in front of a mirror to monitor your form, and consider lighter bands until the mind-muscle connection is established.
Setting Up: Band Tension, Grip, and Anchor Point
Adjusting the band tension, grip, and angle is crucial to tailor the exercise to your goals and avoid injuries. Band tension determines the resistance: thicker bands provide more load, but beginners should start with light to medium bands to focus on form. If the band is too heavy, you might compensate by using momentum or other muscles, reducing effectiveness and increasing injury risk.
Grip width also matters. A wider grip emphasizes the rear delts and upper back, while a narrower grip engages the middle back more. Experiment to find what feels best for your anatomy—generally, hands slightly wider than shoulder-width work well. For grip style, an overhand grip is standard, but a neutral grip (palms facing each other) can be more comfortable for some, especially those with wrist issues.
The anchor point height influences the movement angle. A higher anchor (above head level) increases shoulder extension and external rotation, hitting the rear delts harder. A lower anchor (chest height) shifts emphasis to the mid-back. For most people, chest-height anchoring provides a balanced stimulus. Ensure the anchor is secure to prevent snapping—a common cause of injuries. By fine-tuning these variables, you can customize band face pulls for strength, hypertrophy, or rehabilitation purposes.
Common Form Errors and How to Fix Them
Even with good intentions, mistakes to avoid with this workout can undermine your progress. Here are the most common errors and their fixes:
Elbows Dropping: Letting elbows sink below parallel reduces rear delt activation and shifts load to the biceps. Fix: Consciously keep elbows high throughout the movement. Imagine a shelf at shoulder height preventing descent.
Shrugging Shoulders: Raising shoulders toward ears engages traps excessively and strains the neck. Fix: Depress your shoulders down and back before starting the pull. Think of putting your shoulder blades in your back pockets.
Using Too Much Weight: Heavy bands encourage cheating, like leaning back or using momentum. Fix: Choose a band that allows 12-15 controlled reps with perfect form. If you can’t maintain elbow height, reduce tension.
Incomplete Range of Motion: Pulling only a short distance limits muscle engagement. Fix: Aim to bring the band close to your face, with elbows fully behind your torso. Full ROM ensures maximal squeeze.
Rushing the Movement: Fast, jerky reps reduce time under tension and increase injury risk. Fix: Use a 2-second concentric (pull) and 3-second eccentric (return) tempo. Control is key.
Poor Posture: Arching the back or leaning too far forward. Fix: Engage your core and maintain a neutral spine. If needed, perform the exercise seated to stabilize your torso.
Addressing these mistakes will help you feel face pulls in your upper back as intended, leading to better results and safer training. Regularly film yourself or seek feedback to stay on track.
Band Face Pulls vs. Cable Face Pulls: Which is Better?
Learn how to do face pulls at the gym with cables or at home with resistance band—both are effective, but各有千秋. Cable face pulls use a weight stack and adjustable pulley, offering constant tension throughout the movement and easy weight increments. They’re ideal for progressive overload in a gym setting, allowing precise load management. However, cables require gym access and setup time.
Band face pulls, on the other hand, are portable, affordable, and provide variable resistance—the band gets harder as it stretches, matching your strength curve. This can be beneficial for building power at the peak contraction. Bands also allow for more natural movement patterns and are quieter. For home workouts or travel, bands are unbeatable. For most people, incorporating both methods yields the best results: use cables for heavy, controlled sets at the gym, and bands for high-rep finishers or home sessions. Your choice depends on availability, goals, and personal preference—both effectively target the same muscles.
Optimizing Your Routine: Frequency, Weight Selection, and Progression
Follow our complete guide to face pull form, weight selection and frequency to integrate band face pulls optimally into your program. Regarding frequency, aim for 2-3 times per week, allowing at least 48 hours of recovery for the same muscle groups. They can be done as part of your upper body or pull-day routine, often after heavier compound movements.
Weight selection hinges on your goals. For muscle endurance and posture improvement, use light to medium bands (e.g., 15-30 lbs resistance) for 15-20 reps per set. For hypertrophy, moderate bands (30-50 lbs) for 8-12 reps. For strength, heavier bands (50+ lbs) for 6-8 reps, but only with flawless form. Start conservatively; you should feel the burn in your upper back, not strain elsewhere.
Progression is key to continued adaptation. Increase band tension when you can complete the top end of your rep range with ease. Alternatively, add more sets, slow the tempo, or use drop sets. Track your workouts to ensure progressive overload. A typical protocol: 3-4 sets of 12-15 reps, 2-3 times weekly. Consistency trumps intensity—regular, moderate training yields better long-term results than sporadic heavy sessions.
Avoiding Injuries: Tips for Safe Execution
Injury prevention is paramount with any resistance exercise. Find out how to adjust the band tension, grip, and angle to suit your goals and avoid injuries by adhering to these principles:
- Warm Up: Always warm up your upper back and shoulders with dynamic stretches like arm circles and band pull-aparts before heavy face pulls.
- Control the Band: Never let the band snap back; always control the eccentric phase to protect your joints.
- Listen to Your Body: If you feel pain (especially in the shoulder joint), stop immediately. Discomfort from muscle burn is okay; sharp pain is not.
- Balance Your Training: Don’t neglect pushing exercises; maintain a 1:1 or 2:1 push-pull ratio to avoid imbalances.
- Consult a Professional: If you have pre-existing shoulder issues, work with a physical therapist to tailor the exercise.
By prioritizing form over ego and gradually increasing intensity, you’ll minimize risk and reap the long-term benefits of band face pulls.
Enhancing Your Technique with Video Guides
Watch the band face pull video guide to improve your technique and get the most out of your workout. Visual learning can dramatically enhance your understanding of proper form. Platforms like YouTube are treasure troves of free, high-quality tutorials from fitness experts. Searching for “band face pull tutorial” will yield videos demonstrating setup, execution, and common mistakes.
Read our band face pull guide alongside these videos for a comprehensive approach. Video guides allow you to see the movement from multiple angles, observe subtle cues like elbow height and scapular squeeze, and compare your form. Enjoy the videos and music you love, upload original content, and share it all with friends, family, and the world on YouTube—you might even document your own progress for accountability. However, ensure you follow reputable sources; look for certified trainers with proven expertise. Supplement video learning with written guides like this one to cover all bases. Remember, the best technique is the one that’s safe and effective for your body, so use videos as a tool, not a rigid script.
Staying Motivated: Fitness Events and Community
While mastering band face pulls is a personal journey, staying motivated often involves community engagement. Madisonville, Kentucky have you secured your tickets yet for local events that can energize your fitness routine? For instance, Resurrection, the nation's premier Journey tribute band, will be performing at the Glema Mahr Center for the Arts on Friday, February 27th. Attending such events isn’t just about entertainment; it’s about fostering a holistic healthy lifestyle. Physical activity and mental well-being are intertwined—enjoying music and social outings can reduce stress and boost your motivation to train.
Incorporating fun, non-gym activities into your schedule prevents burnout and keeps fitness enjoyable. Look for local concerts, sports games, or fitness expos in your area. These events often inspire new goals and connect you with like-minded individuals. Plus, the energy from live performances can translate into more enthusiastic workouts. So, while you’re perfecting your band face pulls at home or gym, remember to balance training with leisure. It’s all part of a sustainable, happy life.
Conclusion
Band face pulls are a fundamental yet often overlooked exercise that delivers profound benefits for upper back strength, posture, and shoulder health. By pulling the band toward your face, leading with your elbows and keeping your upper arms parallel to the ground, and focusing on squeezing your shoulder blades together at the peak of the movement, you can maximize muscle engagement and minimize injury risk. Whether you learn how to do face pulls at the gym with cables or at home with resistance band, the principles remain the same: prioritize form, adjust variables like tension and grip, and train consistently.
This guide has equipped you with everything from anatomy to advanced tips, including how to adjust the band tension, grip, and angle to suit your goals and avoid common mistakes. Remember, band face pulls are an excellent exercise for strengthening the rear delts, traps, and upper back, helping to improve posture and shoulder stability. Integrate them into your routine 2-3 times weekly, progressively overloading as you master the movement. Utilize resources like video guides on YouTube to refine your technique, and don’t forget to engage with your local community—perhaps catching a show by Resurrection in Madisonville—to keep your fitness journey vibrant and balanced.
Now, armed with this knowledge, step up to your band, anchor it securely, and feel the powerful squeeze in your upper back. Your future self—with better posture, stronger shoulders, and reduced pain—will thank you. Start today, and experience the transformation that consistent band face pulls can bring.