The Ultimate Guide To Casting Off When Knitting: Techniques, Tips & Finishing Flair
Introduction: Securing Your Knitting Masterpiece
Have you ever wondered how to properly cast off when knitting without compromising the beauty and durability of your handmade creation? You’ve meticulously stitched every row, watched your scarf grow row by row, or shaped a cozy sweater panel with care. The final stitch is on the needle, but now what? This crucial last step—often called casting off or binding off—is the bridge between your project’s completion and its longevity. Done incorrectly, your beautiful knit can unravel at the edges, looking sloppy and compromising all your hard work. Done well, it provides a clean, professional, and secure finish that honors your effort. This comprehensive guide will transform this final, sometimes daunting, step into a confident, routine part of your knitting process. We’ll cover everything from the absolute beginner’s first bind-off to specialized techniques for looms and armholes, ensuring your finished projects are as neat as they are lovely.
Why Casting Off is Non-Negotiable: More Than Just an Ending
Casting off is an essential skill for any knitter to know. It’s not merely a formality; it’s a structural necessity. The primary purpose of a cast-off edge is to secure the knitted fabric and prevent it from unraveling. Without this final anchor, the live stitches on your needle are just waiting for a tug to transform your project into a ladder of dropped stitches. Beyond security, the cast-off edge significantly impacts the overall look and feel of the finished product. A tight, inflexible bind-off can pucker the edge of a sweater or make a scarf uncomfortably stiff. Conversely, a loose, sloppy bind-off can look unprofessional and create gaps. The method you choose—whether a standard stretchy bind-off, a firm decorative edge, or a technique specific to your loom—directly influences the drape, durability, and aesthetic polish of your item. Mastering this skill ensures your final impression is as strong as your knitting.
The Foundational Bind-Off: Your Go-To Method for Flat Knitting
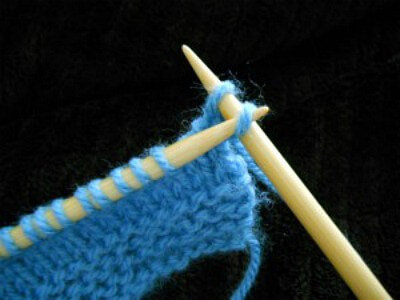
For most beginner projects on straight needles or in flat circular knitting, the standard knitted bind-off is the cornerstone technique. It’s versatile, reliable, and creates a neat, moderately stretchy edge. Here is a detailed breakdown of the process, expanding on the foundational steps:
1. Setup: Begin with the needle holding your project in your left hand and an empty needle in your right hand. You will be working from the left needle to the right.
2. First Steps:Simply start with the stitch you would normally work, such as a purl or knit stitch. If your last row was in knit stitch, knit the first two stitches on your left needle onto the right needle. This establishes the pattern.
3. The Core Action: Now you have two loops on your right needle. When you have two loops on your right needle, pass the first stitch (the one farthest from the needle tip) over the second stitch and off the needle. You are essentially "casting off" that first stitch. It will drop and secure itself.
4. Repeat: Knit one more stitch from the left needle onto the right needle. You now again have two loops on the right needle. Pass the first over the second and off. Continue this sequence—knit one, pass one over—until only one stitch remains on your right needle.
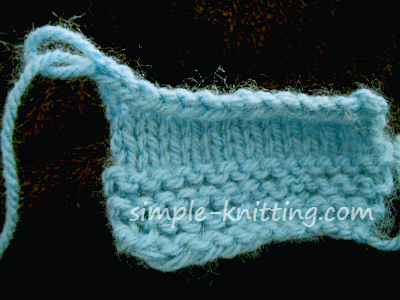
5. Finishing: Cut your working yarn, leaving a 6-8 inch tail. Pull this tail through the last remaining loop and tighten to secure. You have successfully bound off!
Pro Tip: To maximize stretch, especially for necklines or cuffs, use a larger needle (1-2 sizes up) for the bind-off row. For a firmer edge, use a smaller needle or simply maintain consistent tension.
Beyond the Basics: Choosing the Right Cast-Off for Your Project
There are several different ways to end a scarf, each with its own advantages and disadvantages. The "best" method depends entirely on your project's needs.
- The Standard Bind-Off (described above): Creates a stretchy, durable edge. It’s the default for most scarves, blankets, and sweater bodies. Its elasticity makes it comfortable for wearables.
- The Stretchy Bind-Off (e.g., Jeny’s Stretchy Bind-Off): An excellent alternative for projects needing maximum give, like lace shawls or fitted sweater bottoms. It involves a specific yarn-over sequence that creates a remarkably elastic, almost lace-like edge.
- The Non-Stretchy/Firm Bind-Off:This is binding off with no stretch. Techniques like the "K2, P2" bind-off or a "simple cast-off" worked very tightly create a rigid, stable edge. This is ideal for button bands, garment hems where you want no stretching, or decorative elements where structure is key. It’s the opposite of a stretchy edge and should be used judiciously.
- The Three-Needle Bind-Off: Used for joining two live edges, such as shoulder seams or the top of a hat. It creates a strong, flat, and decorative seam that is also a cast-off. It’s a fantastic technique for seamless-looking joins.
Ending a knitted scarf is an important step because the cast-off edge will be one of the most visible parts. For a simple garter stitch scarf, the standard bind-off is perfect. For a bulky, textured scarf, you might prefer the firmness of a simple cast-off to highlight the stitch pattern without excess stretch.
Casting Off on a Loom: A Specialized Technique
Loom knitting is a versatile craft that opens up knitting to those who find traditional needles challenging. However, the cast off technique for the flat looms has to be carefully considered because the mechanics differ from needle knitting. The goal remains the same: secure all loops without unraveling.
A common and effective method for flat looms (like a rake or long loom) is a hook-based bind-off:
- Slide your loops to the top of the pegs and hold your working yarn at the bottom. Ensure all your stitches are sitting properly on the pegs.
- With your loom hook, go under your loop from the top and pull your working yarn through, making a new loop. This is essentially creating a new stitch that will become the anchor.
- Cast off the old loop and place the new loop on the peg. Carefully lift the original stitch off the peg—it is now bound off. The new loop you just made replaces it on the peg.
- Move to the next peg and repeat this process across the entire row. Once all pegs have one loop, you can cut the yarn and pull it through the final loop to secure.
For a purl stitch on a loom, the principle is identical; you are simply using the purl stitch configuration on the pegs. Let me see you do purl stitch on the loom first to set up the stitches, then follow the same hook-and-bind process. This method creates a secure, neat edge suitable for most loom-knit projects.
The Finishing Touch: Weaving in Ends
Weaving in ends is an essential technique that is the final act of a well-finished project. When knitting, yarn is typically carried along the side of the work, creating loose ends at the cast-on edge, at every color change, and crucially, where stitches are cast off. These tails are your project’s weakest points if left unsecured.
These ends need to be woven into the fabric to ensure the garment or project's durability. Here’s how to do it properly:
- Use a tapestry needle.
- Thread the yarn tail.
- On the wrong side (public side for scarves) of your work, weave the needle back and forth through the vertical strands (the legs) of the stitches for 2-3 inches. Follow the path of the yarn as if you’re continuing the stitch path.
- Gently tug to ensure the tail is snug but not puckering the fabric.
- Trim the excess close to the fabric.
- Repeat for every tail, including the one from your cast-off. This simple step prevents any future unraveling and makes your project look professionally finished.
Casting Off in Special Contexts: Armholes and Circular Machines
How to cast off armholes is a specific application of the bind-off, typically used when shaping a sweater or vest. You are binding off a small number of stitches (e.g., 3-5) at the beginning of a row to create the armhole opening. The technique is identical to the standard bind-off; you simply perform it for the required number of stitches, then continue knitting the rest of the row. It’s a straightforward shaping technique.
For those using circular knitting machines, the process is conceptually similar but mechanized. Whether you’re new to circular knitting machines or looking to improve your results, the principle is to transfer all live stitches from the machine’s needles to a waste yarn or a binding attachment in a controlled manner to create a secure, closed edge. Many machine knitters use a "waste yarn cast on & off" technique, which allows for easy removal of the project from the machine and a clean finish. Tutorials from experts like @yarnover often cover these specialized machine techniques, including closing tube flat and troubleshooting issues like tucked stitches.
Tools, Materials, and Resources for Success
Your success in casting off isn't just about technique; it's also about having the right tools and knowledge.
- Needles/Hooks: Ensure your knitting needles or loom hook are smooth and the correct size for your yarn.
- Yarn: The yarn label often suggests a needle size. Using a needle size that creates a fabric you like will also make binding off easier.
- Scissors & Tapestry Needle: Sharp scissors for clean cuts and a blunt-tipped tapestry needle for weaving ends are indispensable.
- Learning Resources: If you’re a visual learner, this detailed guide and video tutorial will have your knitting cast off in no time! Many platforms offer free tutorials. For hands-on learning, with two instructors on hand, you’ll get plenty of individual support as you learn how to cast on, knit, purl, and cast off. Such classes are ideal for building confidence in all fundamental skills.
- Yarn & Supply Sources: For high-quality materials, Webs, America's Yarn Store® offers the most comprehensive selection of yarns and supplies for knitters, crocheters, weavers & more. Shop everything you need at Webs. Having good yarn makes every step of knitting, including finishing, more enjoyable.
Common Cast-Off Mistakes and How to Avoid Them
Even with the best instructions, pitfalls can occur. Here are the most common issues:
- Binding Off Too Tightly: This is the #1 mistake. It puckers the edge and removes stretch. Solution: Consciously work the bind-off loosely. You can even drop the right-hand needle’s grip slightly after passing a stitch over to create more slack. Using a larger needle helps immensely.
- Not Leaving a Long Enough Tail: Forgetting to leave a sufficient tail for weaving in (at least 6 inches) leads to a frantic search for yarn or a insecure finish. Solution: Always cut a generous tail before starting your bind-off row.
- Weaving Ends on the Public Side: This creates visible bumps. Solution: Always weave ends on the wrong side of the work. For scarves, this is the side that will be against your neck or hidden when worn.
- Skipping the Last Weave-In: The tail from the final cast-off stitch is critical. Solution: Make sure to weave this tail in securely through multiple stitch legs, just like any other end.
- Using the Wrong Bind-Off for the Project: A firm bind-off on a lace shawl will ruin its drape. Solution: Consider the project’s needs. Ask: Does this edge need to stretch? Should it be decorative? Choose your method accordingly.
Conclusion: From Final Stitch to Finished Masterpiece
Casting off your knitting to give your finished project a neat and tidy edge is the final, defining act of your creative process. It transforms a fragile web of loops into a durable, finished textile. Today I shall be showing you how to cast off in knitting from the absolute basics to specialized applications, because imagine that your lovely, creative knitting project is complete, but how do you bind off those stitches so that all your hard work doesn’t unravel? The answer lies in practicing the standard knitted bind-off until it’s second nature, understanding when to choose a stretchy or firm variant, mastering loom-specific techniques, and never skipping the vital step of weaving in every single end.
Remember, the pine cone stitch utilizes only fundamental techniques such as cast on, knit, purl, and cast off—proving that even complex patterns rely on these core skills. Whether you’re crafting a simple garter stitch scarf by the end of the session, you’ll have your very own cosy, chunky headband to take home, handmade by you! or an intricate garment, a well-executed cast-off is your signature of quality. So pick up your needles, practice that knit one, pass one over rhythm, and finish every project with the confidence and pride it deserves. Your future self, admiring a perfectly secure and beautiful edge, will thank you.