9 Effortless DIY Hummingbird Feeder Projects To Transform Your Yard
Ever wondered how to invite the mesmerizing, jewel-toned flash of hummingbirds into your garden without spending a fortune on store-bought feeders? The secret lies in your recycling bin and a few minutes of craft time. Creating a DIY hummingbird feeder is one of the most rewarding, eco-friendly, and budget-conscious projects for any bird lover. Not only do you provide a vital energy source for these tiny migratory marvels, but you also get the satisfaction of a handmade creation. This comprehensive guide will walk you through everything you need to know, from the absolute basics to nine unique feeder designs and bonus projects to attract a whole chorus of feathered friends to your outdoor space.
We’ve gathered the most fun, simple, and effective DIY hummingbird feeder ideas using inexpensive, often repurposed materials. All you need is a container to hold the nectar and a spout or opening to reach it. These projects come together quickly with basic tools, proving that anyone can become a backyard bird sanctuary architect. Let’s dive in and start building.
Why Make Your Own Hummingbird Feeder? The Benefits Are Clear
Before we get to the tutorials, let’s address the core question: why choose a DIY hummingbird feeder over a commercial one? The advantages are compelling and multifaceted.
First, it’s incredibly cost-effective. A commercial feeder can cost anywhere from $10 to $30, while a DIY version using a recycled bottle and a few supplies often costs under $5. This allows you to set up multiple feeding stations without straining your wallet, which is key since hummingbirds are territorial. Multiple feeders reduce aggression and allow more birds to feed peacefully.
Second, it’s a powerful act of upcycling and sustainability. By giving a plastic bottle, glass jar, or other single-use item a new purpose, you directly reduce waste. This aligns perfectly with the ethos of attracting wildlife—you’re creating a healthier environment not just for birds, but for the planet.
Third, customization is king. Store-bought feeders come in fixed designs. When you make your own hummingbird feeder, you control every aspect: the color (hummingbirds are attracted to red), the size, the number of feeding ports, and even the aesthetic to match your garden décor. You can add personal touches that make your yard uniquely inviting.
Finally, the process itself is deeply satisfying and educational. It’s a fantastic project for families, classrooms, or solo crafters. It fosters a connection to nature and teaches valuable hands-on skills. Watching a creation you built yourself become a bustling hub for hummingbirds is an unmatched joy.
The Fundamental Principle: Container and Spout
As highlighted in our key principles, all you need is a container to hold the nectar and a spout or opening to reach it. This simplicity is what makes DIY hummingbird feeder projects so accessible. The "container" is your reservoir—this can be any clean, watertight vessel: a plastic bottle, a glass jar, a ceramic cup, even an emptied-out orange. The "spout" is the feeding mechanism. This is typically created by:
- Drilling or poking small holes in a lid or cap.
- Inserting a tube (like a straw or specialized feeding tube) through a seal.
- Using a pre-made feeding port that screws onto a standard mouth (like a Mason jar lid).
- Creating a simple opening that mimics a flower, which hummingbirds will probe with their long tongues.
The most successful feeders mimic natural flowers: they are red (or have red accents), have small openings to discourage bees and wasps, and allow the bird’s beak to reach the nectar without perching (hummingbirds can hover). Keeping this core concept in mind will help you adapt almost any container into a functional feeder.
9 Simple & Stunning DIY Hummingbird Feeder Tutorials
Now for the heart of the matter. Below are nine DIY hummingbird feeder designs anybody can make using mostly repurposed items at home. Each offers a different look and level of complexity, but all follow the basic container-and-spout rule.
1. The Classic Water Bottle Feeder
This is the quintessential DIY hummingbird feeder and the perfect starting point.
- Materials: A clean 16-20 oz plastic water or soda bottle, a red plastic or silicone feeding port (or a bottle cap with 3-4 small holes drilled in it), strong twine or wire, a hook.
- Process: Thoroughly clean the bottle. If using a cap, drill or melt tiny holes (about 1/8 inch) around the edge. Screw the cap on tightly. Fill the bottle with nectar (recipe: 1 part white granulated sugar to 4 parts water, boiled and cooled. Never use red dye, honey, or artificial sweeteners). Turn the bottle upside down so the cap is at the bottom. The nectar will slowly drip out, coating the inside of the cap. Hummingbirds will sip from the holes. Hang it using twine through the bottle’s neck or by attaching a hook to the cap. The red cap or a red ribbon around the neck acts as a visual attractant.
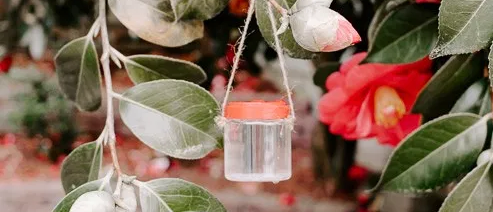
2. The Elegant Juice Bottle or Glass Jar Feeder
Glass provides a beautiful, sturdy alternative and is easy to clean.
- Materials: A glass juice bottle or Mason jar, a lid that fits (a Mason jar lid is ideal), red acrylic paint or tape, a small glass or plastic tube (a cut-off straw works), silicone sealant.
- Process: Paint the lid red or wrap it with red tape. Carefully make a small hole in the center of the lid. Insert a short length of straw or tube through the hole so it extends about 1/2 inch below the lid. Seal around the tube with silicone to make it airtight. Fill the jar with nectar, screw on the lid, and hang upside down. The tube acts as a spout, and the glass reservoir is elegant and durable.
3. The Charming Jelly Jar Feeder
Smaller jars are perfect for tight spaces or as gifts.
- Materials: A small glass jelly or baby food jar, a plastic lid (from a sour cream container or similar), red paint, a small nail or drill.
- Process: Clean the jar and lid. Paint the lid red. Make 3-4 tiny holes around the rim of the lid. Fill the jar with nectar, screw the lid on, and hang. The small size means nectar is consumed quickly, encouraging frequent visits and easier cleaning. You can even attach a tiny perch below the lid for birds to rest, though it’s not necessary for hummingbirds.
4. The Upcycled Wine Bottle Hummingbird Feeder
For a rustic, garden-art look, a wine bottle is a fantastic choice.
- Materials: An empty wine bottle (label removed), a glass bottle cutter (or a method to score and break the bottle safely), a rubber stopper with a hole, a glass feeding tube, red paint.
- Process:Safety first: Use a proper bottle cutter to score and separate the bottom 2-3 inches of the bottle. Smooth the edges with sandpaper. Take the neck portion. Paint the neck or stopper red. Insert the rubber stopper into the neck. Feed the glass tube through the stopper so it hangs down inside. Fill the bottle through the top (now the opening), insert the stopper, and hang upside down. The long neck creates a beautiful, drip-free reservoir.
5. The Soda Bottle with Tray Feeder
This design adds a small landing perch, which can attract other small birds alongside hummingbirds.
- Materials: A 2-liter soda bottle, a plastic plate or shallow dish, a long screw or bolt, nuts and washers, red paint, strong wire.
- Process: Cut the bottom off the soda bottle (this will be the reservoir). Paint the cap red and drill holes in it. Screw the cap onto the neck of the bottle (which is now the top). Turn the bottle upside down so the cap is at the bottom. Take the plastic plate and make a hole in its center. From the inside of the plate, thread the screw up through the hole, then through the bottle’s neck (now pointing down). Secure with washers and nuts on the outside of the plate, creating a tight seal. Fill the bottle with nectar, screw on the cap, and hang. Nectar will drip onto the plate, and birds can sip from the plate or the cap holes.
6. The Simple Tube Feeder from a Bottle Cap
Extremely minimalist and effective.
- Materials: A plastic bottle cap, a short piece of flexible plastic tubing (from an aquarium or hardware store), a nail, red paint.
- Process: Paint the cap red. Make a single small hole in the center of the cap. Push one end of the tubing through the hole from the outside so it protrudes about 1/4 inch into the cap’s interior. Seal with a drop of hot glue if needed. Fill a small bottle or directly the cap (if you add a small reservoir) with nectar. The hummingbird will hover and insert its beak into the tube to drink. Hang the cap directly by attaching a loop of wire to its sides.
7. The Ceramic or Terracotta Pot Feeder
For a beautiful, weather-resistant garden ornament.
- Materials: A small terracotta pot (no drainage hole needed, but if it has one, seal it), a corresponding saucer, a red bottle neck or feeding tube, strong adhesive (like E6000), paint.
- Process: Paint the rim of the pot red. Attach the feeding tube (from a bottle cap or purchased port) to the bottom center of the saucer using adhesive. Let cure completely. Fill the pot with nectar, then quickly invert it and place the saucer (with tube) on top. The suction will hold it. Alternatively, seal the pot’s drainage hole, fill it, and screw a red feeding port into the hole from the outside. Hang the pot by a wire wrapped around its body.
8. The Recycled Milk Jug Feeder
A sturdy, large-capacity option.
- Materials: A clean plastic milk jug, a red plastic lid or piece of red plastic, a nail or drill, twine.
- Process: Clean the jug thoroughly. Remove the cap. Paint the original cap red or cut a red circle to fit the opening. Make 3-5 small holes around the edge of the red circle. Poke a hole in the center of the circle and thread a piece of twine through it to create a hanging loop. Fill the jug with nectar, screw on the red lid, and hang by the twine loop. The jug’s handle can also be used for hanging.
9. The Bamboo or Wood Block Feeder
For a natural, organic look that blends with woodlands.
- Materials: A short length of bamboo (2-3 inches diameter, 4-6 inches long) or a small block of untreated wood, a drill with a small bit (1/8"), red paint, a hook.
- Process: If using bamboo, cut a section with one solid node (wall) at one end. If using wood, drill a hole through the center from top to bottom. Paint the top opening red. Drill 3-4 small holes around the side, about 1 inch from the top. Fill the bamboo/block with nectar by pouring into the top hole. Seal the top hole with a cork or piece of wood. Hang it so the side holes are accessible. Hummingbirds will sip from the side holes.
Creating Accessories & Customizing Your DIY Hummingbird Feeder
These DIY hummingbird feeder ideas will show you how to make your own feeder or create an accessory to go with the hummingbird feeder you have. Customization enhances both function and appeal.
- Add Perches: While hummingbirds can hover, adding a small stick or dowel near a feeding port gives them a rest spot and can attract other birds like chickadees. Attach it with wire or glue.
- Insect Guards: Deter ants by creating a water moat. Attach a small plastic lid or bottle cap between the hanger and the feeder, fill it with water, and the ants won’t cross.
- Weather Protection: A simple plastic dome (from a garden stake light) placed over an upside-down bottle feeder prevents rain from diluting nectar and spoiling it quickly.
- Decorative Elements: Use non-toxic paint to add flowers or patterns. Wrap the reservoir in raffia or twine for a rustic look. The key is to keep red elements prominent near the feeding ports.
Beyond Hummingbirds: Expanding Your Bird-Friendly Yard
While the focus is on diy hummingbird feeder projects, creating a sanctuary means catering to a variety of species. Create your own DIY bird feeder and watch as chickadees, nuthatches, sparrows, finches, cardinals, and woodpeckers flock to your yard. Different birds have different preferences—some prefer seeds, others fruit or suet. For even more fun, do this craft in conjunction with a few other DIY bird feeders utilizing various materials to adorn your yard or patio.
3 Super Simple Bird Feeder Crafts for Other Species
- The Orange Half Bird Feeder:Transform an orange into a bird feeder you can hang off tree branches or a shepherd's hook. Simply cut an orange in half, scoop out the fruit (save it for yourself!), and poke 3-4 holes around the rim. Thread twine through the holes to create a hanging basket. Fill with birdseed or suet chunks. The citrus scent can attract orioles and tanagers, while the seeds appeal to many songbirds.
- The Frozen Fruit Bowl Feeder:Make a frozen bird feeder bowl by freezing water between two different sized bowls. Place a smaller bowl inside a larger one. Fill the space between them with water mixed with pieces of fruit (berries, apple chunks, grapes). Fill the water with fruit and freeze. Once solid, remove the inner bowl. You have a beautiful, decorative ice bowl filled with fruit. Hang it or place it on a platform. As it melts, birds enjoy the fruit and water. Perfect for summer.
- The Seed & Nut Log:Fill with seeds and nuts, and hang. This is delightfully simple. Find a sturdy log or branch section. Drill holes of various sizes deep into the wood. Pack the holes with a mixture of peanut butter, suet, and birdseed. Hang it from a tree. Woodpeckers, nuthatches, and chickadees will work tirelessly to extract the treats.
Pro Tips for Success: Attracting and Nurturing Hummingbirds
Your DIY hummingbird feeder is only part of the equation. To ensure it becomes a popular hotspot, follow these essential tips:
- Nectar Recipe is Key: Use only white granulated sugar and water in a 1:4 ratio. Boil the water to dissolve sugar completely and kill any microbes, then cool. Never use red dye—it’s unnecessary and potentially harmful. Change nectar every 3-5 days, and daily in hot weather, to prevent fermentation and mold.
- Placement Matters: Hang feeders in dappled shade if possible. Direct sun can cause nectar to spoil rapidly and makes the feeder hot. Place them near trees or shrubs so birds have a quick escape route from predators. Avoid placing them too close to windows to prevent collisions.
- Clean Relentlessly:DIY feeders can be harder to clean than commercial ones. Use a bottle brush for bottles. For all feeders, scrub with hot soapy water weekly, and monthly soak in a vinegar-water solution (1 part vinegar to 4 parts water) or a weak bleach solution (1 tablespoon bleach per gallon of water), then rinse thoroughly. Mold and bacteria are deadly to hummingbirds.
- Go Native: While feeders provide a critical energy source, the best way to support hummingbirds is to plant native, nectar-rich flowers like bee balm, salvia, columbine, and trumpet vine. A garden with continuous bloom from spring to fall provides a natural, sustainable food source.
- Be Patient: It can take time for hummingbirds to discover a new feeder. Keep it clean and full. Once one bird finds it, others will follow quickly, especially during migration seasons (spring and fall).
Conclusion: Your DIY Journey Begins Now
Building a DIY hummingbird feeder is more than a craft project; it’s a direct contribution to your local ecosystem and a front-row seat to one of nature’s most spectacular shows. The nine designs we’ve explored prove that with a few repurposed items and a spark of creativity, you can create a beautiful, functional haven for these incredible birds. Remember the core principle: a container and a spout. Then, let your imagination take flight.
By combining your handmade hummingbird feeders with simple projects for other birds, you’ll transform your yard into a vibrant, year-round wildlife refuge. The rated red crew—meaning bird enthusiasts and crafters everywhere—knows that these super easy DIY bird feeders make a world of difference. So gather your bottles, jars, and basic tools. This project comes together quickly, and the reward—the flash of iridescent green and ruby red as a hummingbird hovers at your creation—is truly priceless. Start your DIY hummingbird feeder project today and watch your garden come alive.