Mastering SVG Import In FreeCAD: From Vector Designs To 3D-Printable Solids
Struggling to turn your elegant SVG fonts and vector graphics into tangible, 3D-printable models in FreeCAD? You're not alone. Many makers and designers hit a wall when trying to bridge the gap between 2D vector artwork and parametric 3D solid modeling. The promise of importing an SVG file—like a custom logo, intricate gothic trefoil, or stylized text—and simply "padding" it into a 3D shape, as you might in commercial software, often meets the reality of FreeCAD's unique workflow. This comprehensive guide dismantles those barriers. We will walk through the entire process, from creating your SVG in FreeCAD itself to expertly importing, converting, and manipulating external SVG files, with a special focus on handling typography. By the end, you'll transform that "unusable garbage" into pristine geometry ready for your print bed.
The Genesis: Creating Your Own SVG Directly in FreeCAD
The journey often begins within FreeCAD itself. I created this gothic trefoil design using FreeCAD 1.0, then exported it as an SVG file. This is a powerful, often overlooked capability. FreeCAD's Draft Workbench is not just for import; it's a fully featured 2D drafting tool. You can draw lines, arcs, polylines, and complex shapes with precision constraints. The Arch Workbench also offers useful tools for creating architectural elements that can be exported.
To create an SVG for later use, design your 2D shape in a new FreeCAD document using these tools. Once satisfied, simply go to File > Export and choose Scalable Vector Graphics (*.svg). This exports your Draft objects as a clean, scalable vector file. This workflow is perfect for creating custom logos, decorative patterns, or precise technical outlines that you want to reuse across projects or share with others. The exported SVG retains the geometric integrity of your FreeCAD sketch, making re-importation straightforward.
Why create in FreeCAD first? It ensures your source geometry is inherently parametric and clean, avoiding many common SVG import pitfalls that arise from complex, nested paths generated by other graphics software.
The Core Workflow: Importing SVG as Editable Geometry
This is the critical step everyone asks about: Once you have the SVG file it's simple to import it. The keyword here is simple—but only if you follow the exact steps. The most common mistake is importing the SVG incorrectly, leading to a confusing "drawing" object instead of editable geometry.
First, create a new document, then select import from the file menu, select your SVG file, and choose to import it as geometry (not as a drawing). This single choice defines your entire downstream process. Here’s the detailed breakdown:
- Start Fresh: Open FreeCAD and create a new, empty document.
- Navigate to Import: Go to File > Import.
- Select Your File: Choose your
.svgfile. - The Crucial Dialog: A dialog box will appear. You must select "Import as: Geometry (recommended)". The alternative, "Import as: Drawing," creates a non-editable page with a view of your SVG—essentially a dead end for modeling.
- Confirm: Click "Open."
Your SVG paths will now appear in the Tree View as a collection of Draft::Wire or Draft::BSpline objects, depending on the original paths. They are now native FreeCAD objects. You can select them, move them, and, most importantly, use them as the basis for a new sketch.
From 2D Path to 3D Solid: The Sketch and Pad Method
This is the holy grail for 3D printing: turning a flat SVG into a solid body. Learn how to import an SVG file on FreeCAD and turn it into a solid shape that can be 3D printed. The process mirrors the familiar Fusion 360 workflow many users crave. I'd like to be able to import an image again like SVG and then pad it. In my Fusion360 projects before, I am able to import an SVG file like my initials and put it as part of a sketch then pad it.
Here is the precise method to achieve this in FreeCAD's Part Design Workbench:
- Import Correctly: Follow the steps above to import your SVG as Geometry.
- Create a New Body: In the Part Design workbench, click Create body. This is your container for the solid.
- Create a New Sketch: Inside the Body, click Create sketch. Choose a plane (usually the XY plane for flat designs).
- Project External Geometry: Inside the Sketcher workbench, click the Project geometry tool. Now, click on the imported SVG wires from the 3D view. This projects their edges into your new sketch as construction geometry (blue lines).
- Create Sketch Geometry: Use the Sketcher tools (like Polygon, Rectangle, or Trim) to draw over the projected paths, creating closed, bounded regions. For complex SVG paths, you may need to use Connect to join segments or Convert to arc for smoother curves. The goal is to create fully constrained, closed sketches.
- Pad: Exit the sketch. With the sketch selected in the Tree View, click Pad. Set your extrusion depth, and you have a solid 3D object ready for export to STL.
Learn how to import an SVG file into a sketch in FreeCAD. This projection technique is the bridge. It gives you the full power of the Sketcher's constraint solver to ensure your 2D profile is perfect before extrusion.
The Typography Challenge: SVG Fonts and Text
Handling text is where the SVG import journey gets particularly tricky and interesting. Convert SVG paths into editable sketch geometry easily. When you export text from a program like Inkscape as SVG, it's no longer "text"—it's a series of complex paths outlining the letterforms. This is both a blessing and a curse.
- The Blessing: You get perfect, outline-based geometry for any font, no matter how decorative. This is ideal for 3D modeling.
- The Curse: You lose editability. You cannot change the text content or font without going back to the source file. The imported paths can be extremely complex, with hundreds of segments for a single letter, making sketch manipulation slow.
To import text from an SVG file, look at the import text and geometry from Inkscape tutorial. This official FreeCAD tutorial is your best friend. It details how to prepare text in Inkscape (like converting to paths, simplifying) for a cleaner import. For curved text, you can use the macro FCCircularText. This macro generates circular text directly within FreeCAD, bypassing the SVG import issue for that specific use case.
The current text tool has a handful of predefined fonts which is very limiting. This sentiment is widely shared. The typographic controls in Inkscape are far more advanced than in FreeCAD. This leads to a powerful, recommended hybrid workflow:
- Design in Inkscape: Do all your typography, layout, and artistic shaping in Inkscape. Use its vast font library, kerning, and path effects.
- Simplify & Export: In Inkscape, use Path > Simplify (Ctrl+L) to reduce node count on your text paths. Then export as SVG.
- Import & Model in FreeCAD: Import the simplified SVG as geometry and follow the sketch projection method to create your 3D solid.
Honestly, for most stuff dealing with type, I prefer to do the layouts in Inkscape and just import SVG. This is the pragmatic consensus among experienced FreeCAD users.
Troubleshooting: When SVG Import Goes Wrong
It's interesting that the import gets messed up although the file appears to work in just about all SVG viewers/tools that I have tried. This is a frequent frustration. An SVG can look perfect in a browser or Illustrator but become a tangled mess of overlapping, unclosed wires in FreeCAD. Common causes include:
- Extremely Complex Paths: SVG files from certain sources (especially automated converters) can have thousands of tiny segments.
- Nested Groups and Layers: FreeCAD's importer can struggle with deeply nested SVG groups (
<g>tags). - Non-Standard SVG Features: Use of filters, masks, or CSS styles that FreeCAD's SVG parser doesn't support.
- Transformations: Applied scales, rotations, or skews on groups can confuse the coordinate system.
I appreciate you verifying that there is an issue with the import of this file. If you encounter this, first try simplifying the SVG in Inkscape (Object to Path, then Simplify). Also, try ungrouping everything in Inkscape (Object > Ungroup repeatedly) before re-exporting. Importing any external file format produces either empties (stl, obj) or some unusable garbage (stp). This hyperbolic frustration highlights that SVG is one of the more useful 2D formats for FreeCAD precisely because of the "Geometry" import option, unlike STL/OBJ (which are meshes) or STEP (which can be overly complex).
Proper SVG import would be quite handy in my opinion. The community agrees, which is why improving the SVG import robustness is a recurring topic on the FreeCAD forums.
Comparative Landscape: FreeCAD vs. The Rest
The video tutorial is not in english, but if you have some experience with FreeCAD, you can likely follow along visually. Many excellent resources exist in other languages. This speaks to the global FreeCAD community.
I would love to see a SVG import in Plasticity. This comment from a user of the newer, paid modeler Plasticity highlights a key market perception: seamless, reliable SVG import is a benchmark for modern, user-friendly 3D CAD software. With this video tutorial you can learn the specific, sometimes non-intuitive steps that make FreeCAD's workflow function.
See the forum thread how to use ShapeStrings in PartDesign. For simple, single-line text within FreeCAD, the ShapeString object (found in the Part workbench) is a solution. It creates a solid from a text string using a single font file. However, it lacks layout control and is limited to one font at a time. It's good for part numbers, not graphic design.
Using the Draft workbench to create text or shapes for projection. You can also use the Draft Text tool to create text as a group of lines, but its formatting is extremely basic. The Draft ShapeString is more powerful but still less flexible than Inkscape.
Advanced Tips and Best Practices
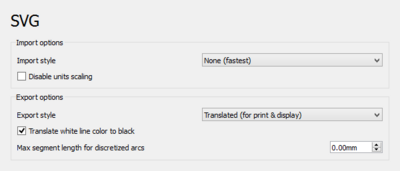
- Scale Awareness: SVG files have no inherent unit. FreeCAD imports them based on the SVG's
viewBoxandwidth/heightattributes, often assuming 1 unit = 1mm. Always check the scale of your imported geometry immediately. Use the Std Transform tool or the Draft Scale tool to adjust if necessary. - Clean Up in FreeCAD: After import, use the Draft Upgrade tool (with "Join" and "Make Face" options) to try and clean up wires into closed faces. This can sometimes skip the sketch step if you just want to extrude a face directly.
- Workbench Choice: The Draft workbench is your primary tool for importing and manipulating the raw SVG geometry. The Part workbench is useful for quick extrusion of faces. The Part Design workbench is essential for creating a fully parametric, editable history (Body + Sketch + Pad).
- Homebrew’s package index this is a listing of all casks available from the cask tap via the Homebrew package manager for macOS. This sentence appears to be an errant copy-paste. It is irrelevant to the SVG workflow. To install FreeCAD on macOS, you can indeed use Homebrew (
brew install --cask freecad), but that is a separate topic from working with SVG files.
Conclusion: Embracing the Hybrid Workflow
Mastering SVG import in FreeCAD is not about finding a single "magic import" button. It's about understanding a hybrid workflow that leverages the strengths of different tools. Use Inkscape for what it does best: advanced typography, artistic layout, and path simplification. Use FreeCAD for what it does best: precise, parametric 3D solid modeling based on clean 2D geometry.
The process—import as geometry, project into a sketch, constrain, and pad—is a reliable, repeatable method that transforms any SVG, from a simple logo to a complex gothic trefoil, into a 3D-printable solid. While current text tools have a handful of predefined fonts which is very limiting, the SVG bridge effectively eliminates that limitation. Yes, the import can sometimes require cleanup, and proper SVG import would be quite handy, but the functionality that exists, when used correctly, is profoundly powerful.
So, open FreeCAD, find an SVG (maybe your own initials), and walk through the steps. Create the sketch, project those paths, and hit Pad. Feel the satisfaction of turning a flat vector into a volume. That's the essence of digital fabrication, and now you hold a key part of the key. Start importing, start projecting, and start printing your vector designs in solid form.