High Tibial Osteotomy Video: A Surgeon's Guide To Correcting Bow Legs And Preserving Knees
Are you a medical professional seeking a clear, high-quality visual resource to explain a complex knee preservation surgery to your patients? Or perhaps you're a patient researching your options for treating early osteoarthritis and wondering exactly what a high tibial osteotomy (HTO) entails? The search for a reliable, instructional high tibial osteotomy video ends here. This comprehensive guide explores the definitive surgical demonstration, breaking down the procedure, the expert surgeons behind it, and how this educational tool empowers both doctors and patients. We’ll delve into the meticulous technique of a medial opening wedge HTO using the Tomofix system, understand the critical role of pre-operative planning, and see the transformative results through direct pre- and post-surgery comparison.
This article is built around a specific, professionally produced high tibial osteotomy video provided by a leading orthopedic practice. It serves as a masterclass for medical professionals aiming to educate their patients with unparalleled clarity. By the end, you’ll understand not only the steps of the surgery but also the clinical reasoning behind each one, the expertise of the presenting surgeons, and why this video is an invaluable asset in the decision-making process for knee preservation.
Understanding High Tibial Osteotomy: The "Why" Behind the Surgery
What is a High Tibial Osteotomy (HTO)?
At its core, a high tibial osteotomy (HTO) is a surgical procedure that is performed to correct angular deformities of the knee to prevent development or progression of unicompartmental osteoarthritis. To understand this, picture the knee joint. It has three compartments: medial (inner), lateral (outer), and patellofemoral (kneecap). Often, due to conditions like bow legs (varus deformity) or knock knees (valgus deformity), excessive weight-bearing pressure falls on just one compartment—most commonly the medial side in varus knees. This uneven load accelerates wear and tear, leading to isolated, or "unicompartmental," osteoarthritis.
An HTO works by strategically cutting and realigning the upper shin bone (tibia). By altering the angle of the tibia, the surgeon shifts the body's weight-bearing line away from the damaged compartment and toward the healthy, cartilage-bearing side. This "off-loads" the arthritic area, relieving pain, improving function, and crucially, delaying or avoiding the need for a total knee replacement for many years, sometimes decades. It is a powerful joint preservation surgery, ideal for younger, active patients with isolated compartment arthritis and a correctable deformity.
Who is the Ideal Candidate?
The procedure is not for everyone. Ideal candidates typically are:
- Under 60-65 years of age.
- Active individuals with moderate to severe activity-related knee pain.
- Diagnosed with isolated medial or lateral compartment osteoarthritis.
- Have a confirmed varus (bow-legged) or valgus (knock-kneed) alignment contributing to their pain.
- Have a stable, functional anterior cruciate ligament (ACL) and a full range of motion.
A thorough clinical and radiographic evaluation, including full-length standing X-rays to measure the mechanical axis, is essential for surgical planning and patient selection.
The Surgical Demonstration: A Step-by-Step Visual Guide
The Presenters and The Platform
This is a surgical demonstration of a high tibial osteotomy (HTO) presented by Mr. Neil Thomas and Mr. Adrian Wilson. Both are highly respected orthopedic surgeons specializing in knee surgery. Their presentation is part of a broader educational initiative. Dr. Laith Jazrawi is an orthopaedic surgeon in New York whose practice is committed to advancing patient education through high-quality medical media. We provide medical videos for medical professionals to educate their patients. This specific video is a product of that mission, offering a transparent, detailed look at a modern HTO technique.
Mr. Neil Thomas and Mr. Adrian Wilson are presenting knee surgery in this tutorial, guiding viewers through each critical phase with expert commentary. Their collaboration highlights a multidisciplinary approach to complex knee preservation, a hallmark of top-tier orthopedic centers like the Hospital for Special Surgery (HSS), which is referenced in the context of this video's popularity (High tibial osteotomy (hto) for bow leg correction hospital for special surgery 276k subscribers subscribed).
The Technique: Medial Opening Wedge HTO with Tomofix
This instructional surgical video shows the safe surgical technique of a medial opening wedge high tibial osteotomy (hto) using the tomofix system as a locked internal fixator without the need for bone grafting. This sentence packs in several key modern advancements in HTO surgery. Let's unpack it:
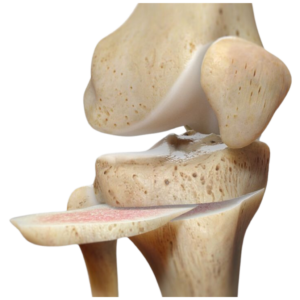
- Medial Opening Wedge: This is the most common HTO technique today. A precise cut (osteotomy) is made on the medial side of the proximal tibia. The bone is then gently opened (like a book) to the predetermined angle, creating a wedge-shaped gap. This directly corrects a varus (bow-leg) deformity.
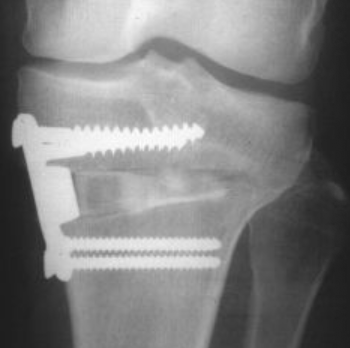
- Tomofix System: This is a specific, low-profile locking plate and screw system designed by DePuy Synthes. It is contoured to fit the medial proximal tibia. Its design provides very rigid, stable fixation, which is critical for early mobilization.
- Locked Internal Fixator: The screws lock into the plate, creating a fixed-angle construct. This maximizes stability in the osteotomy site, reducing the risk of loss of correction or hardware failure.
- Without the Need for Bone Grafting: Traditionally, the gap created in an opening wedge osteotomy was packed with autograft (patient's own bone, often from the pelvis) or allograft (donor bone) to promote healing. The modern Tomofix technique, when performed within specific angular limits (typically up to 10-12 degrees), often eliminates the need for graft. This avoids a second surgical site, reduces operative time, and minimizes donor site morbidity (pain from the hip incision). The video meticulously demonstrates how the rigid fixation alone can maintain the opening and stimulate natural bone healing across the gap.
The tutorial on high tibial osteotomy (hto) shows how to plan an osteotomy on a varus lower limb, with a single cut on either the tibia or femur. Pre-operative planning is arguably the most crucial step. Using long-leg standing alignment radiographs, surgeons calculate the patient's mechanical axis deviation—how far the weight-bearing line is from the center of the knee. They then use digital planning software or manual techniques to determine the exact angle of correction needed and the precise location and orientation of the tibial cut. The goal is to shift the weight-bearing line to a specific target point, usually just inside the lateral tibial plateau, to achieve optimal off-loading. The video illustrates this planning phase, often with overlaid graphics on the pre-operative X-ray.
The Surgical Steps in Detail
While the video is the ultimate visual reference, the key steps it demonstrates include:
- Patient Positioning and Preparation: The patient is supine (on their back) with a thigh tourniquet. The knee is flexed slightly. Standard sterile prep and draping are performed.
- Incision and Exposure: A careful, longitudinal incision is made over the medial proximal tibia, just below the joint line. Soft tissues are carefully retracted to expose the bone.
- Guidewire Placement: Under fluoroscopic (real-time X-ray) guidance, a guidewire is placed from a point just below the tibial joint line, angled distally and anteriorly. This wire defines the plane of the future bone cut.
- The Osteotomy Cut: Using an oscillating saw or a specialized cutting guide, the surgeon makes the precise cut along the guidewire. The cut is stopped just short of the lateral cortex (the outer shell of the bone), leaving a hinge of intact bone on the lateral side. This lateral hinge is vital for stability and controlled opening.
- Creating the Wedge: A osteotome or a specially designed spreader is inserted into the cut. The bone is carefully opened to the pre-calculated angle. The surgeon constantly checks the correction with a fluoroscope, confirming the desired alignment is achieved.
- Plate Fixation: The appropriately sized Tomofix plate is contoured to the bone and slid into place under the soft tissues. It is secured in place with screws or pins, and the incision is closed. Proximal (near the knee) screws are locked into the plate. Distal screws are placed, often initially as "drainage" screws to allow for any post-operative swelling to escape, and later converted to locking screws. The stability is palpable and confirmed on X-ray.
- Final Check and Closure: A final fluoroscopic image confirms perfect alignment and secure hardware. The wound is irrigated, hemostasis achieved, and layers closed with sutures or staples. A sterile dressing and a hinged knee brace are applied.
The Expert Surgeons: Credentials and Case Presentation
Presenting Surgeons: Mr. Neil Thomas & Mr. Adrian Wilson
While the video credits these two esteemed surgeons as presenters, it's common for such productions to feature consultants from a leading institution like the Hospital for Special Surgery (HSS). Their role is to narrate the procedure, explain the decision-making, and highlight key technical pearls and pitfalls. Their combined experience in knee osteotomy and ligament surgery provides a robust educational perspective.
The Guiding Specialist: Dr. Laith Jazrawi
Dr. laith jazrawi is an orthopaedic surgeon in new york whose practice is associated with this educational content. To provide context on the expertise behind the video, here are his professional details:
| Attribute | Details |
|---|---|
| Full Name | Dr. Laith A. Jazrawi, MD |
| Specialty | Orthopaedic Surgery, Sports Medicine, Knee Surgery |
| Affiliation | Clinical Associate Professor, Department of Orthopaedic Surgery, NYU Langone Health (formerly HSS) |
| Expertise | Knee osteotomy (HTO), ACL reconstruction, cartilage restoration, complex knee ligament surgery, patellofemoral disorders. |
| Philosophy | Focus on joint preservation and biologics, offering alternatives to knee replacement for appropriate candidates. |
| Patient Education | Strong advocate for using video and digital media to inform patients about surgical options and outcomes. |
| Location | New York, NY |
Click on the links to know more about his knee surgery information. This call to action directs viewers to the practice's website, where they can find detailed condition guides, treatment options, and patient testimonials, furthering the educational mission.
The Case Study: From Pre-Op Planning to Post-Op Transformation
Case description: Mr. Neil Thomas and Mr. Adrian Wilson are presenting knee surgery on a specific patient case, likely a classic presentation of medial compartment osteoarthritis with a varus deformity. The video doesn't just show a "surgery in a vacuum"; it frames the procedure within a real patient's journey.
Pre-Operative Assessment
The video begins with the patient's pre-operative imaging. Key views include:
- Weight-bearing AP (Anterior-Posterior) X-ray: Shows the severe varus alignment. The mechanical axis line (drawn from hip center to ankle center) passes far medial to the knee joint center, confirming the overloaded medial compartment.
- Lateral and Sunrise X-rays: Assess other compartments and the patellofemoral joint.
- MRI: Confirms the degree of cartilage loss in the medial compartment and checks the health of the lateral compartment and ligaments.
The planning software then overlays the proposed osteotomy cut and the target correction angle, visualizing the post-operative mechanical axis.
Intra-Operative Execution
As detailed in the surgical steps section, the surgeons execute the plan with precision. Key moments highlighted in the narration often include:
- Confirming the starting point for the guidewire to avoid the patellar tendon and collateral ligaments.
- The feel of the "pop" as the lateral hinge gives way during opening.
- The critical use of fluoroscopy to verify the opening angle and the position of the plate.
- The satisfaction of seeing the pre-planned correction materialize on the live X-ray.
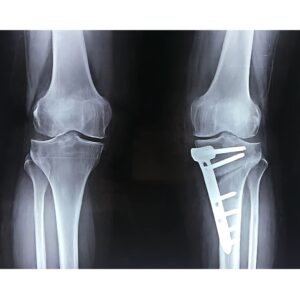
The Reveal: Pre vs. Post Surgery Comparison
In the end, there is a full comparison of pre and post surgery. This is a powerful educational moment. The video will juxtapose:
- Pre-operative long-leg standing film: Showing the varus deformity and medial joint space narrowing.
- Immediate post-operative film: Showing the corrected mechanical axis (now passing near the center or slightly lateral to the knee) and the prominent Tomofix plate and screws in position. The medial joint space may appear slightly widened due to the opening.
- Follow-up images (3, 6, or 12 months): These show callus formation (new bone) bridging the osteotomy gap, indicating healing. The hardware remains stable. Most importantly, the patient's alignment is maintained, and clinically, they report significant pain relief and improved function.
This side-by-side comparison is not just about hardware placement; it's a visual proof of concept. It demonstrates how a controlled bony realignment can fundamentally change the biomechanics of the knee and alter the disease progression.
Frequently Asked Questions (FAQs) About HTO Surgery
Q: Is the high tibial osteotomy video suitable for a patient to watch?
A: Absolutely. While the surgery is technical, the video's narration (when available) or a companion guide can explain each step in layman's terms. Watching helps patients understand the "how" and "why," reducing anxiety and setting realistic expectations for recovery. However, it's best viewed alongside a consultation with their surgeon to contextualize it for their specific anatomy.
Q: How long is the recovery after a medial opening wedge HTO?
A: Recovery is a phased process. Patients are non-weight-bearing or touch-weight-bearing for 6-8 weeks, using crutches, to allow the osteotomy to heal. Physical therapy begins immediately to maintain range of motion and strengthen the quadriceps. Full weight-bearing typically begins once X-rays show solid healing, around 8-12 weeks. Return to low-impact activities can be around 4-6 months, and high-impact sports may take 9-12 months or longer.
Q: What are the risks and complications?
A: While generally safe, risks include infection, deep vein thrombosis (DVT), nerve or artery injury (rare), delayed or non-union of the osteotomy, loss of correction, hardware irritation requiring removal, and persistent pain. The video's emphasis on meticulous technique—like protecting the lateral hinge and using rigid fixation—directly addresses strategies to minimize these risks.
Q: How long does the correction last?
A: For appropriately selected patients, an HTO can provide 10-15 years or more of pain relief and improved function. It successfully treats the deformity and unloads the damaged compartment, potentially slowing OA progression. However, it does not cure arthritis. Over time, the lateral compartment may develop some wear, or the original compartment may worsen, which could eventually lead to a knee replacement.
Q: Why choose an HTO over a knee replacement?
A: For a younger patient with isolated compartment arthritis, an HTO preserves their own natural knee joint. A knee replacement, while excellent, has a finite lifespan (15-20 years on average) and may require revision surgery in a patient's lifetime. HTO offers a chance to delay or avoid replacement, maintaining a higher level of activity and a more "natural" feeling knee.
Conclusion: The Power of Visual Education in Modern Orthopedics
The high tibial osteotomy video you sought is more than just a recording of an operation; it is a convergence of surgical artistry, engineering precision, and patient-centered education. It demystifies a procedure that can be life-changing for the right candidate. By showcasing the medial opening wedge technique with the Tomofix system without bone grafting, it highlights the evolution of HTO toward less invasive, more stable, and faster-healing methods.
The presentation by Mr. Neil Thomas and Mr. Adrian Wilson, under the educational umbrella of experts like Dr. Laith Jazrawi in New York, provides a trustworthy lens through which to view this complex surgery. The full pre- and post-surgery comparison is the ultimate testament to the procedure's goal: a visible, measurable realignment that translates to real-world pain relief and function.
For medical professionals, this video is an indispensable tool for informed consent and patient expectation setting. For patients, it is a window into the solution that could preserve their active lifestyle. The journey from a bow-legged, painful knee to a aligned, stable joint is a powerful one, and this video maps that journey with exceptional clarity. Click on the link to view the high quality high tibial osteotomy video and take the first step in understanding one of orthopedics' most effective joint preservation strategies.