How Do I Regrip A Golf Club? Your Complete DIY Guide To Better Control
Have you ever stood on the tee, felt your clubs slip in your hands during a humid round, and thought, "How do I regrip a golf club?" Worn, slick, or hard grips aren't just uncomfortable—they silently sabotage your swing consistency, distance control, and overall confidence. The good news? Regripping your clubs at home is a surprisingly simple, cost-effective DIY project that transforms your equipment without needing a professional. In this comprehensive guide, we’ll walk you through every step, tool, and tip you need to master this essential skill. By the end, you’ll know exactly how to breathe new life into your favorite clubs, saving money and gaining a tangible edge on the course.
The frustration of deteriorating grips is universal among golfers. A study by a major golf equipment manufacturer suggests that most amateur golfers should replace their grips every 40-50 rounds or at least once a season, depending on play frequency and climate conditions. Yet, many put it off, intimidated by perceived complexity or the cost of a pro shop service. This guide dismantles that myth. We’re here to prove that with a few common tools and a clear process, regripping doesn’t have to be complicated. You can achieve professional-grade results in your garage or basement, ensuring every club in your bag feels like an extension of your hands.
Our inspiration comes from real-world experts and viral DIY wisdom. From the structured lessons of Golftalk with Dormy’s Alex to the quick, effective hacks shared by TikTok creator Olie (@olie_olie_paintz), the message is clear: Learn how to regrip golf clubs at home with this easy DIY guide. One of Olie’s videos garnered 58 likes by demonstrating the process in under a minute, highlighting its accessibility. We’ll synthesize these insights into a detailed, foolproof manual. Whether you’re a beginner or a seasoned player looking to maintain your own gear, this article will equip you with the knowledge to improve your game with comfortable grips and unwavering control.
Why Regripping Your Golf Clubs at Home is a Game-Changer
Before diving into the "how," let’s address the "why." Worn grips are more than a minor nuisance; they are a fundamental performance issue. Over time, the oils from your hands, exposure to sun and rain, and regular use break down the tacky surface and internal structure of the grip. This leads to a cascade of problems:
- Loss of Tactile Feedback: You can’t feel the clubface properly at impact, making it harder to shape shots or control spin.
- Slippage and Tension: A slick grip forces you to grip the club tighter to maintain control, introducing tension in your forearms and shoulders that disrupts your natural swing tempo and reduces clubhead speed.
- Inconsistent Hand Position: A grip that doesn’t "bite" allows your hands to shift during the swing, leading to mis-hits, slices, hooks, and a complete loss of accuracy.
- Discomfort and Blisters: Hard, cracked, or smooth grips can cause painful blisters and calluses, making the game less enjoyable and potentially leading to compensatory swing changes.
Regripping restores the essential connection between you and your club. A fresh, properly installed grip provides a secure, comfortable, and consistent hold, allowing you to swing freely and confidently. The financial benefit is equally compelling. While a club fitting shop might charge $10-$25 per club for a regrip, a quality regripping kit (containing solvent, tape, and grips for multiple clubs) can cost less than $50 total. For a full set, that’s a saving of $150 or more. This DIY approach puts you in control of your equipment maintenance schedule and budget.
Meet the Experts: Learning from the Best
This guide draws on practical, visual instruction from two key sources in the golf DIY space, ensuring our advice is both theoretically sound and proven in real-world application.
Alex from Golftalk with Dormy
In the episode referenced, Alex demystifies the regripping process, emphasizing its simplicity. While specific biographical details from the show highlight his role as a knowledgeable host and golf enthusiast, his teaching philosophy centers on breaking down technical processes into manageable, repeatable steps for the everyday golfer. His approach is methodical and safety-conscious, particularly regarding the use of solvents and the bench vise.
| Detail | Information |
|---|---|
| Name | Alex (Host, Golftalk with Dormy) |
| Primary Role | Golf Instructor & Equipment Educator |
| Key Philosophy | "Regripping doesn't have to be complicated." Focus on accessible, home-based solutions. |
| Expertise Highlighted | Step-by-step tool usage, solvent safety, achieving a perfect final alignment. |
| Associated Media | "Golftalk with Dormy" video series demonstrating the full regripping process. |
Olie’s Viral TikTok Wisdom
The short-form video from Olie (@olie_olie_paintz) that earned 58 likes captures the essence of the process in a rapid, engaging format. While not a deep-dive tutorial, its popularity underscores a massive demand for quick, trustworthy DIY golf tips. Olie’s video serves as a perfect primer, showing that the core steps are few and the motion is straightforward. It’s a reminder that you don’t need hours of training to get started—just the right guidance, which we provide in full detail below.
Your Regripping Toolkit: What You Actually Need
Contrary to what you might think, you don’t need a specialized workshop. The entire process can be completed with three core items, as highlighted in the foundational key sentence. Let’s break down each component and why it’s non-negotiable.
- A Bench Vise (or a Robust Clamp): This is your most critical tool. A bench vise holds the golf club shaft perfectly stationary, allowing you to apply even pressure to remove the old grip and install the new one without damaging the shaft or twisting the grip. Alternative: A heavy-duty workshop clamp with soft jaws (or padded with a rag) can work in a pinch, but a vise is ideal for stability and safety.
- A Regripping Kit: Do not buy grips and solvent separately unless you know exactly what you need. A complete regripping kit is the smartest purchase. It typically includes:
- Golf Grip Solvent (or Adhesive Tape): The lifeblood of the process. Solvent (often mineral spirits-based) acts as a lubricant to slide the new grip on and activates the adhesive on the grip tape. Some modern kits use double-sided adhesive tape instead of solvent, which is cleaner but requires more precision.
- Grip Tape: This is the double-sided tape that lines the shaft. The kit will provide enough for a full set. The adhesive side sticks to the clean shaft; the paper side is peeled away before installing the grip.
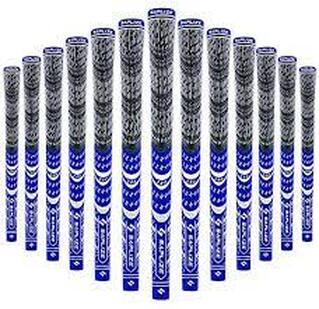
- The Grips Themselves: Kits come with a selection of standard grips (usually all the same model/size). You can also buy individual premium grips if you have a preference.
- A Grip Installation Tool (Optional but Helpful): A plastic or wooden "grip stick" or "grip installer" helps you push the grip fully onto the shaft without bunching the material.
- A Tray or Container to Catch Solvent: This is crucial for a clean, safe workspace. A shallow tray, baking pan, or large plastic container should be placed directly under the club head and vise jaws to catch the dripping solvent as you work. This prevents spills on your floor, allows for solvent reuse (if desired), and makes cleanup effortless.
Additional Helpful Items:
- Rags or Paper Towels: For wiping excess solvent and cleaning the shaft.
- Utility Knife or Grip Cutting Tool: For meticulously removing the old grip. A grip cutting tool is safer and more efficient.
- Ventilation: Work in a well-ventilated area, preferably outdoors or with a fan, as solvent fumes can be strong.
- Gloves: Disposable nitrile gloves protect your hands from solvent.
Step-by-Step Guide to Regripping a Golf Club
Now, let’s get into the meat of the process. Follow these steps precisely for a perfect result every time. The key is patience and preparation. Rushing leads to misaligned grips or solvent messes.
Step 1: Secure the Club & Remove the Old Grip
- Secure: Place the club in your bench vise just below the grip, using the jaws to hold the shaft firmly. Do not overtighten, as you can crush a graphite shaft. Use a soft cloth between the vise and shaft for protection.
- Cut: Using your utility knife or grip cutting tool, carefully slice lengthwise along the old grip. Be mindful not to cut into the underlying tape or, worse, the shaft itself. Once cut, the grip should peel off relatively easily. If it’s stubborn, work a little solvent under the grip edge with a brush or your tool to loosen the adhesive.
- Remove Tape: After the grip is off, peel away all the old adhesive tape from the shaft. This is essential. Any residue will prevent the new tape from sticking properly. Use a rag and a little solvent to clean the shaft thoroughly. Let it dry completely.
Step 2: Prepare the Shaft with New Tape
- Measure & Cut: Take your new double-sided grip tape. Measure a piece slightly longer than the grip (from the butt end to where the grip cap will sit). Cut it.
- Apply: Peel off the backing on one side of the tape and carefully wrap it around the clean, dry shaft, starting from the butt end and working down. Ensure it’s smooth, wrinkle-free, and the edges are sealed. The tape should extend just past where the grip will end. Trim any excess.
- Peel: Once the tape is on, peel off the remaining paper backing to expose the final sticky surface. Do not touch this sticky surface with your fingers.
Step 3: Install the New Grip (The Critical Moment)
- Prepare Grip: Take your new grip. You’ll likely need to plug the small vent hole at the end with a finger or a grip plug to prevent solvent from gushing out the back.
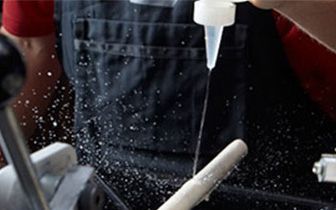
- Add Solvent: Pour a generous amount of grip solvent into the open end of the grip. Swirl it around to coat the entire interior. You can also pour some solvent over the taped shaft area. This lubrication is temporary; the adhesive on the tape will activate and bond permanently once the solvent evaporates.
- Slide On: Quickly but carefully, align the grip’s logo or texture where you want it (usually facing the clubface for drivers/woods, or as desired for irons). Stretch the grip mouth over the shaft’s butt end and begin sliding it down. Use both hands, applying even pressure. The grip installation tool is invaluable here to push the grip the final few inches without creating air bubbles or bunching.
- Align & Set: Once the grip is fully on, adjust its final position while the solvent is still slippery. Ensure the grip cap is flush with the shaft end and the grip is straight. Wipe away any excess solvent that bubbles out. Let the club rest horizontally for at least 30 minutes to an hour to allow the solvent to evaporate and the adhesive to set. Do not use the club during this time.
Step 4: Final Inspection & Cleanup
After the solvent has dried, give the grip a firm tug to ensure it’s locked on. Check the alignment one last time. Wipe the entire club down with a clean rag. Dispose of your solvent-soaked rags properly (they can be flammable). Your club is now ready for the range or course!
The Tape Question: Is It Necessary for a Perfect Regrip?
A very common follow-up question to "how do I regrip a golf club?" is: "Can I regrip golf clubs without tape?" The short answer is: You can, but you absolutely should not if you want a reliable, professional result.
Some golfers attempt to use only solvent as a lubricant, hoping the grip will stay on via friction alone. This is a high-risk gamble. Here’s why utilizing tape is non-negotiable for a permanent, secure installation:
- Prevents Slippage During Play: This is the paramount reason. Without the adhesive bond from the tape, a grip can slowly rotate on the shaft, especially in hot, sweaty conditions. Even a 1/8th turn can completely change your hand position and clubface angle at impact.
- Ensures Consistent Feel: Tape creates a uniform, cushioned layer between the hard metal shaft and the rubber grip. This eliminates any potential for the grip to feel "hard" or transmit unwanted vibrations.
- Facilitates Future Regrips: Tape creates a clean, predictable surface for the next regrip. A solvent-only installation can leave a gummy residue on the shaft that makes the next removal a nightmare.
- Compensates for Minor Shaft Imperfections: The tape fills in any microscopic flaws or scratches in the shaft, ensuring the grip slides on perfectly and bonds evenly.
The minor extra cost and one extra step of applying tape are insignificant compared to the risk of a grip slipping during a critical shot, which can adversely affect your swing and result in extra strokes. For a worry-free, durable regrip, always use the proper adhesive tape provided in your kit.
Pro Tips for a Flawless, Professional-Like Finish
Once you’ve mastered the basic steps, these advanced tips will elevate your regripping from good to exceptional:
- Work Quickly but Calmly: After pouring solvent, you have a limited window (30-60 seconds) before the solvent evaporates and the grip becomes difficult to slide. Have your grip pre-aligned and ready to go.
- The "Funnel" Trick: For a perfectly straight grip, use a plastic funnel (or cut the top off a plastic bottle) placed over the shaft butt. Pour solvent into the funnel; it directs the liquid straight into the grip, minimizing mess.
- Check for Air Bubbles: After sliding the grip on, run your hands along the length. If you feel a soft spot or bubble, you’ve trapped air. Carefully peel the grip back slightly (if solvent is still present) and re-roll it onto the shaft.
- Mind the Vent Hole: The small hole at the end of the grip is for air pressure equalization. Don’t plug it permanently. A small piece of tape or your finger works temporarily during installation.
- Label Your Clubs: Before you start, use a piece of masking tape to label each club head with its name/number. It’s easy to mix up irons when they’re all shaft-less on your workbench.
- Dispose of Old Grips Responsibly: Most rubber grips are not recyclable in curbside programs. Check with your local golf course or pro shop—some have recycling programs for old grips.
Where to Find Quality Grips and Regripping Kits
You have several excellent avenues for sourcing your supplies. The key sentence points to one major retailer, but there are options for every need and budget.
- Dick’s Sporting Goods (and Golf Galaxy): As mentioned, you can Shop all golf clubs at Dick's Sporting Goods, but their real value for this project is in their extensive accessories aisle. They carry a wide range of regripping kits from brands like Golf Pride, Lamkin, and Winn, as well as individual premium grips. The staff at larger stores can often offer advice on grip size and texture.
- Online Retailers (Amazon, Golf Specialty Sites): Websites like Amazon, GolfWorks, Golf Galaxy online, and RockBottomGolf offer vast selections, often at competitive prices. You can read detailed reviews, compare grip textures (cord, rubber, polymer), and buy in bulk. This is the best way to get a specific grip model you’ve tested and loved.
- Direct from Manufacturers: Brands like Golf Pride, Lamkin, and SuperStroke sell their grips and kits directly online. This ensures authenticity and sometimes offers exclusive models or bundles.
- Local Pro Shops & Golf Stores: While often more expensive per grip, they provide the advantage of feeling the grip texture in person before you buy. You can also often get same-day pickup and personalized advice on grip size (undersize, standard, oversize) which is crucial for comfort and control.
Recommendation: For your first time, buy a mid-priced all-in-one kit from a reputable brand like Golf Pride or Lamkin. It will contain everything you need and use proven, reliable materials. Once you know your preferred grip style, you can buy in bulk for future savings.
Conclusion: Your Swing, Your Rules
Regripping your golf clubs is more than a maintenance chore; it’s an act of ownership over your game. It bridges the gap between the equipment you have and the performance you demand. As we’ve detailed, the process is a step-by-step guide on how to regrip a golf club that requires minimal investment in tools and a modest investment of time. The rewards, however, are immense: improved comfort, enhanced control, consistent ball-striking, and significant cost savings.
The narrative from Alex’s methodical tutorial to Olie’s viral snapshot converges on one truth: regripping doesn’t have to be complicated. Armed with a bench vise, a proper kit, and the knowledge in this guide, you are fully capable of executing this task with confidence. Remember the critical role of adhesive tape in preventing slippage and ensuring a bond that lasts through season-changing weather and intense play.
So, the next time you feel that telltale slip or see a grip cracking at the butt end, don’t reach for your wallet to pay a pro. Reach for your toolkit. Learn how to regrip golf clubs at home with this easy DIY guide, and transform the feel of your entire bag. A fresh set of grips is one of the simplest, most impactful upgrades you can make. It’s not just about new rubber; it’s about forging a more reliable, comfortable, and confident connection to every shot you hit. Now, go grab your vise and get gripping—your lower scores are waiting.