Master The Jasmine Stitch Crochet: A Fluffy, Floral Guide For All Skill Levels
Have you ever stumbled upon a crochet pattern that looks impossibly lush and intricate, only to feel a wave of intimidation wash over you? What if you could create that thick, flowery, cloud-like texture with just a few simple, repeatable steps? Welcome to the world of the jasmine stitch crochet—a stunning technique that transforms basic puff stitches into a breathtaking floral fabric. Whether you're dreaming of a cozy blanket, a pair of heavenly slippers, or a delicate holiday snowflake, this guide will demystify every loop and turn. Let's unravel the beauty of the jasmine stitch together.
What Exactly is the Jasmine Stitch?
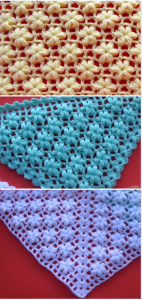
The jasmine stitch, also fondly called the flower star stitch, is a beautiful crochet pattern that creates a dense, puffed, and distinctly floral texture. At its core, it connects multiple puff stitches in a clever way that forms a little "flower" or star motif in each repeat. This results in a fabric that is remarkably warm, squishy, and visually rich, making it perfect for cold-weather projects. Though it may seem complex at first glance, mastering the jasmine stitch is absolutely achievable with practice and patience. Its structured repeat means once you learn the sequence, you can work it almost mindlessly while watching your gorgeous fabric grow.
The Secret Sauce: How It's Constructed
Each jasmine stitch "flower" is typically formed by working a series of puff stitches into the same stitch or space, then closing them together at the top. This clustering action creates the signature 3D dome. The magic lies in the placement of these clusters and how they connect across rows, creating an interwoven, geometric floral pattern. It’s a fantastic way to add incredible texture without needing complex color changes or advanced techniques.
Getting Started: Materials & Crucial Preparation
Before you dive into the tutorial, setting yourself up for success is key. The right tools and a little prep work can make the difference between frustration and pure creation joy.
Yarn Choice: Chunky is Your Best Friend
One of the most consistent tips from experts is to use a chunky or bulky yarn for your first jasmine stitch project. Sentence 7 explicitly states: "Work to any unit of numbers and use a chunky yarn for better results." Why? The thick yarn makes the puff stitches pop dramatically, the fabric works up faster, and it’s easier to see and feel your stitches. This is especially helpful for beginners. Sentence 22 mentions a favorite: Caron Simply Soft in soft shades like blue mint and robin's egg, which gives a lovely drape while maintaining puff definition. For a truly squishy, "walking on clouds" feel (as described for the slippers in sentence 10), consider a super bulky, plush yarn like chenille or a thick wool blend.
Hook Size: Finding the Goldilocks Zone
Hook size is critical for achieving that perfect, defined puff. A hook that’s too large will create loose, floppy stitches. A hook that’s too small will make it brutally tight and difficult to work into. The general rule is to use a hook size recommended for your yarn weight, but lean towards the smaller end of that range to keep the fabric dense and the puffs pronounced. The Reddit post in sentence 20 humorously notes someone starting a jasmine stitch blanket with a 3.5mm hook—this is likely too small for most worsted-weight yarns and would create a very tight, stiff fabric. For a standard #4 medium/worsted yarn, a 5.0mm to 5.5mm (H-K) hook is a great starting point. Always make a small gauge swatch—a 4x4 inch square in the stitch pattern—to check your tension and fabric density.
Understanding the Stitch Multiple
The jasmine stitch has a specific stitch multiple—the number of chains you need to start your row to make the pattern align perfectly. While it can often be worked over a multiple of 4 or 6 chains plus an extra, it’s vital to follow the specific pattern you’re using. Sentence 7’s advice to "Work to any unit of numbers" means once you know the base repeat (e.g., 4 chains), you can adjust your starting chain to make your project any width you desire. This flexibility is a huge plus for customizing blankets and scarves.
The Step-by-Step Jasmine Stitch Tutorial: From Confusion to Confidence
Now, the moment you’ve been waiting for. Let’s break down the classic jasmine stitch into manageable, repeatable steps. Remember, sentence 3 promises: "Learn how to crochet the beautiful jasmine stitch in this step by step tutorial with pictures and video." While we can’t embed video here, we’ll describe the motions clearly. For the definitive visual guide, be sure to watch the video tutorial courtesy of Demetra Bogri from 4elli.com, as mentioned in sentence 5.
Foundational Row: The Chain & First Puff Cluster
- Chain Foundation: Start by chaining a multiple of 4, plus 3 extra chains. For example, chain 15 (which is 4x3 + 3). This extra chain acts as your first turning chain.
- Locate the Stitch: You will work your first puff cluster into the 4th chain from your hook (counting the loop on your hook as chain 1). This skips the first 3 chains.
- Form the Puff Cluster: Here’s the core motion. [Yarn over, insert hook into the designated stitch, yarn over, pull up a loop]repeat this sequence 4 more times in that same stitch. You should now have 6 loops on your hook.
- Close the Cluster: Yarn over and pull the yarn through all 6 loops on your hook. This creates one complete, dense puff stitch.
- Chain to Space: Chain 1. This chain creates the space between your floral clusters.
Building the Pattern: Row 2 and Beyond
- Skip and Repeat: Chain 1 (this counts as your first stitch of the new row, but often is not part of the puff cluster itself). Now, skip the next 2 chains (or the next 2 puff clusters from the previous row, depending on your starting point). You will work your next puff cluster into the next stitch or space.
- The Repeat: Work another puff cluster (the 6-loop repeat and close) into that stitch/space. Chain 1.
- Continue Across: Repeat the pattern: [Skip 2, puff cluster in next, chain 1] across the entire row. Your last puff cluster will likely go into the top of the turning chain from the previous row.
- Turning: At the end of the row, turn your work. Your new row will start with a chain 1 (turning chain), and you’ll begin your puff clusters, typically skipping the first stitch or cluster and working into the next available space, following the same rhythm.
Key Visual Cue: Each puff cluster is separated by a single chain stitch, and each new cluster is positioned two "units" over from the previous one. This creates the offset, woven look. Sentence 6 confirms this is the method: "In this tutorial i show you how to crochet the jasmine stitch or flower star stitch."
The Video Tutorial Advantage: Skip the Struggle
This is where sentence 11 becomes your best friend: "Skip the struggle of deciphering complex written charts!" The jasmine stitch’s rhythm is best learned visually. The hand motions for inserting the hook multiple times into the same space and managing six loops can be tricky to imagine from text alone. The video from Demetra Bogri (sentence 5) shows exactly where to insert the hook, how to hold the yarn, and the precise yarn-over technique. Watching it once or twice can save you hours of frogging (ripping out) your work. Sentence 12 addresses a common fear: "Ready to learn the jasmine stitch — even if you’ve struggled with it before." The video format is often the key that unlocks it.
Troubleshooting & Pro Tips: Get It Right Every Time
Even with a great tutorial, small issues can arise. Here’s how to troubleshoot and perfect your puffs.
Tension is Everything
This is the most common hurdle. If your puffs are tight and small, your tension is too tight. Try using a larger hook or consciously relaxing your grip on the yarn. If your puffs are loose and floppy, your tension is too loose. Use a slightly smaller hook or practice pulling the yarn snug (but not tight) after each yarn-over during the puff formation. Consistent tension is what makes the fabric look uniform and professional. Sentence 2 highlights this: "See photo and video tutorials, tips, projects and tension tricks for this stitch." Pay close attention to how the demonstrator holds the yarn in the video.
Identifying the Correct Insertion Point
Beginners often insert the hook into the wrong part of the stitch. You must insert the hook into the same hole or space for all 6 loops of the puff. In the first row, this is the top of a chain stitch. In subsequent rows, it’s typically the space below the chain-1 from the previous row, or the top of a puff cluster from two rows below. The video is indispensable for seeing this exact placement.
The "Too Tight to Insert Hook" Problem
If, after closing a puff cluster, the next space is so tight you can’t get your hook in (a common issue mentioned in communities like the Reddit post in sentence 20), you likely have two problems: 1) Your hook is too small for your yarn/tension, and 2) You may be skipping too few chains between clusters. Double-check your pattern’s skip instruction. Often, you skip the chain-1 space and the next puff cluster, not just one element.
Project Inspiration: From Cozy to Decorative
The beauty of the jasmine stitch is its versatility. The puffed floral texture (sentence 8) is perfect for so many projects.
The Ultimate Cozy: Jasmine Stitch Chunky Slippers
Sentence 10 asks the enticing question: "Jasmine stitch chunky slippers do you want to create these fluffy, beautifully patterned slippers that feel like walking on clouds?" This is a perfect first project. The stitch’s natural thickness and cushioning make for incredibly warm, comfortable slippers. You can make a simple rectangle, seam it up, and add a sole. The plush texture is ideal for something you’ll slide your feet into.
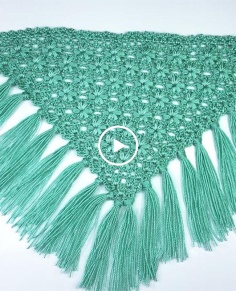
The Statement Blanket
A jasmine stitch blanket is a heirloom in the making. Its density provides wonderful warmth, and the repeating floral pattern is stunning in a solid color or a gentle gradient. The Reddit post in sentence 20 shows someone starting one—a popular choice due to its mindless repeat once you get going. You can make it as large as you like, working in flat rows and seaming panels, or working in the round for a circular blanket. Sentence 19 gives a sample dimension: "Measurements approx 10 x 90 [25.5 x 228.5 cm], excluding fringe"—this sounds like a lovely long scarf or a narrow blanket panel.
Festive Flair: Jasmine Stitch Snowflakes
Sentence 15 introduces a delightful variation: "learn to create a beautiful jasmine stitch snowflake for your christmas decor." By working a small number of jasmine stitch clusters in the round and adding delicate icicle-like chains or beads, you can create unique, textured snowflakes. The puffiness mimics the fluffy look of real snow.
Quick & Cute: Scrunchies & Accessories
While sentence 18 asks "How many scrunchie can i make in a day," it highlights the stitch’s potential for smaller, fast projects. A jasmine stitch scrunchie is wonderfully full and textural. You’d work a short, wide rectangle, seam it into a tube, and insert the elastic. The same principle works for headbands, cozy cup sleeves, or decorative pillow covers.
Advanced Applications & Community Wisdom
Once you’ve mastered the basic flat row, you can adapt the stitch.
Working in the Round
The jasmine stitch can be adapted for rounds, creating beautiful circular motifs or seamless hat crowns. The key is to adjust your starting chain and join carefully to maintain the pattern alignment. Many pattern designers, like those mentioned in sentence 21 (Tynna Williams' granny spike stitch), create entire patterns based on textured stitch repeats.
Color Changes
Introducing a new color at the beginning of a new puff cluster row can create a beautiful striped effect. For a more integrated look, you can change colors within the puff itself by dropping and picking up yarn mid-cluster, though this is more advanced.
The Learning Curve: You’re Not Alone
Sentence 13 offers powerful encouragement: "Over the past few years, i’ve helped thousands of crocheters finally crack the code — without frustration." This stitch has a reputation for being tricky, which is why so many seek out specialized tutorials. The feeling of accomplishment when your first perfect puff cluster forms is immense. Sentence 9 reassures: "Though it may seem complex at first glance, mastering the jasmine stitch is achievable with practice and patience." Start with a small swatch. Don’t aim for a full blanket on your first try. Celebrate each row that looks correct.
Why This Stitch is Worth the Effort
Sentence 17 sums it up perfectly: "The jasmine stitch is a beautiful stitch with a warm fabric!" It’s more than just a pattern; it’s a texture. The fabric it creates is substantial, insulating, and has a lovely drape that’s neither too stiff nor too floppy when made with the right yarn and hook. It elevates simple projects into something that looks intricate and designer-made. Its popularity on platforms like TikTok (sentence 14) and Reddit (sentence 20) is a testament to its visual appeal and the satisfaction of making it.
Conclusion: Your Floral Crochet Journey Starts Now
The jasmine stitch crochet pattern is a gateway to creating truly special, textural handmade items. From the foundational understanding of its puff-cluster structure to the practical steps of your first row, you now have the roadmap. Remember to use chunky yarn for your practice, watch the video tutorial to internalize the hand movements, and focus on consistent tension. Start with a small swatch, then a pair of slippers or a scarf. Embrace the learning curve—the slight struggle is part of what makes the final, beautiful, puffy fabric so rewarding.
This stitch connects you to a vibrant community of crocheters who share tips, patterns, and finished project pride (as seen across social media and forums). You have all the tools: the tutorial, the project ideas, the pro tips, and the knowledge that thousands have succeeded before you. So pick up your hook, choose a squishy yarn, and begin. Your beautiful, thick, flowery jasmine stitch creation is waiting to bloom under your hands.