Master The Picot Stitch Crochet: A Beginner's Guide To Beautiful Edges And Embellishments
Have you ever finished a crochet blanket, shawl, or garment and felt it needed that one special detail to truly shine? What if the secret to achieving a professional, elegant finish was a single, simple stitch you can learn in minutes? The picot stitch crochet is that transformative technique. This tiny decorative bump—created with just a few chains and a slip stitch—adds incredible texture and visual interest to any project, from dainty thread doilies to chunky yarn blankets. Perfect for beginners wanting to master crochet basics, the picot is your ticket to elevating handmade items into heirloom-quality pieces. In this ultimate guide, we’ll unravel everything about the picot stitch, from its fundamental structure to creative applications, ensuring you can confidently add this versatile detail to your repertoire.
What Exactly is a Picot Stitch in Crochet?
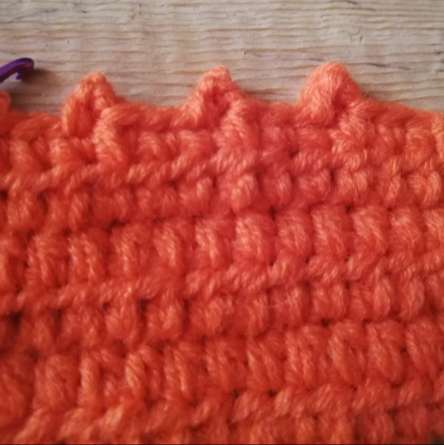
The crochet picot stitch is a simple, effective decorative element that creates a small, rounded bump or "ball" where it’s worked. At its core, a picot is formed by making a small chain (typically 2-4 stitches) and then securing the last chain back to the base with a slip stitch or single crochet. This little loop stands proud from the fabric, creating a delightful textural contrast. You’ll see them quite often in thread crochet for delicate edgings on doilies and fine lace, but they are equally stunning when made with yarn, adding a playful or elegant touch to blankets, scarves, and garments.
Think of the picot as the crochet world’s equivalent of a pearl on a string—small, perfect, and capable of transforming the ordinary into something special. Its beauty lies in its simplicity and versatility. Whether used as a solitary accent, repeated in a row to form a picot border, or scattered within a mesh design to fill empty spaces, the picot stitch is a fundamental tool for any crocheter. The skill level for this stitch is beginner, as it is just chains and either a slip stitch or single crochet, meaning you can start incorporating it into your work almost immediately after learning the basics.
How to Crochet the Basic Picot Stitch: A Step-by-Step Tutorial for Beginners
Learning the basic picot stitch is straightforward, but mastering the tension is key to consistent, pretty results. For the picot stitch, you’ll need to start with a swatch made with any standard crochet stitch—a simple row of single crochets (sc) or double crochets (dc) works perfectly for practice. You only need your crochet hook and yarn; no special tools are required.
Follow these fundamental steps to create a single picot:
- Work your base stitch. Begin by working a single crochet (or your chosen stitch) into the designated stitch of your row or round. This stitch will anchor your picot.
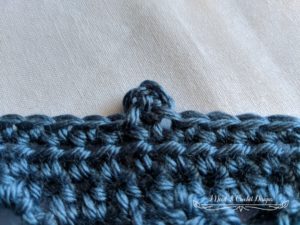
- Chain the required length. The most common and basic picot is a chain 3 (ch3). You can adjust the size: chain 2 (ch2) for a smaller, tighter picot, or chain 4 (ch4) or more for a larger, more pronounced loop.
- Secure the picot. This is the crucial step that forms the "bump." Insert your hook into the very first chain you made (the one furthest from your hook) or, more commonly, into the same stitch where you worked your base single crochet. Make a slip stitch (sl st) to close the loop. Alternatively, for a more secure and slightly raised picot, you can work a single crochet (sc) into that same stitch instead of a slip stitch. Both methods are correct; the slip stitch creates a smaller, tighter picot, while the single crochet makes it a bit taller and more substantial.
- Continue your pattern. After securing, you typically skip one stitch (or the number of stitches specified in your pattern) before working the next base stitch and repeating the picot sequence.
The basic formula is: [Base stitch, chain, slip stitch/single crochet into base], skip stitches, repeat. For example, a classic picot edging pattern reads: *Sc in next stitch, ch 3, sl st in same sc, skip 1 stitch; repeat from * around.
Pro Tips for Perfect Picots Every Time
- Consistent Tension is Key: The most common issue is a picot that’s too loose or too tight. Practice maintaining even tension on your yarn, especially when making the chain and pulling through the slip stitch. Don’t yank the yarn; a firm but gentle pull works best.
- Use a Stitch Marker: When working in rounds, place a marker in the first stitch of each round. This helps you identify exactly where to work your base stitch for each picot, ensuring they are evenly spaced.
- Experiment with Size: The height of your chain directly controls the picot’s size. Try ch2, ch3, and ch4 on the same swatch to see which look you prefer for your project.
- Securing for Durability: If the picot is on a high-stress area like a blanket corner, consider using a single crochet to secure it instead of a slip stitch. It’s less likely to unravel.
Using Picot Stitches to Create Stunning Crochet Borders
One of the most popular applications for the picot stitch is creating a decorative picot border for crochet blankets, shawls, and afghans. This simple edging adds a touch of vintage charm or modern delicacy, instantly elevating the look of your project and giving it a professional touch. The picot border is made using chain stitches and then slip stitching (or single crocheting) back into the chains to create that little ball, which is then anchored to the main fabric with the base stitch.
To add a basic picot border to a finished blanket edge:
- Join your border yarn to any corner or stitch with a slip knot.
- Work a single crochet (or another stitch like a double crochet) into the first stitch of your blanket edge.
- Follow the picot sequence: Ch 3, sl st in the same single crochet you just made. This forms your first picot.
- Skip one stitch (or more, depending on desired density) on the blanket edge.
- Work a single crochet into the next stitch. This single crochet becomes the new base for the next picot.
- Repeat steps 3-5 all the way around. For corners, you might work multiple single crochets or a larger cluster to keep the border flat.
This pattern creates a lovely, scalloped edge. You can vary it immensely: work two or three single crochets between picots for a more open look, or combine picots with other stitches like spike stitches or lace patterns for intricate borders. Many beautiful blanket patterns, like the popular Granny Love Shawl by Meema Makes Yarn, feature picot edging as a signature detail, showcasing how this simple stitch can become a focal point.
Picot Stitches in Mesh and Lace Designs
Beyond standalone borders, picots are fantastic for filling an empty space in a mesh design. In lace crochet, mesh patterns often create large open squares or diamonds. By replacing a standard single crochet or chain-1 space with a picot, you add a delightful 3D dot of texture that breaks up the flat plane of the fabric. This technique is widely used in thread crochet to create dimensional doilies, christening gowns, and summer tops.
When working with yarn, this application is perfect for creating airy, lightweight shawls or mesh scarves. The picots add visual weight and interest without sacrificing the open, breathable quality of the mesh. For example, you might work a row of double crochets separated by chain-2 spaces, and then in the next round, work a picot into every chain-2 space. The result is a fabric dotted with tiny, elegant bumps. A related stitch is the picot trellis stitch, which is very similar to the ch3 picot but worked in a specific repeating pattern to form a trellis-like lattice. This beginner-friendly stitch has a decorative final look and is a great next step after mastering the basic picot.
Creative Projects: From Headbands to Detachable Collars
The picot stitch’s charm isn’t limited to blankets. Its delicate nature makes it ideal for accessories and garments that require a lightweight, pretty detail.
Lightweight Picot-Edged Headbands
Learn how to crochet a lightweight and stylish crochet headband made with wool yarn or cotton. The design is airy and soft, often featuring delicate bobble stitches and picot stitches along the edge. This makes it perfect for summer or transitional weather. The construction typically involves two main steps: crocheting the ornate main body (often in a mesh or lace stitch) with a contrasting border, and adding adjustable ties with flower appliques at the ends. The picots are usually worked into the final round of the border, creating a soft, feminine ruffle effect.
Vintage-Charm Detachable Crochet Collars
A crochet collar is one of the quickest ways to add instant vintage charm to a plain dress, blouse, or sweater. Detachable collars are especially lovely because they allow you to transform multiple outfits with one accessory. Picots are a classic detail for these collars, often worked along the outer edge. For example, a pattern might instruct: For the eleventh stitch, slip stitch, chain two, and then slip stitch again to form a picot. Continue with slip stitches and chains in the next ten stitches. This creates a repeating picot pattern around the collar’s perimeter, giving it a dainty, ruffled finish.
Common Mistakes and How to Troubleshoot Your Picots
Even with a simple stitch, beginners can encounter a few hiccups. Here’s how to fix the most common issues:
- Inconsistent Picot Size: If your picots are all different sizes, the culprit is usually uneven chain tension. Count your chains carefully each time (e.g., always exactly 3). Practice making a long chain and observe your tension—try to keep it consistent from the first chain to the last.
- Loose or Wobbly Picots: A slip stitch that isn’t pulled snugly enough will result in a floppy loop. After making your chain, pull the yarn gently but firmly to tighten the slip stitch. The loop should sit neatly beside your base stitch.
- Picots That Twist or Lie Flat: Sometimes a picot will twist to one side. This often happens if the slip stitch is worked into the wrong part of the chain. Ensure you’re inserting your hook into the same stitch as your base single crochet (or into the top of the first chain, depending on pattern instructions). Working into the correct spot keeps the picot standing straight up.
- Difficulty Joining in the Round: When working a continuous border, the last picot of the round can look awkward. To join seamlessly, at the end of the round, work your final base stitch, chain for the picot, and then slip stitch into the very first base stitch of the round (not the first picot) to close. This creates a seamless transition.
Essential Tips for Mastering the Picot Stitch
To truly master the picot stitch crochet and make it a seamless part of your crafting skills, keep these practical tips in mind:
- Practice on a Swatch First: Before adding picots to your precious project, make a 4x4 inch swatch in the same stitch and yarn. Practice the picot sequence until your tension is consistent and the picots look uniform.
- Choose the Right Yarn and Hook: For delicate picots, use a fine-weight yarn or thread with a smaller hook. For bold, statement picots on a blanket, use a worsted or bulky weight yarn with the recommended hook size. The hook size affects the tightness of your stitches and the final picot size.
- Watch Video Tutorials: While this guide is detailed, visual learning is powerful. Search for "how to crochet the picot stitch" on platforms like YouTube to see the hand movements in real-time. Many creators offer free full video tutorials that break down the steps slowly.
- Explore Pattern Resources: Websites like Yarnspirations offer thousands of free easy crochet patterns, including ones with picot edgings like the Bernat Picot Edged Crochet Granny Blanket. Studying how the picot is integrated into a full pattern will deepen your understanding.
- Customize and Experiment: Once comfortable, customize the basic picot. Try chaining 4 for a larger loop, or work a half-double crochet instead of a single crochet as your base stitch for a different texture. You can also cluster multiple picots together for a dramatic effect.
Conclusion: The Tiny Stitch with Transformative Power
The crochet picot stitch proves that incredible impact doesn’t require complex techniques. It is the epitome of a simple yet elegant border—a handful of chains and a slip stitch that can elevate the look of your blanket and every other project you create. From its foundational role in beginner crochet to its sophisticated use in thread crochet and mesh designs, the picot is a versatile stitch that belongs in every crocheter’s toolkit.
Whether you’re adding a delicate edge to a baby blanket, dotting a mesh shawl with texture, or crafting a vintage-style collar, the picot delivers that professional touch with minimal effort. Remember, the key is practice and consistency. Start with a simple swatch, master the chain-and-secure motion, and then let your creativity flow. Incorporate picots into your next granny square, use them to fill gaps in a lace panel, or follow along in a tutorial for a project like the Granny Love Shawl. This tiny decorative bump is your secret weapon for turning good projects into unforgettable ones. So grab your hook and yarn, and start stitching—your most beautifully embellished creations await.