2006 Toyota Sequoia Backup Light Wire Location: A Complete DIY Guide
Have you ever found yourself in a pitch-black driveway, fumbling to see behind your massive 2006 Toyota Sequoia while backing up? Or perhaps you've just installed a badass new Fab Fours rear bumper with integrated light mounts and realized the factory reverse lamps just don't cut it? The solution seems simple: tap into the existing reverse light circuit to power your new auxiliary lights. But then comes the million-dollar question: where exactly is the 2006 Sequoia backup light wire location? Navigating the labyrinth of wiring under the dash or in the tailgate can be daunting, filled with guesswork and the constant fear of blowing a fuse. This comprehensive guide cuts through the confusion. We'll use official wiring diagrams, factory color codes, and proven methods to pinpoint the exact signals you need, ensuring your aftermarket lighting project is done correctly, safely, and with the flexibility to control your lights whenever you want.
Why the Backup Light Relay is Your Golden Tap Point
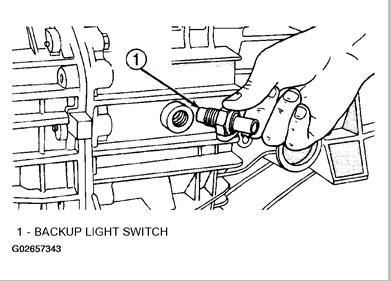
When searching for a switched power source for aftermarket accessories like additional reverse lights, the absolute best source in the dash area is the backup light relay. This crucial component is typically located at the rear of the instrument panel fuse box, which itself is usually found under the driver's side dash, near the steering column. The relay acts as a remote-controlled switch; when you shift into reverse, the vehicle's computer (or transmission range sensor) sends a small signal to this relay. The relay then closes its high-current contacts, sending full battery power out to your rear reverse lights.
The specific wire you want to tap is a red wire with a black tracer that emanates from this relay. This wire carries the "switched" 12-volt signal—it's only hot when the ignition is on and the transmission is in reverse. This makes it the perfect, fuse-protected source for your new lights. You're not creating a new, uncontrolled circuit; you're seamlessly integrating into the vehicle's existing, designed-for-this-purpose system. Tapping here, as close to the source as possible, ensures a clean, reliable signal and minimizes the risk of voltage drop that can dim your new lights. This will be your best option to tap into for any reverse-activated accessory.
Decoding the 2006 Sequoia's Electrical Language: Wiring Diagrams & Color Codes
To confidently find any wire, you must speak the language of your vehicle's electrical system. For the 2006 model year, Toyota used what is often referred to in enthusiast circles as the "Gen 4" wiring diagram system. Consulting the official 2006 Sequoia electrical wiring diagram system circuits page is non-negotiable for a professional job. These factory diagrams are the definitive map.
According to these diagrams, the power wire going to the reverse lights is colored red with a black stripe. This is the same red/black tracer we identified coming from the backup light relay—it's the feed wire that runs the length of the vehicle to the tail light assemblies. Equally important is the ground wire for the reverse lights, which is colored white with a black stripe. A proper ground is 50% of any electrical circuit. Without a solid, corrosion-free connection to this white/black wire (or a clean metal point connected to it), your new lights will flicker, be dim, or not work at all.
You have to have continuity in the power wire, and also in the ground wire, for things to work correctly. Continuity means an unbroken path for electricity. You can verify this with a simple multimeter test. Set your meter to the continuity setting (or the lowest ohms setting), place one probe on the red/black wire at your tap point and the other on the corresponding red/black wire at the rear light connector. The meter should beep or read near zero ohms. Do the same for the ground circuit. This test confirms you've found the right wires and that the path is intact.
Understanding Toyota's Standard Wire Color Codes
While the reverse light circuit has its specific colors, it's helpful to know Toyota's broader palette. Toyota wiring diagram color codes use red, blue, black, yellow, and brown as the major wires for constant battery power, ignition-switched power, ground, and other primary functions. Apart from that, there are many other secondary and tracer wires as well, which are a base color with a thin stripe of another color (like our red/black and white/black). Here’s a quick reference for common 2006 Sequoia circuits:
| Circuit Function | Primary Color | Tracer Color | Typical Location |
|---|---|---|---|
| Battery Direct (Always Hot) | Red | None | Fuse Box, Main Harnesses |
| Ignition Switched Power | Black | White | Fuse Box, Dash Harness |
| Ground | Black | None | Multiple points, Engine Bay |
| Reverse Lights | Red | Black | Relay to Tail, Cab Harness |
| Reverse Light Ground | White | Black | Tail Light Assembly, Frame |
| Left Turn Signal | Green | White/Black | Front to Rear |
| Right Turn Signal | Orange | Black | Front to Rear |
| Brake Lights | Red | White | Pedal to Tail |
Note: Always verify with your specific vehicle's diagram, as trims and options can change assignments.
The Cab-Side Conundrum: Where's the Wire Inside?
Running a wire to the back of the truck is easy enough, but i would really like to know where the reverse light wire is in the cab. This is a critical question for anyone wanting to install a dash-mounted switch to manually override their reverse lights for tasks like trailer loading, as you plan. You don't want to run a new wire all the way from the fuse box to the back; you want to intercept the existing signal inside the cab where it's more accessible.
My guess is that it must be under the drivers seat, and i'm hoping someone here knows which wire it is. Your guess is excellent and very likely correct. In many full-size trucks and SUVs, including the Toyota Sequoia, the main wiring harness that carries signals from the dash to the rear of the vehicle often passes through a conduit or grommet under the driver's seat area or along the driver's side sill/rockers. The reverse light signal wire (red/black) will be part of this main harness bundle.
To find it:
- Remove the driver's side front seat (this usually requires unbolting it from the floor—consult your manual).
- Look for a large, multi-wire harness running from the dash rearward, often secured with tape or clips to the floor pan.
- Follow this harness. You are looking for a red wire with a black tracer within the bundle.
- Crucially, do not guess. Use your 2006 Sequoia electrical wiring diagram. The diagram will show the harness routing and pin numbers for connectors. You can identify the specific connector that carries the reverse light signal (often a large connector near the B-pillar or under the seat) and then test the individual pins in that connector with a multimeter while the truck is in reverse.
Wiring for Flexibility: Adding a Manual Switch
Your goal—to be able to switch [the extra reverse lights] on whenever i want for when i'm loading the trailer—is very common. This requires creating a "manual override" circuit. The cleanest method uses a center-off, double-throw (DPDT) toggle switch or a momentary switch system. Here’s the logic:
- Factory Signal (Automatic): The red/black reverse wire from the relay provides power only in reverse. This will be one input to your switch.
- Constant Power (Manual): You'll tap a ignition-switched power source (a black/white wire from the fuse box) for a manual "on" position. This lets your lights work with the key on, even if not in reverse.
- The Switch: A DPDT switch has two separate poles. Use one pole to select between the "Reverse Signal" and the "Ignition Power." The other pole can be used to feed the output to your new lights. The center "off" position kills power to the lights entirely, preserving battery when not needed.
- Ground: The output from your switch goes to the positive of your new lights. The negatives of your new lights must be securely grounded to the vehicle's chassis, ideally to the same white/black reverse light ground point at the rear for a complete, shared circuit.
This setup gives you three modes: Off, Manual (key-on, any gear), and Automatic (reverse-only). Always use an appropriately rated fuse (e.g., 10-15 amps) on the ignition-switched power feed to your switch to protect the wiring.
Navigating Complex Systems: The 10-Speaker & Rear Seat Entertainment Factor
Your 2006 Sequoia may be equipped with the premium 10-speaker w/ navigation and rear seat entertainment system. This is not just an audio note; it's a critical wiring consideration. These complex systems often share harnesses or pass through the same channels under the seats or in the pillars that you'll be exploring for your reverse light wire. Audio system (10 speaker w/ rear seat entertainment system) wiring typically uses low-voltage signal wires (often pink, blue, violet, or thin gauges) and is very susceptible to interference.
Key Advice: When working in the harness under the seat:
- Identify and label everything. Use colored masking tape and a note pad. Do not cut or probe any wire until you are 100% certain of its function via the diagram and multimeter testing.
- Avoid the audio harness. Your red/black reverse light wire will be a heavier gauge (typically 18-16 AWG) and part of the main power/lighting bundle. The audio wires will be thinner and grouped separately. Cross-wiring here can cause static in your premium sound system or, worse, damage expensive head units or amplifiers.
- Use quality connectors. Soldered and heat-shrunk connections are best. If using twist-on connectors (wire nuts), ensure they are rated for automotive use and are tight. Poor connections here cause intermittent lights and diagnostic nightmares.
Troubleshooting: Ensuring Power and Ground Continuity
Even with the correct wire identified, issues can arise. Your mantra must be: You have to have continuity in the power wire, and also in the ground wire, for things to work correctly.
- No Power at Tap Point: If your multimeter shows no voltage on the red/black wire when in reverse, check the fuse for the backup light circuit (often labeled "BACK UP" or "REV" in the under-dash fuse box). A blown fuse is common if the original bulbs were out and someone replaced them with the wrong type. Also, check the backup light relay itself—swap it with an identical relay from another circuit (like the horn) to test.
- Intermittent Power/Dimming: This is almost always a ground problem. The white/black ground wire at the rear light assembly must have a clean, metal-to-metal connection. Remove the light assembly, sand any paint or corrosion from the grounding bolt hole and the bolt itself, and re-attach firmly. At the cab, if you're tapping a ground, find a dedicated chassis ground stud or bolt, not just a random screw into sheet metal.
- Lights On All the Time: You've likely tapped a constant power wire (red with no tracer, or red/white) instead of the switched reverse wire. Re-check your identification with the diagram and live testing.
- Lights Never On: You may have a break in the wire between your tap point and the rear. Use the continuity test (with power off!) to trace the path. Corroded connectors behind the tail light assembly are a common failure point.
Sourcing the Right Information and Parts
Success in any automotive electrical project hinges on having the correct documentation. With our guide, you’ll have access to detailed information on the electrical wiring system of your Toyota Sequoia 2006 model. However, for the deepest dive, you need the factory service manual. You can often find digital versions of the 2006 Sequoia electrical wiring diagram system circuits page on enthusiast forums or through third-party manual sellers.
When it comes to physical components, Shop partsgeek's online auto parts warehouse for original oem & aftermarket replacement car parts is a viable resource for OEM-style wiring harness connectors, relays, and fuse boxes if you discover damaged components. The dealer alternative store for quality discount auto parts and accessories concept applies here—you don't always need a dealership price for a good-quality relay or socket.
For your specific project—adding Fab Fours bumper lights—ensure you purchase weatherproof connectors (like Deutsch or AMP-style) for any splices exposed to the elements. Use automotive-grade primary wire (often 18 AWG for signal wires) if you need to extend a circuit. And always route new wires away from hot exhaust components, moving suspension parts, and sharp edges.
Conclusion: Empowered by Knowledge
Tackling the 2006 Sequoia backup light wire location project transforms a moment of frustration into a rewarding demonstration of your vehicle knowledge. By understanding that the backup light relay in the dash fuse box is the source, identifying the red wire with a black tracer as your switched power, and respecting the essential white with black stripe ground, you have the keys to the kingdom. The factory Gen 4 wiring diagram is your co-pilot, confirming that these color codes are the standard for your model year.
Whether you're adding powerful LED pods to a Fab Fours bumper for night-time trail runs or simply creating a handy manual switch for trailer loading, the principles remain the same: find the correct, switched signal; provide an unbroken path to ground; and protect your circuit with proper fusing. You’ll be able to identify any issues with your vehicle’s electrical system and repair them with confidence. This isn't just about adding lights; it's about building a deeper, more capable connection with your truck. Now, with a multimeter in hand and this guide by your side, you can walk out to your Sequoia, pop the fuse box cover, and know exactly which wire to grab. The dark no longer holds any mysteries.