Chevy Key Fob Battery Replacement: Your Complete DIY Guide To Saving Time & Money
Is there anything more frustrating than rushing to work, arms full of groceries, only to find your Chevrolet key fob won’t unlock the door? That familiar click or the silent response signals a common woe: a dead chevy key fob battery. Before you panic about costly dealership visits or being locked out, take a deep breath. The solution is likely simpler, cheaper, and faster than you imagine. Replacing the battery in your Chevrolet key fob is a quintessential DIY task—one that takes minutes, requires no special tools for most models, and puts the power back in your hands (literally). This comprehensive guide will walk you through everything you need to know, from identifying your fob type to executing a flawless battery swap, ensuring you’re never stranded by a weak signal again.
Modern vehicles rely heavily on key fobs for various functions, from unlocking doors to starting the engine. Chevrolet vehicles are no exception. These small devices use a battery to transmit signals, and eventually, that battery will need replacement. Knowing how can i replace a key fob battery in a chevy vehicle is essential for every Chevy owner. It’s one of the smallest parts of your vehicle, but it plays a big role in everyday convenience. When the battery dies, these features disappear, leaving you with a frustrating experience. A weak battery can also cause intermittent performance, leading to missed signals and potential lockouts. Knowing how do i change a chevy key fob battery is not only convenient, but it can also be a safety concern, especially in emergency situations.
There is never a convenient time for your Chevy key fob to stop working. Whether you’re rushing to work or loading groceries in the rain, a dead remote is a major hassle. However, before you worry about expensive repairs, there is good news. Replacing the battery in your Chevrolet key fob is a quick and empowering task that saves you the time and cost of a dealership visit. In this guide, you’re going to learn exactly how to replace the battery in a chevrolet car key fob, covering everything from modern smart keys to classic flip keys. By following these methods, you ensure not only a successful battery swap but also extend the overall life and functionality of your key fob. Learn how to change battery in chevy key fob yourself in minutes—save time & money with this easy DIY guide!
Why Your Chevrolet Key Fob Battery Dies & Why It Matters
The Inevitable Battery Lifespan
Key fob batteries, typically small lithium coin cells like the CR2032 or CR2025, have a finite lifespan. On average, they last between 1 to 3 years, depending on usage frequency, environmental conditions (extreme cold drains them faster), and the fob's age. The constant, low-power signal emission for lock/unlock and the RF signal for remote start gradually depletes the cell. Recognizing the early signs of a dying battery is your first line of defense.
Spotting the Warning Signs
Don’t wait until you’re completely locked out. Be proactive if you notice:
- Decreased Range: You have to stand much closer to the vehicle for the fob to work.
- Intermittent Function: It works sometimes, but not others, especially in colder weather.
- The “Click” with No Action: You hear the lock mechanism activate but the doors don’t actually lock or unlock.
- Dashboard Warning Light: Some newer Chevrolets will display a “Key Fob Battery Low” message on the driver information center.
- The Need to Press Harder or Multiple Times: A healthy fob responds to a gentle, single press.
Ignoring these signs can lead to a complete failure at the worst possible moment. A dead Chevy key fob doesn’t just mean inconvenience; it can strand you without access to your vehicle or, in models with push-button start, prevent you from starting the engine at all.
Identifying Your Chevrolet Key Fob Type
Chevrolet has used several key fob designs over the years. The replacement process varies slightly, so identifying yours is the crucial first step. Here’s a breakdown of the most common types:
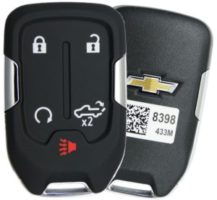
1. Standard Push-Button Key Fob
This is the most common design for models from the early 2010s onward (e.g., Silverado, Equinox, Malibu, Traverse). It’s a compact, rectangular fob with lock, unlock, trunk, and panic buttons. There is no visible mechanical key blade stored inside the main body.
2. Flip Key Fob (With Mechanical Key)
Recognizable by its foldable design. Press a button, and a traditional metal key blade swings out. This design was prevalent in the late 2000s to mid-2010s on models like the Impala, older Silverados, and Tahoe. The battery is housed within the main fob body, not the key blade.
3. Modern Smart Key / Proximity Key
Used on newer models like the Silverado 1500 (2020+), Bolt EUV, and higher-trim Cadillac models sold through Chevrolet. This fob is often sleeker, may have a hidden emergency key, and allows for keyless entry and push-button start simply by having the fob in your pocket or bag. The battery replacement process for these is often the most straightforward, as they typically have a simple seam or a small release mechanism.
Tools & Materials: What You Actually Need
Here's the best part: for most Chevrolet key fobs, you need only one new battery and possibly a small flathead screwdriver. The chevrolet key fob battery replacement guide—learn which battery you need and how to change it in minutes, no tools or dealer visit needed is absolutely accurate for the majority of cases.
- The Correct Battery: This is non-negotiable. Using the wrong size or type will damage your fob.
- Most Common:CR2032 (20mm diameter, 3.2mm thick). This powers fobs for Silverado, Equinox, Tahoe, Suburban, Traverse, Malibu, and many others.
- Less Common:CR2025 (20mm diameter, 2.5mm thick). Found in some older or specific model-year fobs.
- How to Confirm: The easiest way is to open your existing fob and read the number printed on the old battery. You can also check your owner’s manual or use an online parts lookup tool with your Vehicle Identification Number (VIN).
- A Small Flathead Screwdriver: A precision screwdriver or even a sturdy plastic guitar pick can be invaluable for prying open the fob’s seam without marring the plastic. For flip keys, you often need this to access the battery compartment.
- Optional but Helpful: A small plastic spudger tool (often included with phone repair kits) is perfect for prying and is less likely to slip and scratch your fob’s finish.
- A Well-Lit, Clean Workspace: To prevent losing tiny screws (though most Chevy fobs are screwless) and to see the battery orientation clearly.
Pro Tip: Buy your replacement battery from a reputable retailer (auto parts store, electronics store, or online). Avoid bargain-bin batteries from unknown brands, as they can have shorter lifespans or leak.
Step-by-Step: Replacing the Battery in a Standard Key Fob
This guide covers the vast majority of Chevrolet push-button fobs. The process is designed to be tool-free, but a screwdriver can help.
Step 1: Locate the Release Mechanism.
Examine your fob closely. On the side opposite the buttons, you’ll typically find a small notch or seam. This is the access point. Some newer fobs have a tiny button or slider that releases a hidden key blade first.
Step 2: Open the Fob Casing.
- If there’s a notch: Insert the tip of your flathead screwdriver (or a plastic tool) into the notch. Apply gentle, twisting pressure. You should feel a slight pop as the two plastic halves separate. Do not use excessive force, as the plastic clips are fragile.
- If there’s a release button for a hidden key: Press that button to extract the physical emergency key. This key is often stored inside the fob body and its removal may reveal the battery compartment or a secondary seam.
Step 3: Identify and Remove the Old Battery.
Once the case is open, you’ll see the circular coin battery held in place by a small plastic clip or simply resting in a compartment. Take note of the battery’s orientation. Which side is facing up? Is the positive (+) side (usually marked with a “+” and often raised) facing up or down? Snap a picture if needed with your phone. This is the single most important step to avoid installing the new battery backward.
Gently pry the old battery out using your screwdriver or fingernail. If there’s a retaining clip, carefully lift it to free the battery.
Step 4: Install the New Battery.
Match the orientation exactly as you noted from the old battery or your photo. Place the new CR2032 (or correct type) into the compartment, ensuring the “+” side is facing the correct direction as indicated by the “+” symbol embossed in the plastic housing or on the circuit board. Press it down firmly until it sits flush and is secured by the clip or housing.
Step 5: Reassemble the Fob.
Align the two halves of the fob casing. Press them together firmly until you hear all the plastic clips snap back into place. You should feel a secure, tight seal with no gaps. Test the buttons before you finish—they should click normally.
Step 6: Test the Fob.
Go to your vehicle. Test all functions: lock, unlock, trunk release, and panic. Stand at your normal operating distance. If it works perfectly, you’ve succeeded! If not, reopen the fob and double-check the battery polarity. It’s the most common installation error.
Special Case: Replacing the Battery in a Flip Key Fob
For flip-key fobs (like those on older Impalas, Silverados), the process starts differently but ends the same way.
- Press the small chrome button to release the mechanical key. The key blade will swing out.
- Find the small notch along the side of the fob (often on the side where the key is stored) and insert a flathead screwdriver.
- Twist gently to pop open the case. This action separates the fob body from the key compartment.
- The battery will be visible inside the main body of the fob. Take note of the battery's orientation and remove the old battery using the screwdriver or your fingernail.
- Insert the new battery with the correct polarity and snap the two halves of the fob back together. Ensure the key blade mechanism moves freely.
Special Case: Replacing the Battery in a Modern Smart/Proximity Key
These fobs often have a seamless design. Look for a tiny seam around the perimeter or a small button/indentation.
- Locate the seam. Use a plastic spudger or a sturdy fingernail to carefully work your way around the seam, prying the two halves apart. Start at the notch if one exists.
- Once open, the battery is usually visible and held by a simple clip. Note its orientation meticulously.
- Remove the old battery, insert the new one with matching polarity, and carefully press the halves back together until they click. Avoid pressing on the battery itself.
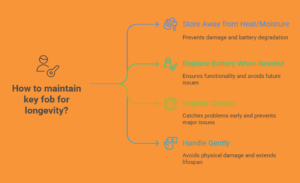
Pro Tips to Ensure Success & Extend Fob Life
Following these 10 methods will ensure a smooth process and keep your key fob reliable for years:
- Always Confirm Battery Type First: Never guess. Use the old battery as your template.
- Mind the Polarity: The “+” must face the correct direction. When in doubt, look for the embossed “+” symbol in the plastic well.
- Use the Right Tool: A plastic tool is ideal. Metal screwdrivers can slip and scratch the fob or short-circuit components if you’re not careful.
- Work in a Clean, Well-Lit Area: A dropped screw or battery is hard to find on a dark floor.
- Handle the Circuit Board Gently: Avoid touching the green circuit board inside with your fingers. Oils and static can damage it. Hold the fob by the plastic edges.
- Don’t Force It: If the case won’t open, you’re likely at the wrong seam or using too much force. Re-examine your fob model online for a specific tutorial video.
- Inspect the Seals: When reassembling, ensure the rubber gasket (if present) is seated correctly. This keeps moisture out.
- Recycle the Old Battery: Coin batteries contain materials that should be recycled. Take it to an auto parts store, electronics retailer, or municipal hazardous waste facility.
- Consider a Spare: Key fob batteries are cheap. Keeping a spare CR2032 in your glove compartment is a smart, $2 insurance policy.
- Test Thoroughly: After replacement, test all functions from various angles and distances before closing everything up permanently.
When to Seek Professional Help (It’s Rare)
While this is a DIY task, there are a few scenarios where a professional might be needed:
- The fob was physically damaged (cracked case, water intrusion) before the battery change.
- The fob still doesn’t work after a confirmed correct battery installation. The issue could be a faulty circuit board or a need for reprogramming.
- You have a high-security proximity key for a very new model that requires specialized tools or software to open (though most still have a simple seam).
- You simply don’t feel comfortable. There’s no shame in asking for help.
At Folsom Chevy, we can test your key fob and replace the battery in minutes — no appointment required. This is a great option if you’re unsure, but for the vast majority of owners, the $5 battery and 5 minutes of your time is all it takes.
Frequently Asked Questions (FAQ)
Q: How often do I need to replace my Chevy key fob battery?
A: Typically every 1-3 years, depending on usage and climate. Colder climates shorten battery life.
Q: What happens if I install the battery backwards?
A: Usually, nothing dramatic happens—it simply won’t work. However, in rare cases with poor-quality batteries or if forced, it could damage the fob’s circuitry. Always double-check polarity.
Q: Can I use a Duracell or Energizer battery?
A: Yes, absolutely. Major brand lithium coin cells (Duracell, Energizer, Panasonic, Sony) are all excellent and compatible. Avoid unknown or very old stock batteries.
Q: My fob has a “+” and “-” printed on it, but the battery only has a “+”. Which way does it go?
A: The flat, unmarked side of the battery (the “-” side) should face the “-” symbol on the fob’s plastic housing. The raised “+” on the battery aligns with the “+” symbol.
Q: My key fob still doesn’t work after changing the battery. Now what?
A: 1) Re-open it and confirm the battery is installed correctly with proper polarity. 2) Ensure the battery is new and not a dud (test it if you have a multimeter). 3) Check for any visible damage to the circuit board. 4) If all else fails, the fob may need to be reprogrammed to your vehicle, which requires a dealer or locksmith with the proper tools.
Q: Is there a way to extend the battery life?
A: Minimize unnecessary button presses. Avoid storing the fob in extreme temperatures (like on a hot dashboard or in a freezing garage). If you won’t use the vehicle for a month or more, consider removing the battery to prevent slow drain.
Conclusion: Empowerment in the Palm of Your Hand
Dealing with a dead key doesn’t have to be a dealership-level crisis. Understanding how to change out the battery in your Chevrolet key remote transforms a moment of potential frustration into a five-minute victory of self-reliance. You’ve now learned that this small, inexpensive component is the heart of your vehicle’s convenience system. By recognizing the signs of a failing battery, identifying your specific fob type, and following the careful, methodical steps outlined—press the small chrome button to release the mechanical key, find the small notch, twist gently, take note of orientation, and snap a picture if needed—you are fully equipped to perform a Chevy key fob battery replacement yourself.
This knowledge is more than just a trick; it’s a practical skill that saves you time, money, and the helpless feeling of being locked out. Replacing the battery in your Chevy key fob is a simple and inexpensive process that you can master today. Keep a spare battery on hand, respect the polarity, and you’ll ensure your key fob remains a reliable partner for every journey. The next time that familiar click is followed by a satisfying thunk of the locks engaging, you’ll smile, knowing you handled it yourself—no appointment, no fee, just pure DIY confidence. Your Chevy key fob battery is no longer a mystery, but a maintainable part of your vehicle’s ecosystem, under your complete control.