Dog Broken Nail: A Vet's Guide To First Aid, Treatment & Prevention
Has your dog suddenly yelped, started limping, or obsessively licking a paw? A dog broken nail is a surprisingly common—and often painful—pet emergency that can leave both you and your canine companion in distress. In this article, our vet experts tell you everything you need to know about first aid for a dog's broken nail, as well as parts of a dog’s nail and what to do when your dog’s nail is broken. Knowing when to treat a broken nail at home versus when to seek veterinary care can make all the difference in your dog's comfort and recovery. This guide will help you recognize the signs that require immediate attention and the steps to take when facing this common pet emergency.
Nail injuries are common in dogs, and while some can be minor, others may need immediate attention. It is not unusual for dogs to break their nails, but breaking or tearing a nail can be a painful experience because the sensitive quick (the living tissue inside the nail) may be exposed. When your dog breaks their nail, you can't leave them just like that; the wound needs to be treated promptly to stop bleeding, ease pain, and prevent infection. Our vet explains how to do this properly and safely. Learn quick steps to fix your dog's broken nail and soothe their pain. Discover tips for cracked, broken, or torn nails so you can keep your dog comfortable with at-home treatments.
Understanding Your Dog's Nail Anatomy: More Than Just a Claw
Before diving into treatment, it's crucial to understand what you're dealing with. A dog's nail is not a simple, solid structure. It's composed of several parts, each playing a role in the injury and its management.
The Quick: The Source of Pain and Bleeding
The most critical part to recognize is the quick. This is the soft, pink (or darker in pigmented nails) tissue that contains blood vessels and nerves. It's the living core of the nail. If a nail breaks or cracks and the quick is exposed, your dog will experience significant pain, and the nail will bleed profusely. In black-nailed dogs, the quick is harder to see but is typically located at the base of the nail. A good rule of thumb is to look for a small, dark circle at the center of the nail's cross-section when you trim.
The Nail Structure: Shell and Support
Surrounding the quick is the hard, keratinized shell. This is the part that grows and is trimmed. The nail grows from the nail bed, the skin at the base. At the very end of the toe is the dewclaw, a higher-set toe that doesn't always touch the ground. Dewclaws are more prone to snagging and breaking because they are often not worn down naturally. Learn to identify your dog's broken or split nail or dewclaw, including info on an exposed quick, as this visual cue dictates your immediate response.
Why Are Dog Paws So Sensitive?
What is it about dogs and their paws? An animal behaviorist explains why some dogs won’t let you touch their paws, and how to get them comfortable. Paws are vital for mobility, balance, and sensory input. They are packed with nerve endings. A dog instinctively protects a painful paw, which can make first aid challenging. This sensitivity is an evolutionary trait—injured paws in the wild could be fatal. Understanding this helps you approach your dog calmly and patiently during treatment.
Immediate First Aid: Stop the Bleeding and Soothe the Pain
When a pet owner brings a dog with a broken nail to see me, I do a few things to fix problems. But your first response at the scene is critical. If your dog has a broken or cracked nail or a bleeding nail, here are some helpful first aid tips.
Step 1: Assess and Calm Your Dog
Your dog will likely be in pain and may try to bite or flee. Muzzle your dog if necessary for safety, but only if you can do so without risking a bite to yourself. Use a calm, reassuring voice. The goal is to minimize stress and movement, which can increase bleeding.
Step 2: Apply Pressure to Stop Bleeding
If the nail is bleeding, which it often does if the quick is involved, you must stop the hemorrhage. Use a clean cloth or gauze pad and apply firm, direct pressure to the tip of the nail for at least 5-10 minutes. Do not peek frequently, as this disrupts clot formation. For minor bleeds, this may suffice. For more persistent bleeding, you'll need styptic powder or a styptic pencil (available at pet stores and pharmacies). These contain a cauterizing agent (like silver nitrate) that contracts blood vessels. Press the powder directly onto the bleeding nail tip. Note: This will sting briefly, so be prepared for your dog to react.
Step 3: Clean the Wound
Once bleeding is under control, gently clean the area. Use warm water and mild, pet-safe antiseptic solution (like diluted chlorhexidine). Avoid hydrogen peroxide, as it can damage healthy tissue. Remove any visible dirt or debris. If a piece of nail is hanging loosely, you may carefully trim it away with clean, sharp clippers, but only if it's easy and won't cause more bleeding. If the break is jagged and close to the quick, it's often best to leave it for the vet to avoid further injury.
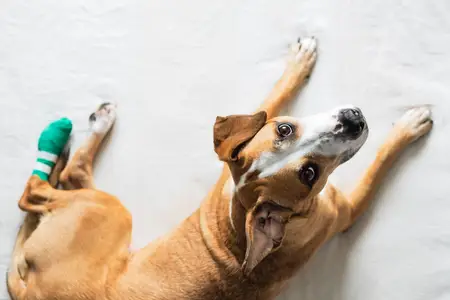
Step 4: Protect the Nail
To prevent infection and further trauma, you should protect the injured nail. Apply a small amount of antibiotic ointment (like Neosporin without pain relief, which can be toxic to dogs) to the nail and surrounding area. Then, carefully wrap the paw with a non-stick pad and a self-adhesive bandage (like Vet Wrap). The wrap should be snug but not cut off circulation. Check two fingers can fit under the bandage. Monitor for swelling, which indicates it's too tight.
Step 5: Manage Pain and Prevent Licking
Pain management is key. Your dog will want to lick the wound, which can introduce bacteria and disrupt healing. An Elizabethan collar (E-collar) is essential to prevent licking and chewing. For pain, consult your vet before giving any human medication. Some NSAIDs for dogs are available by prescription only. In the short term, ensure your dog has a quiet, comfortable space to rest.
Home Treatment vs. Professional Care: The Critical Decision
This is the most important part of managing a dog broken nail. Knowing when to treat a broken nail at home versus when to seek veterinary care can make all the difference. Let’s break down what to do when your dog’s nail is broken, how to manage it at home, and when it’s time to call a vet.
When Home Treatment is Appropriate
Home care is suitable for minor, clean breaks where:
- The bleeding is minor and stops quickly with pressure.
- The broken part is small and not near the quick.
- The nail is not dangling or severely cracked.
- Your dog is not in significant pain (beyond initial shock).
- There are no signs of infection (redness, swelling, pus, foul odor).
6 Expert Steps to Treat Your Dog’s Split or Broken Nail at Home:
- Stop the Bleeding: Apply pressure and styptic powder if needed.
- Clean Gently: Use warm water and a pet-safe antiseptic.
- Smooth the Edge: If a sharp fragment remains, carefully file it with a pet nail file to prevent snagging.
- Apply Ointment: Use a thin layer of pet-safe antibiotic ointment.
- Bandage Securely: Wrap loosely with non-stick pad and self-adhesive bandage.
- Prevent Licking: Use an E-collar and monitor the bandage.
When to Rush to an Emergency Clinic
A broken dog toenail can cause your canine pain and discomfort, and can lead to infections if they aren’t treated. Here are the clear signs that require immediate veterinary attention:
- Heavy or Uncontrollable Bleeding: If pressure doesn't stop the bleeding within 15-20 minutes.
- Exposed Quick: You can see the pink, fleshy tissue at the center of the nail. This is very painful and requires professional trimming and possibly sedation.
- The Nail is Torn or Hanging Off: A large portion of the nail is detached from the nail bed.
- Signs of Infection: Increasing redness, swelling, heat, pus, or a foul smell from the area.
- Your Dog is in Severe Pain: Constant whining, refusal to put weight on the paw, or aggression when the area is touched.
- The Break is Close to the Toe Joint: This can affect mobility and needs expert assessment.
- Your Dog Has a Bleeding Disorder or is on Medication: Like blood thinners (e.g., for heart conditions).
- You Are Uncomfortable or Unable to Manage: Your safety and your dog's welfare are paramount.
What the Vet Will Do
When your dog has a broken nail that requires professional care, the veterinarian will perform a procedure to fix the problem. This typically involves:
- Trimming the Nail: The vet will carefully trim away the damaged portion, often back to where it's healthy and attached. This may require sedation or a local nerve block if the quick is involved.
- Cauterizing the Quick: If the quick is nicked, the vet will use a cautery pen (an electric device) to seal the blood vessels and stop bleeding permanently. This is more effective and less painful than styptic powder for major quicks.
- Cleaning and Disinfecting: Thorough cleaning of the nail bed and surrounding area.
- Bandaging: Applying a professional, secure bandage.
- Pain Medication and Antibiotics: Prescribing appropriate medications to manage pain and prevent infection.
- Tetanus Shot: In some severe cases, a tetanus booster may be recommended.
Prevention: The Best Cure for a Dog Broken Nail
Can broken nails be prevented with regular grooming? Absolutely. Regular nail trims help prevent accidents like broken nails by keeping your dog’s nails at a proper length and reducing the risk of injury. Long nails are more likely to catch on surfaces, snag, and split. Keep maintenance of your dog’s nails on your list of tasks alongside bathing and walking so that you and your dog can avoid the broken nail dilemma.
The Right Tools Are Essential
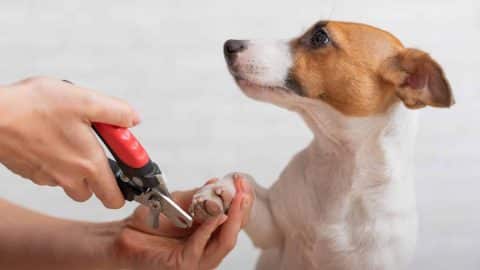
The right tools are essential for successful trimming. Sharp nail trimmers specially designed for dogs are a big plus. Dull trimmers shred the nail and increase the likelihood of a break. Choose between:
- Scissor-style: Good for thick, large nails.
- Guillotine-style: Good for small to medium nails.
- Grinders (Dremels): Excellent for smoothing edges and for dogs afraid of clippers. They require gradual introduction.
Proper Trimming Technique
- Locate the Quick: In light nails, it's the pink triangle. In dark nails, trim small amounts at a time, looking for a small black dot (the quick) in the center of the nail's cross-section.
- Trim at a 45-Degree Angle: Cut from the top side of the nail, following its natural curve. Avoid cutting parallel to the nail bed.
- Don't Cut Too Short: Leave a small margin (2-3 mm) away from the quick. It's better to take multiple small cuts than one big one.
- File the Edges: Use a nail file to smooth any sharp points after clipping.
Beyond Trimming: Environmental Management
- Keep Play Areas Safe: Remove sharp objects, rough concrete patches, or ice from walking paths.
- Be Cautious on Hard Surfaces: Excessive running on very hard surfaces like asphalt can wear nails unevenly.
- Consider Booties: For dogs with particularly active lifestyles or on rough terrain, dog booties can provide protection.
The Paw Touch Problem: Why Some Dogs Hate It & How to Fix It
This behavioral aspect is crucial for both prevention and treatment. An animal behaviorist explains why some dogs won’t let you touch their paws, and how to get them comfortable. A negative past experience (a painful nail trim, a cut pad), lack of socialization, or simply a sensitive nature can cause this.
How to Desensitize Your Dog to Paw Handling
- Start Slow: Begin when your dog is relaxed. Gently touch a paw for a second, then reward with a high-value treat.
- Progress Gradually: Over days and weeks, increase the duration of touch, then gently hold a toe, then simulate holding a nail trimmer near the nail without cutting.
- Pair with Positives: Always pair handling with something wonderful—treats, praise, a favorite game.
- Practice Regularly: Make it a short, positive part of your daily routine, not just during nail trims.
- Seek Professional Help: If your dog is severely anxious or aggressive, consult a certified professional dog trainer or veterinary behaviorist.
This training is invaluable. It makes routine nail trims less stressful and allows you to perform first aid on a broken nail safely if the need arises.
Conclusion: Be Prepared, Not Panicked
Is your dog's broken nail causing you panic? Find expert tips to soothe your pup and promote a speedy recovery! A dog broken nail is a manageable issue when you're armed with knowledge. Remember the core principles: Stop the bleeding, ease the pain, prevent infection, and know when to call the vet.
A broken nail is painful for your dog, can bleed heavily, and carries a risk of infection. While minor cases can be handled at home with proper first aid, never hesitate to seek veterinary care if there's any doubt about the severity. Your vet is your best partner in your dog's health. By incorporating regular nail maintenance with proper tools and technique, and by working to make paw handling a positive experience, you can significantly reduce the chances of this painful mishap.
Ultimately, your calm and confident response is the first and most important step in helping your dog through a broken nail emergency. Keep a first aid kit stocked with styptic powder, gauze, and bandages. Know the location of your nearest emergency vet. With this guide, you are now equipped to handle this common pet emergency with competence and care, ensuring your dog's comfort and a swift return to happy, healthy paws.