How Do I Regrip A Golf Club? Your Complete DIY Guide To A Perfect, Professional Result
Have you ever picked up your favorite wedge, only to feel a slick, worn-out grip that looks more like a used bar of soap than a performance tool? You’re not alone. Worn grips are one of the most common—and easily fixable—issues plaguing golfers of all levels. The burning question for many is: how do I regrip a golf club? The answer might surprise you: it’s a straightforward, satisfying, and cost-effective project you can master at home with minimal tools. Forget the myth that regripping is a complex clubmaker’s secret. In this comprehensive guide, we’re demystifying the entire process, from the exact tools you need to the pro alignment tricks that make your clubs look and feel like they just came from a high-end fitting studio. Whether you’re a weekend warrior or an avid enthusiast, taking control of your grip game is one of the quickest ways to boost confidence, consistency, and control on the course.
The Golftalk Workshop: Learning from the Experts
Before we dive into the nuts and bolts, let’s set the stage with the definitive visual resource for this topic. The process we’re about to detail is perfectly demonstrated in “Golftalk with Dormy,” a popular video series that breaks down golf equipment topics with clarity and charm. In a key episode, host Alex is joined by Brad, a seasoned workshop expert, who provides a masterclass in DIY regripping.
Brad’s approach is methodical yet accessible, emphasizing that regripping doesn’t have to be complicated. He and Alex walk viewers through the entire journey, from removing old grips to installing new ones with perfect alignment, proving you can achieve a clean, professional result — all from home. Their video, produced in collaboration with Keiser University College of Golf, serves as an invaluable companion to this written guide, offering visual confirmation of each step. Think of Brad as your personal, patient mentor in the workshop, ensuring you avoid common pitfalls and finish with pride.
About the Experts: Your Guides to a Perfect Grip
| Name | Role | Expertise | Affiliation |
|---|---|---|---|
| Alex | Host, Golftalk with Dormy | Golf Media, Equipment Communication | Golftalk with Dormy |
| Brad | Workshop Expert | Club Building, Regripping, Shaft Installation | Golftalk with Dormy / Certified Club Technician |
Their combined expertise—Alex’s ability to communicate complex ideas simply and Brad’s hands-on technical skill—creates the perfect learning environment for anyone asking “how do i regrip a golf club.”
The Essential Toolkit: What You Actually Need
The beauty of a DIY regrip is its simplicity. You don’t need a sprawling workshop. The foundational setup is elegantly minimal, as highlighted in the core guidance: “In this video, you will learn how to easily regrip your golf clubs at home with only a bench vise, a regripping kit, and a tray to catch the extra solvent.” Let’s break down this holy trinity and a few helpful extras.
- The Bench Vise: This is your most critical piece of equipment. It holds the club shaft perfectly steady, freeing up both your hands for the delicate work of grip removal and installation. A standard metal or woodworking vise works perfectly. Pro Tip: Wrap the jaws of the vise with a soft cloth or use dedicated shaft protectors to prevent any marring of your club’s finish.
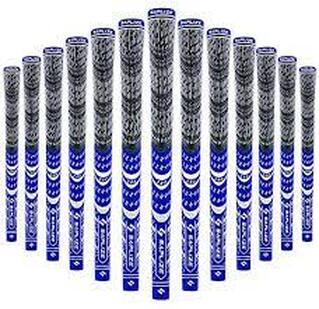
- The Regripping Kit: Never buy grips and solvent separately. A complete regripping kit is the smart, economical choice. These kits typically include:
- A bottle of grip solvent (often a mineral spirits-based solution).
- A double-sided grip tape roll (the adhesive-backed kind).
- A grip installation tool (a plastic, hook-ended wand used to feed tape into the shaft).
- A grip cutting knife or a sturdy utility knife with fresh blades.
- A vents cleaning brush (for clearing the grip vent holes).
- The Solvent Tray: This is non-negotiable for a clean workspace. A simple plastic tray, cookie sheet, or even a large piece of cardboard will catch the dripping solvent as you remove the old grip. It prevents a slippery, hazardous mess on your garage floor or workbench.
Helpful Extras (Not Mandatory, But Nice):
- Rubber Mallet: For gently tapping the grip fully onto the shaft without damaging it.
- Vent Hole Punch: If your new grips have sealed vents, this tool creates the small holes needed for solvent to escape during installation.
- Paper Towels/Rags: For cleanup and wiping solvent from the shaft.
- Work Gloves: To keep your hands clean and improve grip on tools.
The total initial cost for a quality kit and a few supplies is often less than the price of having two clubs regripped professionally. And that kit will last for dozens of regrips.
Step-by-Step: The Regripping Process Demystified
Now, the heart of the matter. Following Brad’s methodical approach, here is a detailed, step-by-step guide on how to regrip a golf club. We’ll cover one club at a time.
Phase 1: Removal – Destroying the Old to Make Way for the New
- Secure the Club: Place the club in your bench vise, clamping it on the shaft just below the grip. Ensure it’s tight but not so tight you crush the graphite shaft (use a cloth barrier).
- Ventilate & Protect: Ensure good airflow. Put on your solvent tray directly beneath the grip.
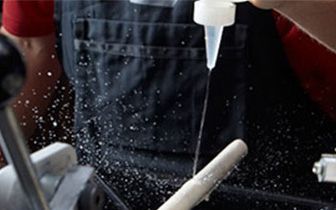
- Puncture & Saturate: Use your grip knife or a small screwdriver to poke 3-4 holes in the end of the grip (the butt end). This allows solvent to penetrate. Slowly pour or inject grip solvent into these holes and along the edge where the grip meets the tape. You’ll hear a faint hissing sound as the solvent works its way down, breaking down the old adhesive.
- The Twist & Pull: After 30-60 seconds of soaking, firmly grip the club head with one hand (or use a second vise for long shafts). With your other hand, firmly twist and pull the old grip straight off the shaft. It should slide off with a satisfying plop. If it resists, add more solvent and wait a bit longer. Never try to cut it off while it’s on the shaft—you risk damaging the shaft.
- Clean the Shaft: Once the grip is off, you’ll see the old, sticky double-sided tape. Use your solvent and a rag to completely remove all residue from the shaft. The shaft must be impeccably clean and dry for the new tape to adhere properly.
Phase 2: Preparation – The Foundation of a Perfect Grip
- Apply New Tape: Unroll your double-sided tape. Measure and cut a piece that is slightly longer than your grip (from the butt end to where the grip cap sits). Carefully apply it to the clean, dry shaft, starting at the butt end and pressing it down smoothly as you go toward the clubhead. The adhesive side should face outward.
- Peel & Vent: Remove the protective paper layer from the tape, exposing the sticky surface. If your new grip has sealed vents, use your punch to create small holes in the grip cap area where the tape will be. This allows air and excess solvent to escape during installation.
- Prepare the Grip: Pour a small amount of solvent inside the grip through the vent holes. Swirl it around to coat the interior. Then, pour a little solvent over the exposed tape on the shaft. This lubricates the tape, allowing the grip to slide on easily.
Phase 3: Installation – Alignment is Everything
- The Slide-On: Holding the grip vertically (butt end up), align the grip’s reference mark (usually a small dot or line on the side) with your desired face alignment. For most players, this mark should point directly at the leading edge of the clubface when the club is soled-down. Carefully slide the grip onto the shaft in one smooth motion. It will slide down easily due to the solvent.
- The Final Push: Once the grip is fully on (the butt end should be flush with the top of the shaft), you may need to give it a firm, final push with the palm of your hand to seat it completely against the shaft’s ferrule.
- Alignment Check: Immediately after installation, before the solvent evaporates and the tape sets, double-check your alignment. Look down the shaft from the butt end. Does your reference mark line up perfectly with the clubface? Now is the time to rotate it slightly if needed. The solvent provides a small window of adjustment.
- Curing: Wipe away any excess solvent that may have seeped out. Place the club upright (butt end on the floor) or back in the vise and let it sit for at least 2-4 hours, preferably overnight. This allows the solvent to fully evaporate and the tape adhesive to cure, creating a permanent, solid bond.
And there you have it! You’ve just completed a professional-level regrip. “Here’s a quick video on how you can regrip your golf clubs all by yourself with just simple tools.” The process is therapeutic, precise, and deeply rewarding.
The Critical Factor You’re Probably Getting Wrong: Grip Size
This is the most impactful—and overlooked—element of the entire equation. The staggering statistic bears repeating: “9/10 golfers are playing with the wrong size grips.” Using an incorrect grip size can drastically affect your swing mechanics, causing pulls, pushes, and an inability to release the club properly. Grip size is not about comfort; it’s about biomechanics.
- How to Check Your Size: The classic test is the “two-finger rule.” With your lead hand (left for right-handed golfers) holding the club in your normal grip position, you should be able to fit the index and middle fingers of your trailing hand comfortably in the gap between your lead-hand fingers and the palm. If they don’t fit, the grip is too small. If there’s a huge gap, it’s too large.
- Standard Sizing: Golf grips come in standard, midsize, and oversize (sometimes called jumbo). Most manufacturers have their own sizing charts.
- Info for correct sizing in pictures is readily available online from grip companies like Golf Pride, Lamkin, and Winn. These charts correlate hand measurements (knuckle length, ring finger size) to recommended grip sizes.
- The Impact of the Wrong Size:
- Too Small: Promotes excessive hand action, can cause the clubface to close too quickly (a hook), and leads to tension in the wrists and forearms.
- Too Large: Inhibits wrist hinge and release, often resulting in a slice or a loss of distance and feel. It can also cause you to grip too tightly.
Actionable Tip: Before you buy your next set of grips, measure your hands properly. When in doubt, sizing up is generally safer for most amateur golfers, as it promotes lighter grip pressure and better wrist action. Consider trying a midsize grip as a starting point if you’re unsure.
Frequency & Cost: How Often and Is It Worth It?
How often are you regripping? A good rule of thumb is every 40-60 rounds of golf, or at least once a year for frequent players. Signs it’s time include: visible wear (smooth, shiny spots), loss of tackiness, cracks, or a general feeling of slippage in your hands. For players who practice a lot or have sweaty hands, the cycle will be shorter.
The Cost-Benefit Analysis:
- DIY Cost: A premium regripping kit (enough for 10+ clubs) costs $25-$40. A set of 14 premium grips runs $70-$120. Total DIY cost for a full set: $95-$160.
- Pro Shop Cost: Most club shops charge $5-$10 per club for labor, plus the cost of the grip. For a full set, that’s $70-$140 in labor alone, plus grip cost. Total: $140-$260+.
The math is clear: Regripping yourself saves you 50% or more and gives you complete control over grip model, texture, and size. It’s one of the easiest ways to save significant money on equipment maintenance.
When to Call the Pros: Beyond Simple Regripping
While regripping is a perfect DIY project, some club work is best left to certified technicians. As noted by industry leaders like Golf Galaxy, their “certified club technicians can help with professional golf club regripping, golf shaft installations, removals and adjustments, and loft and lie adjustments to get your clubs ready for the course.”
Seek professional help for:
- Shaft Installation/Removal: Especially with graphite shafts, which require special care and heating to remove old epoxy without damage.
- Loft & Lie Adjustments: This requires a precise bending machine and expertise to avoid weakening the clubhead.
- Club Lengthening/Shortening: Involves precise measurement and shaft trimming.
- If You’re Uncomfortable: If the vise, knife, or solvent make you nervous, a professional regrip is a small price for peace of mind and a flawless result.
Think of it this way: regripping is to clubmaking what changing your oil is to auto mechanics. It’s a fundamental, user-serviceable task. Shaft work and bending are more like engine rebuilds—best for the specialists.
Conclusion: Take Control of Your Clubs
So, how do i regrip a golf club? The answer is: with confidence, the right tools, and a little patience. You now have the complete blueprint. You understand that the process hinges on three things: a secure vise, quality solvent and tape, and perfect alignment. You know that 9/10 golfers are using the wrong grip size, and you have the tools to check and correct your own. You can see the significant cost savings and the profound satisfaction of a job done with your own two hands.
The next time you feel a grip deteriorating, don’t just tolerate it or pay a premium for a simple fix. Embrace the DIY spirit. Set up your tray, secure your club, and follow the steps. You’ll not only save money and have perfectly gripped clubs, but you’ll also gain a deeper connection to your equipment. That clean, professional result you see in the Golftalk with Dormy video? That can be yours. All it takes is the first turn of the vise. Your clubs—and your scorecard—will thank you.