How Long Does JB Weld Take To Dry? The Complete Guide To Curing Times And Strong Bonds
Have you ever stared at a JB Weld repair, wondering, “How long does JB Weld take to dry?” You’re not alone. This is arguably the most common—and critical—question for anyone using this legendary two-part epoxy. Getting the timing wrong can mean the difference between a fix that lasts for years and one that fails after a few minutes. The confusion often stems from mixing up “setting” with “curing.” This definitive guide cuts through the noise, explaining exactly what happens during the drying process, the factors that speed it up or slow it down, and how to ensure your bond achieves its maximum, ultimate strength every single time.
What Is JB Weld and Why Do You Need It?
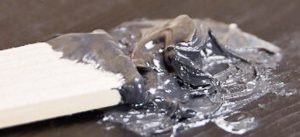
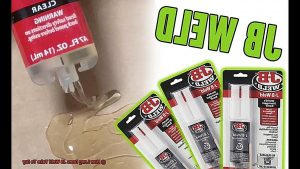
Before diving into clocks and temperatures, let’s establish why JB Weld is the go-to solution for millions of DIYers, mechanics, and homeowners. JB Weld is a proprietary, two-part epoxy system consisting of a resin and a hardener. When mixed, they undergo a chemical reaction (polymerization) that transforms the putty-like mixture into an incredibly hard, durable, and versatile bond. Its fame rests on its ability to adhere to almost anything—metal, plastic, wood, ceramic, concrete—and its resistance to heat, water, chemicals, and vibration.
Common Applications and Benefits
JB Weld’s utility is nearly endless. Here are some of its most popular uses:
- Automotive Repairs: Fixing cracked manifolds, repairing radiators, patching exhaust systems, and reattaching broken brackets.
- Plumbing Fixes: Sealing leaks in pipes, tanks, and fixtures.
- Household & DIY: Repairing broken pottery, fixing garden tools, patching furniture, and even crafting.
- Industrial & Marine: Bonding metal components, repairing machinery, and fixing boat parts.
Its primary benefits are strength (often cited as stronger than the original material), versatility, and durability in harsh conditions. However, all this power is nullified if the curing process is rushed or misunderstood.
A Brief History: The Founders Behind the Formula
JB Weld was born from necessity and ingenuity. The company was founded in 1969 by Sam and Mary Bonham in Sulphur Springs, Texas. Sam, a machinist, was frustrated with existing adhesives failing on the job. He began experimenting in his garage, eventually developing the original “J-B Weld” formula—a name that simply stood for “JoB Weld.” Their creation quickly gained a cult following among mechanics and tradespeople for its reliability. The brand has remained family-owned and is still based in Texas, a testament to its humble, problem-solving origins.
| Founder | Year Founded | Key Innovation | Headquarters |
|---|---|---|---|
| Sam & Mary Bonham | 1969 | Original steel-reinforced epoxy formula | Sulphur Springs, Texas, USA |
Set vs. Cure: The Most Important Distinction
This is the core of your question. “How long does JB Weld take to dry?” is actually two questions in one: How long until I can touch it? and How long until it’s at full strength? Understanding the difference is non-negotiable for a successful repair.
The “Set” Time: When It Feels Dry
The set time (often called “tack-free time”) is the period after which the surface of the epoxy is no longer sticky or tacky to the touch. JB Weld will feel dry to the touch at this point. For the standard original JB Weld formula, this typically occurs in 4 to 6 hours at room temperature (around 70-80°F or 21-27°C) on a typical application. This is the moment many users mistake for “done.” This drying period means that the bonded object can be touched or lightly handled, but the bond is not yet fully hardened and lacks its ultimate strength. The interior of the epoxy is still undergoing its primary chemical reaction.
The “Cure” Time: When It Reaches Full Strength
The cure time is how long it takes for the epoxy to reach its maximum mechanical and chemical strength—its ultimate strength. This is the number you must respect for load-bearing or stress-bearing applications. For JB Weld at optimal temperatures, full cure is generally achieved in 15 to 24 hours. Many people make the mistake of thinking their JB Weld repair is ready to go as soon as it sets. Using it before it’s fully cured is the #1 reason for premature bond failure. The epoxy is still relatively soft and vulnerable underneath that dry surface.
Key Takeaway:Set = Touch-Dry (4-6 hrs). Cure = Full Strength (15-24+ hrs). Always plan your project around the cure time, not the set time.
The Crucial Factors That Influence Curing Time
The 4-6 hour set and 15-24 hour cure times are benchmarks for ideal conditions (around 70-80°F, moderate humidity, proper thickness). Several factors can significantly alter this duration, with temperature being the most powerful.
1. Ambient Temperature: The Master Control
Cold weather slows down the chemical reaction between the resin and hardener, which is what makes JB Weld harden. The reaction is temperature-dependent; molecules move slower in the cold, drastically reducing the rate of polymerization.
- Below 50°F (10°C): This is the critical threshold. That reaction crawls, sometimes taking 48 hours or more to cure fully. At near-freezing temperatures, the epoxy may never cure properly without assistance.
- Optimal Range (70-80°F / 21-27°C): You’ll achieve the standard set and cure times.
- Warm Temperatures (80-100°F / 27-38°C): The reaction accelerates. Set time can drop to 1-2 hours, and cure time to 6-12 hours. Caution: Excessive heat (above 120°F/49°C) can cause the epoxy to cure too quickly, becoming brittle.
2. Application Thickness: The Depth Factor
Factors such as the thickness of the application... can significantly influence this duration. Epoxy cures via an exothermic (heat-generating) reaction.
- Thin Layers (<1/8 inch): Heat dissipates quickly, leading to a slower cure. A very thin film might take longer to reach full strength than a standard bead.
- Standard Thickness (1/8 to 1/4 inch): Ideal for generating and retaining enough heat for an efficient cure.
- Very Thick Applications (>1/2 inch): The outer layers can cure and trap heat inside, potentially causing the core to overheat, bubble, or crack. For deep repairs, it’s best to apply in multiple, thinner layers, allowing each to set before adding the next.
3. Humidity and Environment
While less impactful than temperature, high humidity can slightly slow the surface cure and potentially interfere with adhesion on very porous materials if not properly prepared. A dry, stable environment is always preferable.
4. Surface Condition and Material
Porous materials (like wood or concrete) can wick away some of the epoxy’s moisture, slightly affecting the surface skin. Non-porous, clean metals provide the most predictable results.
How to Accelerate the Curing Process (Safely!)
If you’re working in less-than-ideal conditions or are simply impatient, you can safely speed things up. Using a heat lamp, heat gun, or hairdryer can accelerate the curing process, while humidity levels and environment temperature can slow it down. Here’s how to do it without damaging your repair.
Safe Heating Methods:
- Hair Dryer: The safest option for most users. Set to a medium or high heat setting and hold it 6-12 inches away from the repair. Move it constantly to avoid concentrating heat in one spot. This can cut set time in half.
- Heat Lamp: An incandescent work lamp or reptile heat lamp positioned 12-18 inches above the repair is excellent for maintaining a warm ambient temperature around the project. Ensure it’s secure and won’t be knocked over.
- Heat Gun:Use with extreme caution. Keep it on the lowest setting and constantly move it. A heat gun can easily overheat the epoxy, causing it to scorch, bubble, or become brittle. It’s best for large, thick metal parts where you need to warm the substrate itself.
⚠️ Critical Safety Warning:
Never use an open flame (propane torch, candle) to speed up JB Weld. The fumes can be flammable, and you risk igniting them or causing a fire. Also, avoid using ovens or microwaves, as they create uneven, uncontrollable heat.
Other Acceleration Tips:
- Pre-warm the Substrate: If possible, warm the parts you’re bonding (e.g., with a hairdryer) before applying the epoxy. A warm surface gives the reaction a head start.
- Ensure Proper Mixing: Incomplete mixing is a leading cause of slow or incomplete curing. Mix the resin and hardener thoroughly for at least 1 minute, scraping the sides and bottom of your mixing surface.
- Use the Correct Ratio: JB Weld’s power comes from its precise 1:1 ratio by volume. Guessing or using uneven amounts will prevent a proper cure.
Common Mistakes and Troubleshooting: “My JB Weld Is Still Wet!”
Even with the best instructions, things can go wrong. The classic tale is: “I used JB Weld to repair my lawnmower. It's been a few days and I noticed the JB Weld is still wet.” Let’s diagnose why.
Why Your JB Weld Might Feel “Wet” or Soft Days Later:
- Temperature is Too Low: This is the prime suspect. If your repair is in a cold garage, shed, or during winter, the chemical reaction is severely retarded. Wondering how long JB Weld takes to dry in cold temperatures? The answer is: a very, very long time. It may feel superficially set but never develop true strength.
- Incorrect Mixing Ratio or Incomplete Mix: Too much resin or hardener, or unmixed streaks, will leave uncured, sticky sections.
- Excessive Thickness: A thick blob may have a cured skin with a soft, uncored center.
- High Humidity: Can affect the surface cure on porous materials.
- Using the “Weld” Formula on Incompatible Surfaces: While JB Weld adheres to many things, extremely slick or oily surfaces (without proper degreasing) can prevent a sound bond.
What to Do:
- If cold: Move the item to a warm area (above 60°F/15°C) and use a hairdryer or heat lamp as described above. Be patient; it may still cure given time and warmth.
- If mixed incorrectly: Unfortunately, there’s no fix. You must remove the uncured epoxy completely (scrape, sand, use a solvent like acetone for the uncured resin), clean the surface thoroughly, and start over with a perfect mix.
- If too thick: You may need to remove the bulk of the material and reapply in thinner layers.
Step-by-Step Guide for a Strong, Lasting Bond
This article introduces you to what you need to know about JB Weld, its right repair applications, how to use it and cure it faster. Following these steps meticulously is the surest path to success.
- Surface Preparation (The Most Important Step): Clean the repair area with a degreaser or soap and water. Remove all dirt, oil, grease, and loose material. For metal, lightly sand or grind the surface to create a rough texture for mechanical adhesion. Wipe away all dust.
- Mixing: On a clean, disposable surface, squeeze out equal amounts of the black (Resin) and white (Hardener) compounds. Mix them together thoroughly until the color is uniform grey with no streaks. This takes at least 60 seconds of vigorous kneading.
- Application: Apply the mixed epoxy to the prepared surface. Press it firmly into cracks and gaps. Shape it as needed. For a strong joint, “dress” the bead—smooth it and ensure it overlaps the damaged area on both sides by at least 1/2 inch.
- Initial Set: Let it set for 4-6 hours (at room temp) before any handling. Do not disturb it.
- Final Cure:Do not subject the repair to any stress, load, or fluid exposure for a full 24 hours. For critical applications or in cold weather, wait 48 hours to be absolutely certain of full strength.
- Post-Cure (Optional for Maximum Strength): For the absolute hardest, most chemical-resistant bond, you can “post-cure” the repair. After the initial 24-hour cure, place the item in an oven at 200°F (93°C) for 2-3 hours. This drives the reaction to completion. Only do this if the item and substrate can safely withstand that temperature.
Real-World Wisdom: User Experiences and Humor
The JB Weld community is full of colorful stories and hard-earned wisdom. The quotes you referenced capture the spirit perfectly:
“1D 1 Calvyn Jacobsen: Just do the JB Weld it’ll hold long enough for you to buy more JB Weld and continue the same process until you’re unable to afford JB Weld.”
“1D 1 Nate Evans: [Agreement]”
This tongue-in-cheek observation highlights a truth: JB Weld is often a temporary-to-permanent fix. You apply it to get something running now (like a lawnmower or car), and it holds long enough for you to source a proper part or save for a replacement. Its reliability buys you time.
But the real lesson is in patience. Those who treat the 24-hour cure time as a suggestion often learn the hard way. The user who repaired their lawnmower and found it “still wet” days later likely ignored the temperature factor. Wondering how long JB Weld takes to dry? The answer is: as long as it needs. Rushing it is the only true mistake.
Conclusion: Patience is the Ultimate Ingredient
So, how long does JB Weld take to dry? The complete answer is a spectrum:
- Touch-Dry (Set): 4-6 hours at 70-80°F.
- Full Strength (Cure): 15-24 hours at 70-80°F.
- In Cold Weather (<50°F): 48 hours or more, potentially requiring artificial heat.
Find out how long JB Weld takes to set and cure fully, and how to ensure a strong and lasting bond. The formula is simple: Perfect Prep + Perfect Mix + Perfect Patience = Perfect Bond. Factors like thickness and ambient temperature will tweak the clock, but the principle never changes. We’ll share everything you need to know about drying times, application steps, and handy tips to get the best results—and that starts with respecting the cure. Don’t be fooled by a dry surface. That grey, rock-hard shell is just the beginning. The molecular magic happening inside needs its full time to create the legendary bond that has made JB Weld a workshop icon for over 50 years. Learn the factors that affect curing time, tips to speed it up, and how to ensure a strong, reliable bond every time! Your future self—and your repaired lawnmower—will thank you.