How To Do Chin Tucks: Your Ultimate Guide To Perfect Form, Pain Relief, And Better Posture
Do you spend hours hunched over a desk, only to end the day with a stiff neck, nagging headaches, and a posture that screams “I work in an office”? What if the secret to reversing years of forward head posture and easing that persistent neck tension wasn’t a complicated machine or a costly therapy session, but a simple, subtle movement you can do anywhere, anytime? The answer lies in mastering the chin tuck.
Often called the McKenzie chin tuck, this deceptively simple exercise is a cornerstone of physical therapy for a reason. It directly targets the deep neck flexor muscles responsible for holding your head high and proud. But here’s the critical catch: the move is simple, but easy to miss the mark on. Performing it incorrectly can actually increase tension or do little to fix the root problem. In this article, I’ll walk you through the dos and don’ts of chin tuck technique, breaking down every detail from beginner basics to advanced progressions. By performing chin tucks regularly and correctly, you can improve your posture with less pain and more precision. Let’s build your perfect form from the ground up.
What Exactly Is a Chin Tuck? More Than Just a Double Chin
The chin tuck exercise is a therapeutic movement that involves pulling your chin straight back, creating a temporary double chin. The primary goal is to re-train the deep cervical flexor muscles—the longus colli and longus capitis—which are essential for stabilizing the neck and maintaining a neutral head position. When these muscles are weak and inactive (a common result of prolonged sitting and screen time), larger, superficial muscles at the back of the neck and shoulders overwork to compensate, leading to strain, pain, and that characteristic forward head posture.
It is often used as a therapeutic exercise to help improve posture, alleviate neck pain, and reduce tension in the neck and shoulders. Think of it as a rehabilitative reset button for your head and neck alignment. The movement is subtle; there should be no tilting or nodding of the head. It’s a pure, linear glide of the head straight backward over the spine. This precision is what makes it so effective for addressing the root cause of postural issues rather than just stretching the symptoms.
The Step-by-Step Beginner's Guide: Nailing the Fundamentals
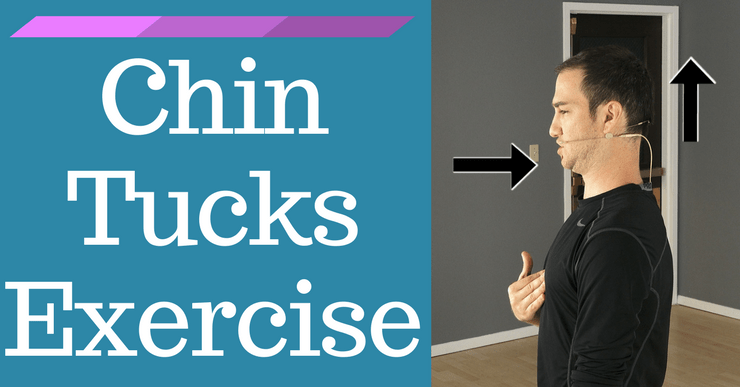
Before you attempt any variations, you must master the foundational movement. Here is a simple way to do chin tucks for a beginner. Follow these exact steps to ensure you’re targeting the right muscles from day one.
1. Start with the Right Position
Sit upright in a chair with your back supported or stand against a wall. The key is a neutral spine. Look straight ahead with your gaze parallel to the floor. Your ears should be directly over your shoulders. This is your starting “neutral” alignment. If you’re sitting, make sure your hips are back in the chair, not slouching forward.
2. The Finger Cue for Precision
Place a finger gently on your chin. This tactile cue is invaluable. It helps you become aware of any unwanted movement. Your finger should not move forward, backward, or to the side during the exercise. Its job is to stay put, acting as a reference point.
3. The Tuck: Create the Stretch
Without moving the finger, pull the chin and head straight back until a good stretch is felt at the base of the head and top of the neck. You should feel a gentle lengthening and engagement deep in the front of your neck, just below the jawline. Your chin will tuck down slightly, and the back of your neck will lengthen. Hold this position for 5-10 seconds, breathing normally. You’ve created a double chin. Slowly return to the starting neutral position. That’s one repetition.
Key Takeaway: The movement comes from the upper cervical spine (the base of the skull). Your jaw should remain relaxed. Do not jut your chin forward and then back—that’s a different, less effective motion.
Why Perfect Form Is Non-Negotiable: Common Mistakes & How to Fix Them
Chin tucks for posture can do wonders—but if you feel pressure in the front of your neck or tension in the back when you try them, you might be doing it wrong. This is one of the most common posture mistakes I see. Let’s diagnose and correct them.
- Mistake: Nodding or Tilting. You’re dropping your chin toward your chest or tilting your head down. Fix: Keep your gaze level. Imagine a string pulling the crown of your head straight up toward the ceiling as you tuck. The finger-on-chin cue prevents this.
- Mistake: Jutting Forward First. You push your chin out and then pull it back. This engages the wrong muscles. Fix: Start in perfect neutral. The movement is a direct glide backward from that starting point. No forward motion allowed.
- Mistake: Excessive Force or Crunching. You’re clenching your jaw or straining so hard you feel a muscle burn in the front. Fix: The movement should be controlled and mild. The stretch should be felt at the top/back of the neck, not a contraction in the front. Think “gentle retraction.”
- Mistake: Holding Your Breath.Fix: Breathe steadily throughout the hold. Inhale to prepare, exhale softly as you tuck, breathe normally while holding.
Watch the video and follow the instructions to avoid common mistakes and get the benefits of this exercise. Visual learning is powerful for this nuanced movement.
Building Your Routine: 6 Best Chin Tuck Exercises & Progressions
Once the basic seated/standing chin tuck is mastered (aim for 3 sets of 10-15 reps, holding for 5-10 seconds each), you can introduce variations to increase the challenge, improve stability, and target the muscles from different angles. Here are 6 simple moves to incorporate.
- The Wall-Assisted Chin Tuck: Stand with your back, buttocks, and head gently touching a wall. Perform the tuck. The wall provides immediate biofeedback, ensuring your head stays in contact and you’re not extending at the upper back. Excellent for beginners to feel the correct alignment.
- The Lying Chin Tuck (Supine): Lie flat on your back, knees bent. Let your head rest naturally on the floor. Perform the tuck. You should feel the back of your neck press gently into the floor. This removes gravity’s influence, making it the easiest variation and perfect for those with significant weakness or pain.
- The Resistance Band Chin Tuck: Anchor a light resistance band (theraband) at chest height. Hold the ends in both hands, with the band behind your head. Perform the tuck against the light resistance. This chin tuck against resistance builds strength more dynamically. Learn how to do chin tuck against resistance description by ensuring the pull is directly backward, not downward.
- The Peanut Ball Chin Tuck: Using a peanut ball (or two tennis balls taped together), place it under the back of your skull, centered on the cervical spine. Gently rest your head and perform light chin tucks. The ball provides a focal point for pressure and a gentle stretch to the suboccipital muscles, enhancing the stretch at the base of the skull (as mentioned in sentence 24).
- The Quadruped (All-Fours) Chin Tuck: Start on your hands and knees. Ensure your spine is neutral (not sagging or rounding). Perform the chin tuck. This unstable position challenges your core and neck stabilizers to work together, translating to better posture during movement.
- The Weighted Chin Tuck (Advanced): Place a very light weight (1-2 lbs) or a small sandbag on your forehead. Perform the tuck slowly and with maximum control. This is for advanced practitioners only who have mastered all other forms without pain. The weight increases the load on the deep flexors.
The Critical Difference: Chin Tucks vs. Neck Curls (The "Shaker" Exercise)
Chin tucks push the skull back without fixing the root problem. This is a crucial insight. While chin tucks are fantastic for endurance and postural awareness, they primarily train isometric (static) holding. For full functional recovery, you need dynamic control.
Neck curls teach control, stability, and proper activation. The traditional "head lift" or "shaker" exercise (lying on your back and lifting your head) is a dynamic strengthening move for the sternocleidomastoid (SCM) and other superficial muscles. Ctar can be used in place of the head lift exercise (shaker), especially when your patient is unable to lie flat on their back. This highlights that different exercises serve different purposes. A comprehensive neck program uses both: chin tucks for deep flexor endurance and postural re-education, and controlled neck curls for dynamic strength. Don’t rely on one exclusively.
The 30-Day Chin Tuck Challenge: What to Expect
What happens if you do chin tucks every single day for 30 days? The results can be transformative, but they depend on consistency and correct form.
- Week 1-2 (Awareness Phase): You’ll likely feel muscle fatigue and mild soreness in the deep front-neck muscles. This is a good sign they’re waking up! Your main goal is to perfect your form. You’ll become hyper-aware of your head position throughout the day.
- Week 3-4 (Integration Phase): The movement will feel more natural. You may notice you’re naturally holding your head in a better position without thinking. Subtle reductions in daily neck tension and headache frequency are common. My physical therapist has me do that exercise daily for this very reason—it’s preventative maintenance for the neck.
- Beyond 30 Days (Maintenance Phase): The deep muscles will have built endurance. To maintain gains, integrate chin tucks into your daily routine (see below). The biggest change is proprioceptive—your brain now has a new "neutral" map for your head, making good posture your default setting.
Important: If you experience any sharp pain, dizziness, or tingling, stop and consult a healthcare professional.
The Power of Consistency: Your Daily Desk Reset
Do this right now if you work at a desk: chin tucks = the best stretch you should be doing daily. It reverses forward head posture, relieves neck tension, takes 10 seconds, can be done anywhere. Try it.
This is not an exaggeration. Set a timer on your phone or computer to prompt you every 60-90 minutes. Stand up, sit tall, and perform 5-10 perfect chin tucks. This "micro-dosing" of postural correction combats the cumulative creep of forward head posture throughout the day. It’s a safe, natural approach with clear guidance and realistic expectations. You’re not fixing years of damage in one session, but you are consistently sending the correct signal to your neuromuscular system.
The Synergy of Strength and Flexibility: Why Stretching Matters
It's helpful to include stretching in your exercise plan. Chin tucks strengthen the front of the neck. To create balance, you must also stretch the back and side of the neck and upper shoulders, which are chronically tight in forward head posture.
Stretching can increase flexibility and improve the range of motion in your joints. Being more flexible can help you move more freely and be better able to do daily activities. And the flexibility you gain from stretching might protect you from** future strains and pain.
Simple Post-Chin Tuck Stretches:
- Upper Trapezius Stretch: Sit tall, gently pull your head to the side (ear toward shoulder) until a stretch is felt on the opposite side of the neck. Hold 20-30 seconds.
- Levator Scapulae Stretch: From the same position, rotate your head down toward your armpit (nose toward opposite knee) to deepen the stretch.
- Pectoral (Chest) Stretch: Doorway stretch. Tight chest muscles pull the shoulders forward, contributing to head protraction. Stretching them is essential for holistic posture correction.
Your Action Plan: Starting Today for a Stronger, More Confident You
Here are 6 simple moves I do every single day (seriously!) to feel stronger, steadier, and more confident in my body. They are:
- Seated Wall-Assisted Chin Tucks (10 reps) – For form mastery.
- Standing Resistance Band Chin Tucks (10 reps) – For strength.
- Quadruped Chin Tucks (10 reps) – For core-neck integration.
- Upper Trapezius Stretch (30 sec/side) – To release tension.
- Pectoral Doorway Stretch (30 sec/side) – To open the chest.
- Peanut Ball Release (1-2 min) – For suboccipital muscle relief.
Perform this sequence once or twice daily. It takes less than 5 minutes.
Conclusion: Your Neck Will Thank You
Mastering how to do chin tucks correctly is one of the most impactful, accessible things you can do for your long-term musculoskeletal health. It’s the antidote to our screen-saturated lives. Remember: Learn the right form and what to avoid when starting. Begin with the basic finger-cue method, prioritize perfect form over numbers, and be patient. The deep neck flexors are endurance muscles; they build strength slowly through consistent, low-load repetition.
Incorporate the progressions, balance your routine with stretching, and make the 10-second desk reset a non-negotiable habit. You are not just doing an exercise; you are re-programming your posture. The benefits—reduced pain, improved breathing, a taller appearance, and a stronger, more resilient neck—are well worth the few minutes of daily practice. Start now. Your future self, standing tall and pain-free, will thank you.