The Ultimate Guide: How To Sharpen An Axe Like A Pro
Ever stared at a dull, battered axe head after a day of chopping and wondered how to sharpen an axe properly? You’re not alone. The satisfying thwack of a sharp bit biting into wood is a primal feeling, but achieving it requires a keen edge. In our world of power tools, the simple, reliable sharpness of a well-maintained axe is a forgotten skill—a lost art with massive benefits for efficiency, safety, and pride in your work. Whether you’re a seasoned woodsman, a weekend gardener, or a beginner with your first hatchet, mastering axe sharpening is a fundamental skill that transforms labor into craft. This guide cuts through the noise, giving you a complete, actionable roadmap from a ragged edge to a razor-sharp finish, using simple tools and proven techniques.
We’ll explore six essential sharpening methods, from the classic file to modern power tools, dive deep into the step-by-step process with a file and stone, and unlock the secrets of seasonal maintenance that will make your axe last for generations. Forget the guesswork; this is your definitive manual for peak axe performance.
Why a Sharp Axe is Non-Negotiable: Efficiency, Safety, and Pride
Cutting quickly and efficiently with an axe requires a sharp edge. This isn’t just about making the job easier; it’s about fundamental physics. A sharp edge concentrates force into a tiny area, allowing the axe to split wood fibers instead of crushing them. A dull edge crushes, bounces, and requires exponentially more force, leading to exhaustion, inaccurate swings, and dangerous kickback. The sharper your axe, the easier, faster, and more pleasant it will be to do your work. You’ll accomplish more with less strain, and the clean, crisp sound of a perfect cut is immensely satisfying.
This wisdom is ancient. Loggers in the past knew that sharp edges made their work easier and more efficient, so they often sharpened their axes during breaks. They understood that a sharp tool was a safe and productive tool. Today, that principle holds firm. Sharpening an axe may seem outdated, but it has many benefits: it reduces physical fatigue, improves control, minimizes the risk of the axe glancing off the wood (a common cause of injury), and ensures your valuable tool performs at its peak. Being proactive about sharpening will prolong the life of your tools and improve performance during use. It’s an investment in your own capability and your equipment’s longevity.
The Six Essential Methods to Sharpen Your Axe
But thankfully, sharpening an axe (or a hatchet, for that matter) is a fairly simple process, and there are a number of methods you can choose by which to sharpen it. Your choice depends on your tools, budget, skill level, and how quickly you need a sharp edge. Here are the six primary methods, from traditional to modern:
- Using a File: The classic, portable, and controllable method. Ideal for routine touch-ups and major edge repair. You can quickly learn how to sharpen an axe using a file with a little practice. It’s quiet, requires no power, and gives you complete feel for the edge.
- Using a Whetstone (Water or Oil Stone): The traditional method for achieving a polished, razor-sharp edge. Slower than a file but produces a superior, keen edge perfect for fine work. An axe sharpening stone is a single sharpening tool that is used to sharpen an axe edge. It’s excellent for honing and maintaining an already sharp edge.
- Using a River Stone (Natural Stone): The original bushcraft method. A smooth, fine-grained river stone can work in a pinch, especially with some slurry (stone and water paste). It’s free and always available in the wild, though less consistent than manufactured stones.
- Using a Dremel (Rotary Tool): A fast, powerful option for rapid material removal. Find the perfect sharpening an axe with a dremel to enhance your next adventure, but caution is key. It’s easy to overheat and ruin the temper of the steel if you’re not careful. Best for experienced users or very dull edges.
- Using an Angle Grinder: The fastest method for restoring a severely damaged edge. Like the Dremel, it requires extreme care to avoid overheating. It’s a power tool solution for major rehabilitation, not fine sharpening.
- Using a Belt Sander: A professional-grade method that can produce a incredibly consistent and sharp edge. It’s the tool of choice for many commercial sharpeners. Discover how to sharpen an axe with expert tips and essential tools for peak performance, and a belt sander is a top-tier tool for that.
You can sharpen your axe at home if you have a grinder, a file, or a sharpening stone. For most people, starting with a file and an inexpensive sharpening stone is the perfect, cost-effective entry point that covers 95% of sharpening needs.
Your Essential Toolkit: Files, Stones, and Kits
The other tools you will need are a file and a sharpening stone—perhaps a couple of sharpening stones. Let’s break down what to look for.
Files:Most any file will work, but life is better if you buy an axe file made specifically for this job. Look for a single-cut file (one set of diagonal ridges) in a mill file or farrier’s rasp style. A 6-8 inch length is versatile. The bastard cut (medium coarseness) is a great all-around choice. Avoid double-cut (cross-hatched) files; they’re too aggressive and leave a rough edge.
Sharpening Stones: You have two main paths:
- A Single Stone: A medium grit (e.g., 800-1000)axe sharpening stone is perfect for general sharpening and touch-ups.
- A Comprehensive Kit:An axe sharpening kit contains multiple tools including sharpening stones, files, and honing oil. A kit with a coarse stone (for repairing nicks), a medium stone (for primary sharpening), and a fine stone (for honing/polishing) is ideal. Look for water stones (soaked before use) as they’re cleaner and faster than oil stones.
Other Necessities:
- Vise or Clamp:It can be done freehand, but it is much better if you clamp the axe head in a vise. This frees both hands, ensures consistency, and is safer.
- Honing Oil or Water: For lubricating the stone, carrying away metal filings (swarf), and preventing clogging.
- Rag: For cleaning the edge and wiping down the axe.
- Gloves & Safety Glasses: Always protect your hands and eyes.
Work sharp makes electric and manual knife sharpeners, belt sharpeners, and guided systems, which are excellent for consistent angles, but for a simple axe, a dedicated file and stone are more than sufficient and offer greater control.
Step-by-Step: Sharpening Your Axe with a File and Stone
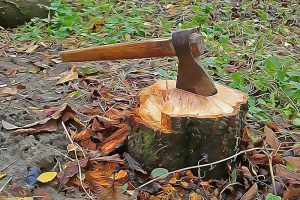
Let’s get practical. After removing some tree stumps with my axe, the edge is in really bad shape and needs sharpening. Here’s how to fix it, from a ragged edge to a shaving-sharp finish.
Step 1: Secure the Axe. Clamp the axe head firmly in a vise, with the bit (the cutting edge) pointing up and slightly toward you. Ensure the handle is protected from the vise jaws.
Step 2: Assess and Clean. Wipe the head clean. Examine the edge. Is it rolled over, nicked, or just dull? For a badly damaged edge, start with the file. For routine sharpening, you may start directly with the stone.
Step 3: The Filing Technique (For Major Repair).
- Angle is Everything: The typical factory bevel on an axe is between 25-30 degrees. You are essentially recreating this angle. A good trick: hold the file so it’s parallel to the ground; the angle you’re filing at is the angle of the bevel.
- Push, Don’t Pull: Apply firm, even pressure as you push the file away from you, cutting on the push stroke. Lift the file on the return pull to avoid dulling it.
- Full Strokes: Use the entire length of the file in smooth, consistent strokes. Start at the heel (near the handle) and push to the toe (the tip).
- Count Your Strokes: Do an equal number of strokes on each side of the edge (e.g., 5-10 per side). This keeps the bevel symmetrical. Work sharp techniques emphasize consistency.
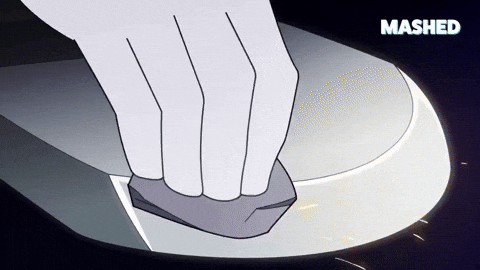
Step 4: The Honing Technique (With the Stone).
- Lubricate: Apply a few drops of honing oil or water to your medium-grit stone.
- The Motion: Place the stone on the bevel you filed. Using a circular or figure-8 motion, push the stone along the edge, maintaining that constant bevel angle. The goal is to remove the faint burr left by filing and create a fine, consistent edge.
- Feel for the Burr: After several strokes on one side, feel the opposite side with your thumb (carefully!). You’ll feel a small, raised edge of metal—the burr. Once you feel it consistently, flip the axe and repeat on the other side until the burr transfers.
- Progress to Fine: For a truly keen edge, repeat the process on your fine grit stone. This polishes the edge, removing the microscopic serrations from the medium stone and leaving a smooth, sharp edge.
Step 5: The Final Test & Cleanup. Wipe the edge clean. A properly sharpened axe should easily shave arm hair or cleanly slice a piece of paper held vertically. How to easily sharpen an axe comes down to this consistent angle and motion. Finally, wipe the entire head with a light coat of oil to prevent rust.
Need to sharpen your axe in a hurry? The file method is fastest. Skip the fine stone for now, get a functional edge with the file, and hone properly later.
Beyond Sharpening: The Complete Art of Axe Maintenance
It covers all the tools you need and tips for keeping your axe super sharp. Sharpening is only one part of the equation. When you want your axe to last, regular care and sharpening make all the difference.You’ll keep a reliable tool when you commit to seasonal maintenance.
Follow this simple post-use ritual:
- Clean: After each use, wipe down the entire head with a rag to remove dirt, sap, and moisture. Hitting a rock, dense wood, wet wood, or even dirt can dull the axe and promote rust.
- Dry: Ensure the head and the eye (where the handle sits) are completely dry. Any trapped moisture will cause the head to rust and the handle to degrade.
- Oil: Apply a thin coat of light machine oil, linseed oil, or even WD-40 to the metal head. This creates a protective barrier against rust. For the handle, especially if it’s wood, apply a coat of boiled linseed oil to prevent drying and cracking.
- Store:Store the axe somewhere dry and ventilated. Avoid damp basements or humid sheds. Hang it on a wall rack or store it with the head slightly elevated to prevent moisture pooling.
Is the nedfoss axe sharpener tool suitable for beginners? Many guided systems like Nedfoss or Work Sharp’s guided systems are excellent for beginners as they hold the correct angle for you. However, mastering the freehand file and stone technique gives you unparalleled control and is a deeply satisfying skill to develop.
Choosing the Right Axe: Hatchets, Midweights, and Mauls
Discover the ideal axe for splitting—compare hatchets, midweight axes, and heavy mauls to find the perfect match for your logs and strength. Your sharpening technique might vary slightly based on the tool.
- Hatchets/Tomahawks: Smaller, often with a shorter handle. Their edges are usually ground to a steeper angle (30-35°) for strength when used with a hammering motion. Sharpening requires maintaining that steeper bevel.
- Felling/Bit Axes: The classic all-purpose axe. Typically has a 25-28° bevel. This is the most common type discussed in this guide.
- Splitting Mauls: Have a much wider, heavier head and a much steeper wedge angle (often 35-40° or more). They are designed to split wood by force, not by a thin, sharp edge. You still sharpen the bit, but the primary function is the wedge shape. Over-sharpening a maul’s edge can actually make it less effective, as a slightly rounded edge helps it stay in the crack.
Find the perfect sharpening an axe with a dremel to enhance your next adventure, but remember: a Dremel is often overkill for a maul and best reserved for felling axes or hatchets needing rapid repair.
Frequently Asked Questions: Your Sharpening Doubts Addressed
How often should I sharpen my axe?
Sharpen it before it feels dull. A good habit is to give it a few strokes with a file or stone after every major use or at the start of every season. Proactive sharpening prevents you from having to do major repair work later.
How can I tell if my axe is truly sharp?
The classic tests: it should cleanly shave arm hair, and you should be able to slice a hanging piece of paper without tearing it. Visually, the edge should reflect no light—a dull edge will shine.
What’s the biggest mistake beginners make?
Using the wrong angle. Too shallow, and the edge will roll over or chip easily. Too steep, and it won’t cut well. Clamp the axe in a vise and practice finding that 25-30° sweet spot. Also, not maintaining a consistent angle along the entire length of the edge.
Can I use a knife sharpener?
For a small hatchet, possibly, but most knife sharpeners (especially pull-through types) are designed for a much thinner, more fragile edge and a different bevel angle. You’re better off with tools designed for the thicker steel and geometry of an axe.
What about rust?
Remove light rust with steel wool or a rust remover pad, then sharpen the affected area. For heavy pitting, you may need to grind it out, which removes material. Prevention with oil is always better.
Conclusion: The Enduring Power of a Sharp Edge
Journeymen and masters, add to the knowl. The knowledge of keeping a sharp edge is a timeless piece of practical wisdom. The ultimate guide to axe sharpening isn’t about a single secret trick; it’s about understanding the principles—the critical importance of angle, the value of consistent pressure, and the non-negotiable need for regular maintenance.
From the file and an inexpensive sharpening stone that can rescue a battered head, to the six methods that cater to every need and skill level, you now hold the blueprint. How to use a puck, sharpening technique (as seen in channels like Coalcracker Bushcraft) is just one of many resources, but the fundamentals remain universal.
Embrace the process. The rhythmic shink-shink of a file on steel is as meditative as it is productive. By committing to seasonal maintenance—the clean, dry, oil, store routine—you do more than just maintain an edge. You forge a reliable partnership with a tool that can last centuries. You honor the loggers of the past who knew that a sharp edge made their work easier and more efficient.
So, pick up that file. Clamp your axe. Find your angle. And feel the transformation as a dull, frustrating tool becomes an extension of your own strength and intention. A sharp axe is a safe axe, an efficient axe, and a joy to use. That’s a truth that never goes out of style.