How To Use A Spray Gun To Paint: The Ultimate Guide For Flawless Finishes
Have you ever stared at a paintbrush or roller, wondering if there’s a faster, smoother way to transform a surface? How to use a spray gun to paint is a question that opens the door to professional-quality results, whether you’re tackling a home renovation, refinishing furniture, or working on a automotive project. The promise of a flawless, even coat without brush strokes is incredibly appealing, but the process can seem daunting if you’ve never wielded this powerful tool. Fear not. This comprehensive guide is designed to take you from a curious beginner to a confident practitioner, demystifying every step from setup to cleanup. We’ll walk you through the ins and outs of selecting the right equipment, mastering technique, troubleshooting issues, and ensuring safety, so you can achieve stunning finishes on projects of any size.
Embarking on a painting project can be both exciting and daunting, especially if you’re unfamiliar with the nuances of using a paint spray gun. The learning curve might feel steep, but with structured guidance, the rewards are immense. In this detailed guide, we’ll walk you through the ins and outs of wielding this powerful tool, breaking down complex processes into manageable, actionable steps. So, this tutorial will walk you through everything you need to know: the parts of a gun, mixing paint for the gun, how to properly hold your gun while spraying, troubleshooting common problems, cleaning your gun, and, most critically, safety protocols. By the end, you’ll understand how spray guns can give you quick, smooth results that elevate your work from amateur to exceptional.
Understanding Spray Guns: The Heart of a Professional Finish
Before diving into technique, it’s essential to understand what a spray gun is and why it’s such a game-changer. At its core, a spray gun is a tool that atomizes liquid paint into a fine mist using compressed air or high-pressure fluid, allowing for an incredibly uniform coating. Unlike old conventional guns that blast paint at high pressure (50+ psi), an HVLP spray gun uses high volume and low pressure (under 10 psi) to gently shear paint into a fine mist. This fundamental difference makes HVLP (High Volume Low Pressure) systems the preferred choice for beginners and professionals alike because they drastically reduce overspray, waste less paint, and offer superior control.
The benefits of switching to a spray gun are compelling. Learn how spray guns can give you quick, smooth results that are nearly impossible to achieve with brushes or rollers. They excel at covering large, flat surfaces like walls and ceilings with speed and uniformity. Simultaneously, they provide the finesse needed for intricate work on furniture, cabinets, and automotive parts, getting into corners and crevices without brush marks. The finish is consistently smooth, free of roller texture or brush strokes, which is why they are the industry standard for high-end woodworking, automotive refinishing, and professional painting contracts. For the DIY enthusiast, this means a factory-like finish on your weekend projects.
Choosing the Right Spray Gun for Your Project
Learn how to use a paint sprayer for big and small jobs starts with selecting the appropriate tool. The market is flooded with options, from simple handheld aerosol cans to sophisticated professional rigs. Your choice hinges on three main factors: project scale, paint type, and budget.
- For Small to Medium DIY Projects (Furniture, Crafts, Small Rooms): A standalone HVLP spray gun that you can purchase as a kit is ideal. These are affordable, easy to set up, and perfect for water-based latex paints, enamels, and lacquers. They often come with a turbine or compressor.
- For Large Jobs (Exterior Walls, Whole House Interiors): Consider a paint sprayer system with a separate motor/pump unit and a handheld gun connected by a hose. If you’re using a large machine with a separate handheld spray gun connected to the machine via a hose, make sure the hose is long enough to reach the surface you’re painting. A hose that’s too short will force you to constantly move the heavy pump unit, creating fatigue and inconsistent coverage.
- For Automotive or High-Gloss Finishes: You may need a more professional-grade gravity-feed HVLP gun that offers precise control over atomization and pattern.
Read this guide for tips on choosing the right paint sprayer and how to get the best results. Don’t get swayed by color or flashy designs alone. Shop by color or use to fit your needs—meaning, prioritize the gun’s specifications (tip size, air consumption, fluid capacity) over its aesthetic. A gun with a 1.3mm to 1.7mm tip is versatile for most interior paints and stains. Always match the gun’s requirements to your compressor’s output (CFM and PSI) if using a separate compressor.
Preparation and Safety: The Non-Negotiable Foundation
Skipping preparation is the number one cause of spray gun disasters. A methodical setup saves time, money, and frustration.
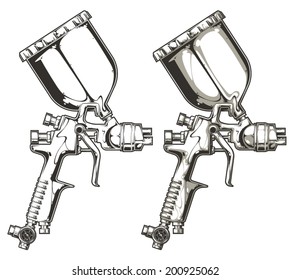
1. Familiarize Yourself with the Parts
A standard HVLP spray gun consists of:
- Fluid Needle & Nozzle (Tip): Controls paint flow and atomization. Size is critical for different paint viscosities.
- Air Cap: Directs air to shape the spray pattern (fan).
- Trigger: Controls both air and paint flow.
- Paint Cup: Holds the paint. Can be suction-feed (below gun) or gravity-feed (on top).
- Air Adjustment Valve: Fine-tunes air pressure.
- Fan Control (Pattern Adjustment): Adjusts the width of the spray pattern.
2. Mixing and Testing Paint Viscosity
Fill the HVLP paint spray gun container with your selected paint or finish, checking viscosity for best results. Paint that is too thick will clog the gun; too thin will cause runs and poor coverage. Use a viscosity cup (like a Ford or Zahn cup) to test. Dip the cup into the paint, time how long it takes to drain, and compare to the paint manufacturer’s recommendation for spray guns. Thin the paint with the appropriate reducer (mineral spirits for oil-based, water for latex) in small increments, stirring thoroughly. Always strain the paint through a fine-mesh filter to remove any lumps or debris that could block the tip.
3. Safety First: Gear and Environment
- Personal Protective Equipment (PPE): Always wear a NIOSH-approved respirator (not just a dust mask), safety goggles, and disposable coveralls. Paint mist is hazardous to inhale.
- Ventilation: Work in a well-ventilated area, preferably outdoors or in a dedicated spray booth with exhaust fans. Avoid enclosed spaces without airflow.
- Fire Hazard: Paint fumes are flammable. No smoking, open flames, or sparks near the work area. Ensure electrical tools are rated for hazardous locations.
- Surface Preparation: The surface must be impeccably clean, dry, sanded, and primed if necessary. Any dust, grease, or imperfections will be magnified by the spray.
Step-by-Step: Mastering the Spray Technique
This is where theory meets practice. Proper technique is everything.
1. Setup and Adjustment
- Connect the gun to your air source (compressor or turbine). Ensure the hose is secure.
- Adjust the controls for desired paint flow and spray pattern to match your project’s needs. Start with the air pressure set to the manufacturer’s recommendation (usually 15-25 PSI for HVLP). Adjust the fan control to a width slightly wider than your arm’s reach. Do a test spray on a piece of scrap cardboard or plywood. The pattern should be even, with no heavy centers (a "donut" pattern) or uneven edges.
2. How to Properly Hold Your Gun
How to properly hold your gun while spraying is a skill that separates novices from pros.
- Stance: Stand with your feet shoulder-width apart, facing the surface. Your body should move, not just your arm.
- Grip: Hold the gun firmly but not tensely. Your index finger should be on the trigger.
- Distance: Maintain a consistent 6-12 inches from the surface. Too close causes runs; too far causes dry spray and poor coverage.
- Angle: Keep the gun perpendicular (90 degrees) to the surface at all times. Tilting causes uneven buildup.
- Motion: Use your entire arm and body to make smooth, overlapping passes. The gun should be in motion before you pull the trigger and continue moving after you release it. This prevents paint buildup at the start and end of each pass.
- Overlap: Each pass should overlap the previous one by about 50%. This ensures complete, uniform coverage.
3. Spraying Different Surfaces
- Walls and Ceilings: Work in horizontal passes for walls, vertical for ceilings. Start at the top and work down to catch drips. Keep the gun moving at a steady, moderate speed.
- Furniture and Cabinets: These require more finesse. Spray the edges and details first, then the flat surfaces. Use a smaller fan pattern for intricate areas. From setup and safety to spraying walls and furniture, this beginner’s guide shows you how to achieve smooth, professional finishes with ease by maintaining consistency and overlap.
Troubleshooting: Fixing Common Spray Gun Problems
Even with perfect setup, issues can arise. Here’s a quick diagnostic guide:
- Orange Peel (Bumpy Texture): Caused by paint drying too fast before leveling. Solutions: Thin paint slightly, increase air pressure, reduce spray distance, ensure proper ambient temperature (not too hot/cold), and use a slower drying reducer.
- Runs and Sags: Paint is too thick, you’re holding the gun too close, or moving too slowly. Thin the paint, increase distance, and speed up your pass.
- Poor Coverage/Transparent Finish: Paint is too thin, or you’re not applying enough coats. Apply multiple thin coats rather than one thick coat.
- Spatter or Blistering: Often from moisture in the paint or substrate. Ensure everything is completely dry. Use a moisture meter for wood.
- Uneven Spray Pattern (Heavy Center): The air cap or fluid tip may be worn or clogged. Clean thoroughly. The air pressure may be too low. Increase pressure incrementally.
Cleaning and Maintenance: Protecting Your Investment
Cleaning your gun is not optional; it’s critical. Paint dries quickly and will ruin the internal components if left.
- Immediately after use, empty any leftover paint from the cup.
- Flush the gun with the appropriate solvent (water for latex, mineral spirits for oil-based) until it runs clear. Use a soft brush (like a toothbrush) to clean the exterior and air cap holes.
- For deep cleaning, disassemble the gun (refer to your manual). Soak parts in solvent, clean needles and orifices with soft wires or cleaning needles. Never use metal tools that can scratch.
- Reassemble carefully, lubricate O-rings with a tiny amount of gun oil, and store in a clean, dry case.
A Gun for Daily Life: Professional Insight and Efficiency
For professionals like Rodrigo, a high-quality spray gun isn’t just a tool; it’s an indispensable partner. A gun to be used in your daily life, bringing more economy, speed and agility to your work, guaranteeing a great result. The time saved on a large project—say, spraying the exterior of a home versus brushing—can be staggering, often cutting labor by 60-70%. The reduced paint waste (overspray) from an HVLP system also translates to direct cost savings. For a shop like Rodrigo’s in Miami specializing in high-end automotive finishes (like a Porsche restoration), the ability to lay down a flawless, mirror-like basecoat is what commands premium prices. The agility comes from the lightweight, ergonomic design of modern HVLP guns, reducing user fatigue during long jobs.
Professional Spotlight: Rodrigo's Toolkit
| Detail | Information |
|---|---|
| Name | Rodrigo |
| Location | Miami, Florida |
| Specialty | Automotive Custom Paint & Restoration |
| Favorite Spray Gun | WPTools HVLP Pro Series (Gravity Feed) |
| Key Benefit | "Precision control for metallic and pearl finishes. The low overspray saves me thousands in material costs yearly." |
| Social Media | @rodrigo_paint_car (TikTok/Instagram) |
Rodrigo emphasizes that the right tool, paired with disciplined technique, is what creates viral-worthy results. #spraygun #wtptools #miami #rells #rodrigo_paint_car #viral #fypシ゚viral #tiktokviral #rells #red #porsche – these hashtags reflect a community where sharing techniques and showcasing flawless finishes drives trends.
Bonus: The Virtual World – Using Spray Paint Codes in Roblox
While our primary focus is physical painting, the concept of "spray paint" has a vibrant digital counterpart. Before you can use spray paint codes, you'll first need to purchase the spray paint item from Roblox's avatar shop for 350 Robux. This is a cosmetic item that allows you to apply decals (images) in supported Roblox experiences.
After doing this, enter any experience that has spray paint compatibility enabled, equip the spray paint can from your inventory, enter one of the codes below in the decal ID box, and click where you'd like to spray! These "codes" are actually Decal IDs—unique numbers that correspond to images uploaded to Roblox. You can find popular Decal IDs on community websites. This digital spray can is a fun way to customize your avatar or environment in-game, operating on a similar principle of "spraying" an image, but with no physical mess or safety concerns.
Final Tips and Shopping Guide
As you prepare to buy, remember:
- Shop by color or use to fit your needs. Consider the primary color of paint you’ll use most and buy a gun that’s easy to clean for that type (e.g., stainless steel fluid passages for water-based paints).
- For online purchases, Enjoy free US shipping on orders over $85 from many reputable tool suppliers.
- Shop the best selection today! Look for brands with good customer support and availability of replacement parts (nozzles, needles, air caps).
Conclusion: Your Journey to Mastery Starts Now
How to use a spray gun to paint is a journey of blending knowledge, practice, and patience. We’ve covered the spectrum: from understanding the high-volume, low-pressure magic of HVLP systems to the meticulous dance of holding the gun, from mixing the perfect viscosity to the sacred ritual of cleaning. Remember, the first few projects might not be perfect, and that’s okay. Troubleshooting is part of the learning process. Embrace the safety protocols—they protect you and your work. Whether you’re refreshing a childhood dresser, painting a room, or dreaming of a car restoration, the spray gun is your key to a smooth, professional finish. Equip yourself with the right tool, prepare thoroughly, practice your technique on scrap materials, and you’ll join the ranks of creators who achieve stunning results with economy and speed. Now, go pick up that gun and start spraying your vision onto reality.