Map Sensor Symptoms: The Complete Guide To Diagnosis, Testing & Replacement Costs
Is your car feeling sluggish, gulping gas like there's no tomorrow, and flashing a mysterious check engine light? You might be staring down a failing Manifold Absolute Pressure (MAP) sensor—a tiny but critical component that can cause big headaches. Understanding map sensor symptoms isn't just for professional mechanics; it's essential knowledge for any vehicle owner wanting to save money, prevent breakdowns, and keep their engine running smoothly. This comprehensive guide will walk you through every telltale sign, explain exactly how the sensor works, teach you how to test it yourself, and break down realistic replacement costs. By the end, you'll be equipped to diagnose, confirm, and address a faulty MAP sensor with confidence.
What Exactly is a MAP Sensor and Why Does It Matter?
Before diving into symptoms, it's crucial to understand the sensor's job. The Manifold Absolute Pressure (MAP) sensor is a key component of your vehicle's electronic management system. Its primary function is to monitor the air pressure inside the engine's intake manifold and send this real-time data to the Engine Control Module (ECM) or Engine Control Unit (ECU).
The ECU uses this pressure data, combined with engine speed (RPM) and air temperature, to calculate the optimal amount of fuel to inject into the combustion chambers. This process is fundamental for maintaining the correct air-fuel ratio. A precise ratio ensures efficient combustion, which translates to smooth performance, optimal fuel economy, and minimal emissions. In essence, the MAP sensor is the ECU's "pressure gauge" for the engine's breathing, making it indispensable for modern engine operation.
The 7 Most Common & Unmistakable Map Sensor Symptoms
When a MAP sensor begins to fail or provides inaccurate data, the ECU's calculations go awry. This leads to a cascade of performance issues. Recognizing these signs of a failing map sensor is the first and most critical step in diagnosis.
1. The Illuminated Check Engine Light
This is often the first and most universal red flag. A faulty map sensor will typically trigger the check engine light. The ECU constantly monitors sensor data for values that fall outside its programmed parameters. If the MAP sensor's voltage signal is too high, too low, or erratic, the ECU logs a specific trouble code (commonly P0106, P0107, P0108, or P0109) and illuminates the warning light on your dashboard. Never ignore this light; it's your car's primary communication tool for electronic faults.
2. Poor Fuel Economy (Decreased Gas Mileage)
This is one of the most noticeable and costly symptoms. A malfunctioning MAP sensor often causes the engine to run "rich"—meaning it injects more fuel than necessary for the given operating conditions. You might find yourself filling up the tank far more frequently. A decrease in gas mileage of 10-20% or more is common. This happens because the ECU, receiving incorrect pressure data (e.g., thinking the manifold pressure is lower than it is), adds extra fuel to "compensate," leading to incomplete combustion and wasted gasoline.
3. Rough or Erratic Idling
The map sensor helps the ECU maintain a consistent and smooth idle speed. With bad data, the ECU cannot properly adjust fuel delivery at a standstill. The result is an engine that feels shaky, vibrates excessively, or has a RPM that fluctuates up and down (hunting). You might feel the vibrations through the steering wheel and seat. In severe cases, the engine may even stall at idle.
4. Engine Misfires and Stalling
This symptom escalates from rough idle. Misfiring occurs when the air-fuel mixture in one or more cylinders is so off that the spark plug fails to ignite it properly. You'll hear a popping or coughing sound from the exhaust and feel a distinct jerk or loss of power. A severely misfiring engine can overheat and damage the catalytic converter. Stalling—where the engine suddenly shuts off—is another dangerous possibility, especially when coming to a stop or at idle, and is directly linked to the sensor's failure to manage air intake data.
5. Reduced Acceleration and "Lazy" Throttle Response**
Your car should respond promptly when you press the gas pedal. With a bad MAP sensor, you'll notice a significant lack of power, especially during acceleration from a stop or when trying to pass on the highway. The engine feels "flat" or "weak." This is because the ECU is working with incorrect manifold pressure data, leading to improper fuel metering during load changes, causing a hesitation or complete lack of power.
6. Excessive Exhaust Smoke and Emissions
An overly rich fuel mixture doesn't burn completely. This unburned fuel exits the engine as visible black or dark gray smoke from the tailpipe. You may also notice a strong smell of unburned gasoline. This not only pollutes the environment but can also foul spark plugs and damage the expensive catalytic converter over time.
7. Poor Engine Performance at Altitude or Under Load
The MAP sensor's job is most critical when engine load changes—like climbing a hill, towing a trailer, or driving at high altitudes where air pressure is lower. A failing sensor cannot accurately report these pressure changes, leading to pronounced sputtering, bucking, or a severe loss of power under these specific conditions. This is a classic and highly indicative symptom.
How a MAP Sensor Works: The Science Behind the Signal
To understand failure, you must understand function. The MAP sensor is essentially a pressure transducer. It contains a delicate membrane and a reference vacuum chamber. As manifold pressure changes (lower pressure during acceleration/high load, higher pressure during deceleration/closed throttle), the membrane flexes. This flexing changes the sensor's internal resistance, which in turn changes the output voltage signal sent to the ECU.
- At ignition on, engine off (key on, engine off - KOEO), manifold pressure equals atmospheric pressure. The MAP sensor should read a baseline voltage (typically 0.5 to 1.5 volts, depending on the vehicle).
- At idle, manifold pressure is relatively high (low vacuum), so voltage is lower (e.g., ~0.9V).
- Under full throttle/load, manifold pressure drops significantly (high vacuum), so voltage rises (e.g., ~1.9V or up to 5V in some 5V reference systems).
The ECU expects this voltage to change smoothly and predictably with engine load and RPM. Any deviation, noise, or lack of change indicates a problem.
Why Do MAP Sensors Fail? Common Causes of Failure
Understanding failure modes helps in prevention and diagnosis.
- Extreme Heat Exposure: This is a leading cause. The sensor is mounted on or near the intake manifold, one of the hottest parts of the engine bay. Chronic exposure to excessive heat (from an overheating engine, aggressive tuning, or a failing exhaust manifold) can damage the sensor's internal electronics and membrane.
- Contamination: The sensor's port can become clogged with carbon deposits, oil vapor (from a faulty PCV valve), or engine debris. This prevents the sensor from "seeing" the true manifold pressure, leading to sluggish or stuck readings.
- Electrical Issues: Corroded connectors, damaged wiring harnesses (from heat or chafing), or poor grounds can interrupt or corrupt the signal.
- Vacuum Leaks: A large vacuum leak (e.g., a cracked hose) allows extra, unmetered air into the manifold. This changes the pressure environment the sensor measures, making its readings inaccurate for the actual air mass entering the engine, creating a "rich" condition.
- Age and Wear: Like all electronic components, MAP sensors have a lifespan. The internal components can simply wear out over many years and miles (often 100,000+ miles).
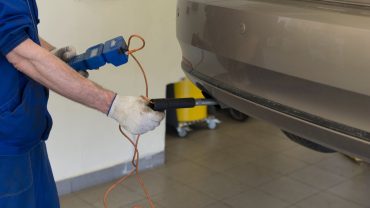
How to Professionally Test & Diagnose a Bad MAP Sensor
Diagnosis follows a logical path: scan for codes, perform visual checks, and then test the sensor's output. As noted in the key sentences, testing a map sensor is much simpler than many drivers expect.
Step 1: Scan for Trouble Codes
Always start here. Use an OBD-II scanner to read the ECU's memory. Look for codes in the P0100-P0109 range. The specific code (e.g., P0106 for "MAP Sensor Performance") gives a starting point. Note if the code is "pending" or "confirmed."
Step 2: Visual and Physical Inspection
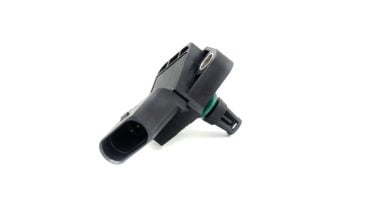
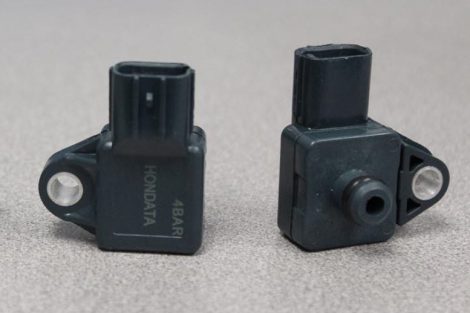
- Locate the Sensor: The MAP sensor is usually found on or near the intake manifold. Consult a vehicle-specific repair manual. It's a small, usually black or silver, electronic component with a vacuum hose attached and an electrical connector.
- Check the Hose: Inspect the vacuum hose for cracks, splits, or disconnections. A leaky hose will cause symptoms identical to a bad sensor.
- Inspect Connector & Wiring: Look for corrosion, bent pins, or frayed wires at the connector. Ensure it's clicked in securely.
- Check for Contamination: Carefully remove the sensor (if accessible) and look into its port. If you see heavy carbon or oil sludge, it needs cleaning.
Step 3: Live Data Testing with a Scan Tool (The Gold Standard)
This is the most effective method. With the engine running, use a professional-grade or advanced DIY scan tool to view the MAP sensor's live data stream (often labeled "Manifold Absolute Pressure" in kPa or "MAP Sensor" in volts).
- Key On, Engine Off (KOEO): Compare the reading to the known atmospheric pressure for your location (check a weather app). The sensor should read within 1-2 kPa of the barometric pressure. Voltage should be in the low range (e.g., 0.5-1.5V).
- At Idle: The voltage should be steady (e.g., 0.9V) and the pressure reading should be relatively high (e.g., 25-35 kPa, depending on engine).
- During a Throttle "Snap": Have an assistant quickly press and release the throttle while you watch the data. The voltage should rise smoothly and quickly as throttle opens (pressure drops) and fall smoothly as throttle closes (pressure rises). Any lag, sticking, or erratic movement points to a faulty sensor.
Step 4: Manual Voltage Test with a Multimeter
If you don't have a scan tool, you can perform a basic voltage check.
- Locate the MAP sensor's signal wire (using a wiring diagram).
- Back-probe the connector or use a pin to access the signal wire.
- Set your multimeter to DC volts.
- Connect the black lead to a good engine ground.
- With the ignition ON (engine off), check reference voltage from the ECU (usually 5V) at the sensor connector.
- Then, check the signal voltage with the engine running at idle. It should be steady in the expected range (e.g., 0.9V).
- Perform the throttle "snap" test again, watching for smooth voltage changes. Erratic or stuck voltage confirms a bad sensor.
Step 5: Vacuum Test (Advanced)
Using a hand-held vacuum pump, you can apply controlled vacuum to the MAP sensor's port (with the sensor removed) and watch the voltage change on a multimeter. Voltage should increase smoothly as vacuum increases. This isolates the sensor from engine variables.
MAP Sensor vs. MAF Sensor: Critical Differences Explained
The key sentences mention a "deep dive into MAF sensors." It's vital to distinguish these two, as they are often confused.
- MAP Sensor: Measures pressureinside the intake manifold. It's an indirect air mass measurement system. The ECU uses MAP data + RPM + air temp (from IAT sensor) to calculate air mass. It's robust and used in many applications, especially with forced induction (turbo/superchargers).
- MAF Sensor: Measures the mass of airentering the engine directly, using a heated element or film. It's a direct measurement. It's typically located in the intake tube before the throttle body.
Some vehicles use both (a MAF for primary metering and a MAP for altitude/boost compensation and to verify MAF operation). Symptoms of a bad MAF are very similar to a bad MAP (poor fuel economy, rough idle, lack of power) because both provide critical air data to the ECU. Diagnosis requires distinguishing which sensor is at fault via scan data and specific tests.
Map Sensor Replacement Cost: What to Expect
If testing confirms a faulty sensor, replacement is the fix. The cost to replace a map sensor varies widely.
- Part Cost: The sensor itself typically ranges from $30 to $200+ for an OEM (Original Equipment Manufacturer) part. Aftermarket parts are often cheaper ($20-$100) but quality varies.
- Labor Cost: This is where the price swings. Since the sensor is usually accessible on the intake manifold, labor is often straightforward. Expect 0.5 to 1.5 hours of labor. At a shop rate of $80-$150/hour, labor can be $40 to $225.
- Total Estimated Cost: For most vehicles, the total replacement cost (parts + labor) at a repair shop will be between $150 and $450. Luxury or difficult-to-access models can exceed $600. DIY replacement can save you the labor cost, making it a very affordable fix if you're comfortable with basic tools and following a repair guide.
Important: Always clear the stored trouble codes after replacement and take the vehicle for a test drive to ensure the check engine light stays off and performance is restored.
Safety First & Pro Tips for DIYers
If you attempt to clean or test a map sensor yourself, remember:
- Use Sensor-Safe Cleaner: Only use electrical contact cleaner or MAF/MAP sensor-specific cleaner. Never use carburetor cleaner or brake clean—they can damage the sensor's delicate elements.
- Handle with Care: The sensor is an electronic component. Avoid dropping it or touching the sensing element.
- Don't Over-Tighten: When reinstalling, hand-tighten the bolt first, then give it a final snug turn with a wrench. Over-tightening can crack the sensor housing.
- Check Related Parts: Replace a clogged PCV valve or fix vacuum leaks at the same time as the MAP sensor. A new sensor will fail quickly if fed dirty air or a leaking system.
- When in Doubt, Scan: Even if you suspect the MAP sensor, a professional scan during a test drive provides the most definitive data. Many auto parts stores offer free code scanning.
Conclusion: Don't Ignore the Signs
A failing MAP sensor might seem like a small problem, but its symptoms—poor fuel economy, rough idle, misfires, and a check engine light—are your engine's cry for help. Left unchecked, it can lead to catastrophic damage to your catalytic converter, spark plugs, and overall engine health due to prolonged rich-running conditions. By understanding the signs of a failing map sensor, performing systematic diagnostics (starting with a code scan and live data), and knowing the realistic cost to replace a map sensor, you empower yourself to make informed decisions. Whether you choose the DIY route for a simple sensor swap or consult a trusted professional, addressing this issue promptly will restore your vehicle's performance, efficiency, and reliability. Keep your engine breathing correctly—your wallet and your peace of mind will thank you.
{{meta_keyword}}
map sensor symptoms, bad map sensor signs, test map sensor, replace map sensor cost, map sensor vs maf sensor, manifold absolute pressure sensor, check engine light, poor fuel economy, engine misfire, rough idle, how to diagnose map sensor, map sensor location, map sensor testing, map sensor replacement, car sensor problems, obd2 codes p0106, automotive diagnostics, diy car repair, engine performance, fuel efficiency