The Ultimate Vertical Monitor Setup Guide: Boost Productivity For Coding, Design & Multitasking
Are you tired of endless scrolling and a cramped screen that leaves you feeling drained by the end of the day? What if a simple adjustment to your workspace could transform your workflow, reduce physical strain, and unlock a new level of efficiency? The answer might be staring you right in the face—or rather, to the side. Vertical monitor setup is no longer a niche preference for programmers; it's a powerful ergonomic and productivity tool for anyone who works with text, code, or long documents. This comprehensive guide will walk you through every step, from the "why" to the "how," for both Windows and Mac users. We'll explore the transformative advantages, provide foolproof setup instructions, and recommend the best vertical monitors tailored for coding, design, and seamless multitasking.
Why Go Vertical? The Transformative Advantages of a Portrait Display
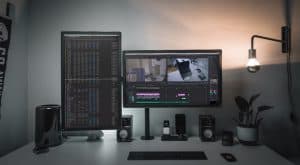
Before we dive into the mechanics of a vertical monitor setup, it's essential to understand why making the switch can be a game-changer. The traditional landscape orientation (wider than it is tall) mimics a movie screen, which is great for entertainment but often inefficient for productivity. A portrait-oriented monitor (taller than it is wide) aligns with the natural reading pattern of documents, code, and webpages, which are predominantly vertical.
For coders and developers, a vertical monitor displays more lines of code on a single screen. This means less scrolling, better context retention, and the ability to see more of your function or class structure at a glance. You can have your code editor on the main vertical screen and your browser, documentation, or terminal on a secondary landscape monitor, creating a perfectly balanced dual-monitor setup.
Designers and content creators benefit immensely when reviewing long webpages, multi-page PDFs, or vertical social media graphics (like Instagram Stories or Pinterest pins). A single glance shows the full composition without constant zooming in and out. For writers, editors, and researchers, the reduction in vertical scrolling is profound. Studies on ergonomic productivity suggest that minimizing unnecessary scrolling and head movement can reduce cognitive load and physical fatigue, leading to longer, more focused work sessions.
Ultimately, a proper vertical monitor setup improves comfort by promoting a more neutral neck position. Instead of constantly tilting your head down or craning your neck to look at a low landscape screen, a portrait monitor allows for a more direct, straight-ahead gaze when paired with a properly adjusted monitor arm. This ergonomic viewing is crucial for preventing tech neck and long-term musculoskeletal issues.
How to Set Up a Vertical Monitor on Windows: A Step-by-Step Guide
Setting up your monitor in portrait mode on a Windows PC is surprisingly straightforward. The operating system has robust built-in display controls. Setting up your vertical monitor properly is crucial for productivity, and getting the software settings right is half the battle.
Navigating to the Display Settings
Your first step is to access the display configuration menu. You can do this in two primary ways:
- Right-click on any empty space on your desktop and select "Display settings" from the context menu.
- Click the Start Menu and type "Display settings" until the option appears, then select it.
Once in the Display settings page, you'll see a graphical representation of your connected monitors. If you have multiple displays, ensure you have selected the correct monitor thumbnail that you wish to rotate. You can click on it to select it; it will be highlighted.
The Critical Step: Changing Display Orientation
This is the core of the vertical monitor setup. Scroll down to the "Scale & layout" section. Here, you'll find a dropdown menu labeled "Display orientation." This is the control that dictates whether your screen renders in landscape or portrait mode.
- Landscape: The standard wide format.
- Portrait: The vertical format, rotating the display 90 degrees clockwise.
- Portrait (flipped): Rotates the display 90 degrees counter-clockwise.
Click the dropdown and select "Portrait." Your screen should immediately rotate. You may get a brief countdown warning asking you to confirm the change; click "Keep changes" if the orientation looks correct. If you select the wrong one, just wait for the timeout or use the keyboard shortcut Ctrl+Alt+Arrow keys to revert.
Fine-Tuning for the Perfect Vertical Experience
After rotation, your screen resolution might look odd, or elements may appear too large or too small. This is normal. You need to adjust the scale (the size of text, apps, and other items) and the resolution.
- Under the same "Scale & layout" section, use the "Scale" dropdown. For most modern monitors, 100% (Recommended) is ideal in portrait mode, but you may need to experiment with 125% or 150% if text appears too small.
- Use the "Display resolution" dropdown. Select the native (recommended) resolution for your specific monitor model. Using a non-native resolution can cause blurriness. For a typical 24-inch 1080p monitor, this will likely be
1920 x 1080in portrait mode (note the swapped values from landscape1080 x 1920).
Pro Tip: If you are using a dual monitor setup with one landscape and one portrait screen, you must also adjust the physical arrangement of the monitor icons in the Display settings. Click and drag the monitor rectangles to match how your monitors are positioned on your desk. This ensures your mouse moves seamlessly between screens in the correct physical direction.
How to Set Up a Vertical Monitor on macOS: Simple and Intuitive
For Mac users, the process is equally simple and integrated into the System Settings (formerly System Preferences). Apple's approach is clean and user-friendly.
- Open System Settings from the Apple menu () or your Applications folder.
- Click on "Displays" in the sidebar.
- You will see a preview of your connected displays. Select the display you want to rotate.
- Look for the "Rotation" dropdown menu. It will likely be set to "Standard" (landscape).
- Click the dropdown and choose "90°" for a standard portrait orientation (home button/glow on the right if it's an iPad-style screen) or "270°" for the opposite orientation. The change should apply instantly.
- If your screen appears rotated incorrectly (e.g., upside down), simply select the other portrait option.
Like on Windows, you may need to adjust your scaling (found under "Displays" as "Resolution" with "Default for display" or "Scaled" selected). For crispest text on a Retina or high-PPI display, using the "Default for display" option is usually best. If you find UI elements too small, choose a "Scaled" option with a higher scaling factor.
Important Note for MacBook Users: If you are using your MacBook's built-in screen in landscape and an external monitor in portrait, macOS handles this mixed-orientation setup very well. Your mouse will move between screens correctly as long as you arrange the display icons in the "Displays" settings to reflect their physical placement.
Top Vertical Monitor Recommendations: Finding Your Perfect Fit
Not all monitors are created equal for portrait use. The best vertical monitors share key characteristics: a stand that easily pivots to portrait mode (often called a "pivot" or "height-adjustable" stand), a high resolution for sharp text, and an IPS or OLED panel for excellent viewing angles—crucial when the screen is tall and you might look at it from slightly different angles.
- For Coding & Development: Look for a 27-inch 1440p (QHD) monitor. This size/resolution combo offers a fantastic balance of screen real estate and pixel density. The Dell UltraSharp U2723QE is a standout with its excellent IPS Black panel, USB-C hub with 90W charging, and flawless pivot function. The LG 27QN880-B is a superb budget-friendly alternative with a sleek design and reliable performance.
- For Design & Creative Work: Color accuracy is paramount. Consider a 4K UHD monitor like the Dell UltraSharp U3223QE. Its 31.5-inch screen in portrait mode provides an immense canvas for timelines, long documents, and detailed vector work, all with factory-calibrated colors. The BenQ PD3420Q (34-inch ultrawide) can also be used in a "tall" mode by rotating it, offering a unique 3440x1440 resolution in portrait.
- For Budget & Multitasking: You don't need to break the bank. A 24-inch 1080p monitor with a pivot stand is a perfect entry point. The HP V24i or Acer SB242Y EBI are reliable, affordable options that get the job done. For those wanting more screen without the cost, a 29-inch ultrawide 1080p (like the LG 29WN600-W) rotated into "tall" mode gives you a very long, narrow screen ideal for documents and chat windows alongside your main work.
When shopping, always double-check the product specifications for the word "pivot" or "portrait rotation." Some cheaper monitors have stands that only tilt and swivel but cannot rotate 90 degrees. In those cases, you would need to purchase a separate monitor arm (like those from Ergotron, Humanscale, or AmazonBasics) that provides full motion, including pivot, which is often a better long-term ergonomic investment anyway.
Troubleshooting Common Vertical Monitor Setup Issues
Even with clear instructions, you might encounter a hiccup. Here’s how to solve the most common problems:
- "My text is blurry after rotating!" This almost always means you are not using the monitor's native resolution. Go back to your display settings and select the resolution marked as "(Recommended)."
- "My mouse doesn't move correctly between my landscape and portrait monitors." This is a physical arrangement issue. In your OS's display settings (Windows Display settings or macOS Displays), you will see boxes representing each monitor. Click and drag these boxes so their relative positions match how your monitors sit on your desk. The edge where they touch should be where your mouse travels.
- "My monitor won't rotate; the option is grayed out or missing." First, ensure your graphics driver is up to date. Download the latest driver from NVIDIA, AMD, or Intel's website. Second, and most importantly, your physical monitor must be rotated manually first. The software setting only tells the OS how to draw the image; you must physically turn the screen 90 degrees on its stand or arm. The stand must support this rotation.
- "Apps and windows are all messed up after rotation." This is common with applications that don't handle resolution changes well. Most modern apps (Chrome, VS Code, Office) adapt fine. For problematic apps, you may need to adjust their individual scaling settings or, as a last resort, use the compatibility settings in Windows to override DPI scaling.
Elevating Your Setup: Ergonomic and Practical Tips
A vertical monitor setup is more than just rotating a screen. To truly improve comfort and productivity, consider these enhancements:
- Invest in a Quality Monitor Arm: This is the single best upgrade you can make. A good arm (like the Ergotron LX Desk Mount or Huanuo Monitor Arm) provides effortless height, tilt, swivel, and pivot adjustment. It frees up desk space and allows you to position the vertical monitor at the perfect height and distance, with the top of the screen at or slightly below eye level.
- Mind Your Keyboard and Mouse Position: With a vertical monitor centered in front of you, your keyboard and mouse should be directly in front as well, at elbow height. If you are using a dual-monitor setup with the vertical screen as primary, you may need to center your input devices on that screen and accept a slight turn of your head to the secondary landscape screen, or vice-versa.
- Use Window Management Software: Tools like PowerToys FancyZones (Windows) or Rectangle (macOS) allow you to quickly snap windows into predefined grid zones on your vertical screen. This is invaluable for dividing your tall screen into two or three vertical columns for code, notes, and a browser.
- Adjust Your Workflow: Think in vertical columns. Place your primary tool (IDE, document, design canvas) in the center column. Put reference materials, communication apps (Slack, Teams), or file explorers in the left or right columns. This reduces the need to switch tabs or windows constantly.
Conclusion: Your Vertical Future Starts Now
Setting up your vertical monitor properly is crucial for productivity, and as this guide has shown, the process is accessible to everyone, whether you're on Windows or Mac. The journey from a cramped, scrolling nightmare to an ergonomic, information-rich command center is just a few clicks and a physical pivot away. The benefits—reduced neck strain, dramatically less scrolling, and a vastly expanded view of your work—are immediate and tangible for coders, designers, writers, and multitaskers alike.
Follow easy steps to set up a vertical monitor for improved productivity and ergonomic viewing. Start by assessing your current monitor's capabilities, update your display drivers, and navigate to the orientation settings. Don't be afraid to experiment with scaling and resolution to find your sweet spot. And seriously consider a monitor arm; it's the cornerstone of a healthy, flexible workspace.
This guide has shown you how to set up a vertical monitor, provided essential setup tips, detailed the transformative advantages, and offered top monitor recommendations for an optimal vertical monitors setup. The next step is yours. Rotate that screen, reclaim your vertical space, and experience the tangible difference a thoughtfully configured workspace can make. Your neck, your eyes, and your to-do list will thank you.