The Ultimate Sugar Wax Recipe: Your Guide To Gentle, At-Home Hair Removal
Tired of pricey salon appointments or nicking your skin with razors? What if you could achieve weeks of smooth, hair-free skin using nothing more than three simple ingredients from your kitchen? The ancient art of sugaring is making a massive comeback, and for good reason. This natural hair removal method is not only incredibly effective but also gentler than traditional waxing, making it perfect for sensitive skin. In this comprehensive guide, we’re diving deep into everything you need to know about the sugar wax recipe. From the exact science behind the sticky paste to step-by-step application techniques and expert aftercare, we’ve rounded up all the essential knowledge to help you master DIY sugaring at home. Get ready to say goodbye to expensive treatments and hello to irresistibly smooth skin.
What is Sugaring? The Ancient Secret to Modern Smoothness
Sugaring is a natural hair removal technique with roots stretching back to ancient Egypt, where it was the primary method for achieving hair-free skin. Unlike traditional hot wax, which adheres to both hair and skin, sugaring paste is water-based and only binds to the hair shaft. This fundamental difference is why it’s celebrated as a gentler alternative to traditional waxing. The paste is applied at room temperature or slightly warm, in the opposite direction of hair growth, and then flicked off in the direction of growth. This technique minimizes tug on the skin, reduces breakage, and often results in less pain and fewer ingrown hairs.
The modern resurgence of sugaring is largely fueled by social media, with viral TikTok videos from creators like @thrivewithcandice and @inaris_shoes showcasing its simplicity and effectiveness. hashtags like #sugarwax, #homemadesugarwax, and #naturalhairremoval have amassed millions of views, proving that this DIY beauty trend is here to stay. It aligns perfectly with the growing demand for natural ingredients, cost-effective self-care routines, and sensitive skin-friendly solutions.
Sugaring vs. Traditional Waxing: A Clear Winner for Gentle Hair Removal
Understanding the key differences between sugaring and traditional waxing is crucial for appreciating its benefits:
| Feature | Sugaring (Sugar Wax) | Traditional Waxing |
|---|---|---|
| Adhesion | Binds primarily to hair, not skin | Binds to both hair and skin |
| Temperature | Applied lukewarm or at room temp | Applied hot, risk of burns |
| Direction | Applied against growth, removed with growth | Applied with growth, removed against growth |
| Ingredients | Sugar, lemon juice, water (natural) | Resins, chemicals, fragrances (often synthetic) |
| Pain Level | Generally less painful | Often more painful due to skin adhesion |
| Cleanup | Washes off easily with water | Requires oil or special remover |
| Ingrown Hairs | Lower incidence due to exfoliating nature | Higher incidence, especially on sensitive skin |
This table highlights why sugar waxing is a natural and gentle hair removal method that can be done at home with confidence. The natural ingredients ensure soft skin without harsh chemicals, making it ideal for the bikini line, underarms, and even the face (with a finer recipe).
The Holy Trinity: Your 3-Ingredient Sugar Wax Recipe
At the heart of this entire process are three simple, pantry-staple ingredients. This is the core of how to make sugar wax at home using only 3 basic ingredients. The magic lies in their chemical interaction.
- Sugar (Granulated White Sugar): The primary binding agent. When heated, sugar undergoes a process that creates a sticky, pliable paste. The ratio of sugar to liquid determines the final consistency—from a soft paste for facial hair to a firmer ball for body hair.
- Lemon Juice (Fresh or Bottled): This is the key to the formula. The citric acid in lemon juice breaks down the sugar molecules slightly, preventing crystallization and creating a smooth, elastic texture. It also has natural antiseptic properties.
- Water: The solvent that dissolves the sugar and lemon juice, allowing for precise control over the paste's hardness. The amount of water used is the main variable for adjusting consistency based on humidity and desired application method.
Why These Three? The Science of Simple Ingredients
- Sugar acts as a natural humectant, drawing moisture into the skin, which can leave the treated area feeling softer.
- Lemon juice provides mild exfoliation and its acidity helps to create a pH environment that is less hospitable to bacteria, reducing the risk of post-waxing bumps.
- Water ensures the mixture is non-toxic, hypoallergenic, and rinses cleanly from the skin and fabrics.
This combination creates a safe & effective DIY sugaring wax that is free from parabens, fragrances, and resins found in many commercial products. For anyone with sensitive skin or allergies, this homemade sugar wax recipe is a revelation.
Step-by-Step: How to Make DIY Sugar Wax at Home
Follow this easy sugar wax recipe tutorial for natural hair removal. The process is straightforward but requires attention to detail for the perfect consistency.
Equipment You'll Need:
- Medium saucepan (avoid non-stick if possible)
- Wooden spoon or silicone spatula
- Candy or digital thermometer (highly recommended for beginners)
- Glass jar or heatproof container for storage
- Cloth strips (muslin or cotton) OR use the "no-strip" method for best results
The Classic Sugar Wax Recipe (Firm Ball Consistency for Body)
This recipe yields a paste that can be used with or without strips and is perfect for legs, arms, and the bikini line.
Ingredients:
- 1 cup (200g) granulated white sugar
- ¼ cup (60ml) fresh lemon juice (about 1 large lemon)
- ¼ cup (60ml) water
Instructions:
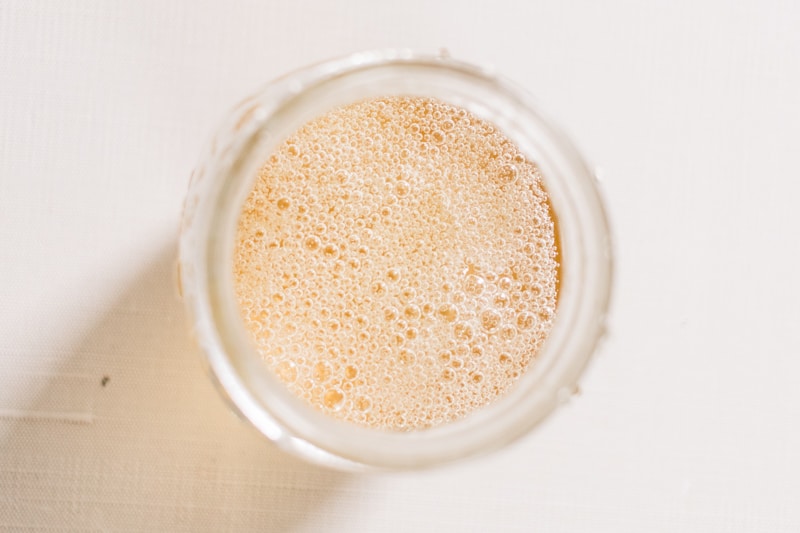
- Combine & Heat: In your saucepan, combine the sugar, lemon juice, and water. Stir over medium heat until the sugar is completely dissolved. Once dissolved, stop stirring.
- Bring to a Boil: Increase the heat to bring the mixture to a rolling boil. It will bubble up significantly.
- Simmer & Watch: Once boiling, reduce the heat to a low simmer. Do not stir. Let it bubble gently. The color will change from clear to a light golden amber.
- Monitor Temperature: For a firm ball ideal for body sugaring, you want the temperature to reach between 250°F and 255°F (121°C - 124°C) on your thermometer. This is the "hard ball" stage in candy making. If you don't have a thermometer, this takes about 10-15 minutes of simmering. Drop a tiny bit into a cold bowl of water—it should form a firm, malleable ball that holds its shape.
- Cool Slightly: Once it reaches the right temperature/color, immediately remove from heat. Let it cool for about 5-10 minutes until it's just warm enough to handle comfortably (like a warm bath). It will thicken as it cools.
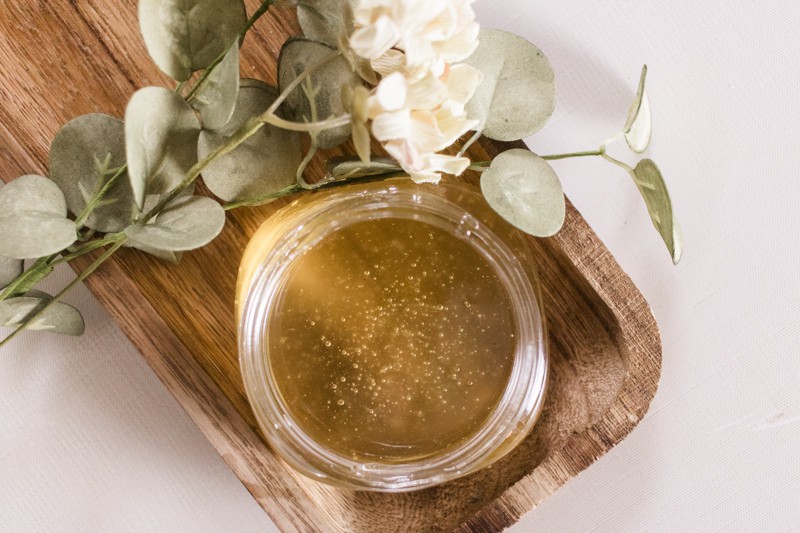
- Knead & Store: Pour the mixture into your glass jar. Once it's cool enough to touch, knead it with your hands like dough for 1-2 minutes until it becomes smooth, pliable, and slightly opaque. This aeration is crucial for the right texture. Store in an airtight jar at room temperature for up to 1 month. To reuse, simply microwave for 5-10 seconds or place the jar in hot water to soften.
Pro Tip for Consistency: If your paste is too sticky, it needs to be cooked a bit longer. If it's too hard and crumbly, you can add a tiny drop of water and knead thoroughly. Humidity plays a big role—on humid days, you may need to cook it to the higher end of the temperature range.
Recipe Variations for Different Needs
- For Sensitive Areas (Face & Bikini): Use a 1:1:1 ratio (e.g., ½ cup sugar, ¼ cup lemon, ¼ cup water). Cook to a lower temperature (around 230°F / 110°C - "soft ball" stage). This creates a much softer, more delicate paste.
- For Very Coarse Hair: Stick with the 1:0.5:0.5 ratio (1 cup sugar, ½ cup lemon, ½ cup water) and cook to the firm ball stage for maximum grip.
The Art of Application: How to Apply, Store, and Care for Your Skin
Learn how to apply, store, and care for your skin before and after sugaring. Technique is everything for a successful, pain-minimized experience.
Pre-Sugaring Skin Preparation (Crucial for Best Results)
Proper prep prevents infection, reduces pain, and ensures the paste adheres to hair, not skin.
- Exfoliate 24 Hours Prior: Use a gentle scrub or chemical exfoliant (like a lactic acid lotion) to remove dead skin cells. This prevents ingrown hairs and allows the paste to grip hair at the surface.
- Cleanse Thoroughly: On the day, wash the area with a mild soap and water. Remove any lotions, oils, or deodorants. Skin must be completely dry.
- Hair Length is Key: Hair should be about ¼ inch (the length of a grain of rice). Too short, and the paste won't grip; too long, and it will be more painful and prone to breakage.
- Avoid Moisturizers & Creams: Do not apply any products on the day of sugaring.
- Test Patch: Always do a patch test on a small area of skin 24 hours before full application to check for adverse reactions.
The Application Technique: Two Primary Methods
The "No-Strip" Method (Most Authentic & Effective):
- Take a small amount of the cooled sugar wax and roll it into a ball between your palms.
- Press the ball firmly onto the skin against the direction of hair growth.
- Quickly flick the ball off in the direction of hair growth using a swift, smooth motion. The ball will lift away with the hair.
- Use one ball per section (e.g., one for an upper leg). It will collect hair and become less effective—then make a new ball.
- This method is less messy, causes minimal skin trauma, and is what professionals in the Middle East use.
The Strip Method (Familiar for First-Timers):
- Spread a thin layer of sugar wax on the skin against the grain using a spatula or your fingers.
- Immediately press a cloth or muslin strip onto the wax and smooth it down firmly.
- Hold the skin taut with one hand. With the other, pull the strip off quickly in the direction of hair growth, parallel to the skin.
- While effective, this method can be slightly more painful and messy than the no-strip technique.
Key Application Rules:
- Always work against the grain for application.
- Always remove in the direction of growth.
- Keep the skin taut with your free hand to minimize pain and skin pinching.
- Work in small sections (2-3 inches wide).
- Do not reapply over the same area multiple times. If you miss hairs, let the skin rest for a day.
Post-Sugaring Skin Care: The Key to Lasting Smoothness
Get soft, smooth skin for weeks at a time! Proper aftercare soothes the skin, prevents irritation, and prolongs results.
- Immediately After: Gently wipe any residual paste with a damp washcloth. Apply a cool compress or aloe vera gel to soothe.
- For 24-48 Hours:
- Avoid heat (hot showers, saunas, exercise).
- Wear loose clothing.
- Avoid direct sun exposure.
- Skip perfumed lotions, scrubs, or exfoliants.
- Use only gentle, fragrance-free moisturizers.
- Starting Day 2: Begin gentle exfoliation (a soft washcloth or mild scrub) every other day to prevent ingrown hairs.
- Hydrate: Drink plenty of water to support skin health.
Storage and Shelf Life of Your Homemade Sugar Wax
- Storage: Keep your sugar wax in an airtight glass jar at room temperature. It can last for up to one month. If it hardens, simply soften it by placing the sealed jar in a bowl of hot water for a few minutes or microwaving in 5-second bursts.
- Do Not Refrigerate: This will make it rock-hard and unusable.
- Signs of Spoilage: If you see mold, smell an off odor, or notice a change in texture that isn't corrected by heating, discard it.
Mastering the Technique: Tips for Successful Sugar Waxing
Even with the perfect recipe, technique makes all the difference. Here are the 5 best sugar waxing tips gleaned from experts and seasoned DIYers:
- Temperature is Everything: The paste must be warm enough to be pliable but not so hot that it burns. Test on the inside of your wrist first. It should feel like warm honey.
- Taut Skin is Non-Negotiable: Use your free hand to pull the skin tight in the direction you're pulling the wax. This dramatically reduces pain and prevents skin from being pinched.
- Flick, Don't Pull: The motion should be a swift, confident flick or pull, parallel to the skin. A slow, hesitant pull is what causes the most pain and potential for bruising.
- Mind the Direction: This bears repeating—apply against growth, remove with growth. It’s the single most important rule for less pain and fewer broken hairs.
- Practice on a Small Area First: Don't attempt your first full leg sugaring the day before a beach vacation. Practice on your lower leg or underarm to build confidence and skill.
Troubleshooting Common Problems
- Paste is Too Sticky/Hard to Remove: It's too cool. Warm it up slightly. It may also be over-cooked; next time, remove from heat a few degrees earlier.
- Paste is Too Soft/Gooey: It's too warm or under-cooked. Let it cool more. Next time, cook it to a higher temperature.
- Too Much Pain: Ensure skin is taut, hair is the correct length, and you are removing in the correct direction. A softer paste recipe for sensitive areas can also help.
- Lots of Broken Hairs: Hair is likely too long. Trim to ¼ inch. You may also be applying in the wrong direction (with growth instead of against).
- Skin is Red and Irritated: You may be going over the same area too many times. Apply a cool compress and aloe. For next time, ensure skin is perfectly prepped and exfoliated.
Frequently Asked Questions (FAQ)
Q: Is sugar waxing less painful than traditional waxing?
A: For most people, yes. Because the paste only adheres to hair and not skin, and because it's removed in the direction of growth, there is significantly less tug on the skin. Pain tolerance varies, but many report a mild stinging sensation rather than the sharp pain of resin-based wax.
Q: Can I use sugar wax on my face and bikini area?
A: Absolutely. This is one of its greatest advantages. Use the softer recipe (1:1:1 ratio) for delicate areas like the eyebrows, upper lip, and full bikini line. The gentle formula is perfect for sensitive skin.
Q: How long do sugaring results last?
A: Results typically last 3-6 weeks, similar to traditional waxing. Because sugaring can remove hair as short as ¼ inch, you can often re-sugar sooner than with waxing, which requires longer hair.
Q: Can sugaring cause ingrown hairs?
A: It is less likely than with traditional waxing or shaving. The technique of removing hair in the direction of growth and the natural exfoliation from the paste help prevent hairs from curling back into the skin. However, improper aftercare (not exfoliating) can still lead to ingrowns.
Q: Is it really cheaper than salon waxing?
A: Yes, dramatically. The cost of a cup of sugar, a lemon, and some water is pennies. Your initial investment is in a few basic supplies. This makes it the ultimate hair removal that doesn't have to be expensive.
Q: What about the TikTok trend? Is it safe?
A: The viral TikTok video trends showcasing DIY sugar wax are generally safe when the basic recipe and safety precautions are followed. The core formula (sugar, lemon, water) is non-toxic. The main risks are minor burns from overly hot paste or skin irritation from improper technique—both are avoidable with the guidance in this article.
Conclusion: Embrace the Sweetness of Sugaring
Learning how to make sugar wax at home empowers you with a powerful, natural, and cost-effective beauty tool. This ancient technique has endured for centuries because it works—gently and effectively. By mastering the simple sugar wax recipe of sugar, lemon juice, and water, and pairing it with proper skin preparation, application technique, and aftercare, you can achieve ultra smooth skin for weeks without ever leaving your bathroom.
The benefits are clear: gentler on sensitive skin, free from harsh chemicals, deeply exfoliating, and incredibly affordable. Whether you’re a beginner looking to save money or someone with skin that reacts poorly to salon products, DIY sugar waxing offers a superior solution. Follow this easy sugar wax recipe tutorial, practice the techniques, and discover why so many are making the switch. Your journey to smooth, radiant, and confident skin starts with just three ingredients and a little bit of practice. Sugar waxing is a natural and gentle hair removal method that truly changes everything.
{{meta_keyword: sugar wax recipe, how to make sugar wax, DIY sugar wax, homemade sugar wax, natural hair removal, sugaring at home, sugar wax tutorial, gentle hair removal, sensitive skin hair removal, bikini line waxing, cost-effective beauty, ancient hair removal, sugar lemon juice water recipe}}