How To Replace TPMS Sensor: A Complete DIY Guide & Professional Insights
Have you ever been driving when suddenly a bright orange light illuminates your dashboard—a tiny exclamation point inside a tire cross-section? That’s your TPMS (Tire Pressure Monitoring System) warning light, and it’s your vehicle’s way of saying one or more tires is underinflated. But what happens when you check the pressure, inflate the tires correctly, and the light stubbornly stays on? The culprit is often a failing TPMS sensor. This leads to a critical question for any car owner: how to replace a TPMS sensor? While it might seem like a complex electronic repair, understanding the process can save you significant money and empower you to maintain your vehicle’s safety systems. This comprehensive guide will walk you through everything from identifying a bad sensor to the actual replacement steps, costs, and crucial post-installation procedures, helping you decide if a DIY approach is right for you or if professional help is the safer bet.
Understanding Your TPMS: Direct vs. Indirect Systems
Before diving into replacement, it’s essential to understand what type of TPMS your vehicle uses. There are two primary systems, and knowing the difference is the first step in troubleshooting.
Direct TPMS: The Individual Sensor Approach
Direct TPMS is the most common system in North American vehicles since the TREAD Act mandated it for all cars sold after September 2007. This system uses a small, battery-powered sensor mounted inside each wheel valve stem. These sensors directly measure the air pressure and temperature inside the tire and transmit that data wirelessly to the vehicle’s computer. If pressure drops 25% below the manufacturer’s recommendation, the dashboard light illuminates. The sensors themselves are sophisticated little devices, and their internal batteries are designed to last between 5 to 10 years. Over time the TPMS sensors can go bad or the batteries can go, leading to a constant warning light or complete system failure.
Indirect TPMS: The Wheel Speed System
The indirect TPMS system, used more often in Europe, does not have pressure sensors in the wheels. Instead, the sensors are located within the ABS braking system and/or the speed sensors of each wheel. This system monitors the speed of the rotations of the wheels for any change because underinflated tires have a slightly smaller diameter and thus rotate faster than properly inflated ones. The vehicle’s computer compares wheel speeds and triggers a warning if it detects a significant discrepancy. While simpler and cheaper (no battery-powered sensors to replace), indirect systems can be fooled by tire rotations or different tire tread depths and often require a manual reset after tire service.
Recognizing the Signs of a Failing TPMS Sensor
A persistent TPMS light isn’t always a sign of low tire pressure. Here are the key indicators that your sensor itself may be failing:
- Constant Light: The TPMS warning light stays on even after you’ve checked and correctly inflated all tires to the manufacturer’s PSI (found on the driver’s door jamb sticker).
- Intermittent Light: The light flickers on and off sporadically, suggesting a dying sensor battery or a loose connection.
- Inaccurate Readings: If you have a scan tool that reads individual sensor pressures, one sensor may show an implausible reading (e.g., 0 psi or an extreme number) while the tire feels fine.
- Physical Damage: Corrosion on the sensor’s valve stem, a cracked plastic housing, or damage from tire sealant can compromise the sensor. Tire sealant, corrosion from the elements, and a weak or dead battery can make sensor replacement necessary.
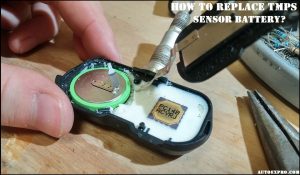
- Age: As a general rule, if you keep a car longer than about ten years, you will likely end up replacing them because the sensor batteries are not serviceable. The battery inside the TPMS sensor is not removable; the entire unit must be replaced when the battery dies.
The DIY Dilemma: Can You Replace a TPMS Sensor at Home Without a Tire Machine?
This is the core of how to replace a TPMS sensor. The short answer is yes, but with significant caveats. Though TPMS sensors are designed to be simple to service and operate, it will still be necessary to remove the tire from your wheel to replace them. You do not need a professional, hydraulic tire changing machine, but you will need specific tools and a considerable amount of skill and patience.
Essential Tools for a DIY TPMS Sensor Replacement:
- Tire Iron/Impact Wrench & Lug Nut Socket: To remove the wheel.
- Jack and Jack Stands: To safely lift the vehicle.
- Tire Bead Breaker & Iron: To break the tire’s seal from the rim and pry the bead over the edge. This is the most challenging part without a machine.
- Valve Core Tool: To remove the old valve stem core and install the new one.
- TPMS Sensor Tool/Valve Stem Tool: A special socket (often a star or torx pattern) that fits the sensor’s retaining nut. This is non-negotiable.
- New TPMS Sensor(s): Must be compatible with your vehicle’s year, make, model, and frequency (315 MHz or 413 MHz).
- TPMS Rebuild Kit (Optional but Recommended): A metal TPMS rebuild kit includes the rubber grommet, retaining nut, core and cap. Using a new kit with every sensor ensures a perfect seal and prevents future leaks.
- Soapy Water & Tire Inflator: For leak testing and final inflation.
- TPMS Activation/Programming Tool (Critical): This is often the biggest hurdle. After installing a new sensor, it must be registered or programmed to your vehicle’s computer. This requires a specialized scan tool. Some universal sensors can be "cloned" from the old one, but many newer vehicles require a specific OEM-level procedure.
Step-by-Step DIY Overview:
- Safety First: Park on a level surface, engage the parking brake, and chock the opposite wheels. Loosen lug nuts before jacking.
- Remove Wheel: Jack up the vehicle, secure with stands, and remove the wheel.
- Break the Bead: Use the bead breaker to separate the tire rubber from the rim on both sides. This requires significant force and care to avoid damaging the rim or injuring yourself.
- Remove Old Sensor: Deflate the tire completely. Use the valve core tool to remove the core. Then, using the special TPMS socket from inside the tire, unscrew the retaining nut and pull the sensor out.
- Install New Sensor: Apply a tiny bit of dielectric grease to the new sensor’s o-ring (if equipped). Insert the new sensor (with a new grommet from the rebuild kit) through the hole in the rim. Hand-tighten the retaining nut, then torque it to the manufacturer’s specification (usually 25-35 lb-ft) using your special socket.
- Re-seat the Tire: This is the other incredibly difficult part. You must pry the tire bead back over the rim’s edge on both sides, ensuring it’s seated evenly all around. An air blast may be needed to seat the bead.
- Inflate & Leak Test: Inflate to the recommended pressure. Spray soapy water on the valve stem area and listen for hissing. Bubbles indicate a leak.
- Reinstall Wheel: Mount the wheel, hand-tighten lug nuts, lower the vehicle, and torque lug nuts in a star pattern to spec.
- The Most Important Step: Relearn/Registration:If you replace wheels, rotate tires, install new sensors or inflate tires and the TPMS light stays on, the problem is usually not the tire. In most cases, the TPMS system just needs recalibration, relearn, or sensor registration. This step is vehicle-specific and often requires a scan tool. Procedures range from a simple button press to a complex drive cycle. This article will guide you through everything you need to know about TPMS sensors, the cost of replacement, and how to change them yourself if you're up for the task—but skipping the relearn will leave your light on and the system non-functional.
Given the physical difficulty of tire removal/installation and the mandatory electronic programming, this guide strongly recommends that unless you are an experienced DIYer with the proper tools, you should likely seek professional help for sensor replacement.
TPMS Sensor Replacement Costs: What to Expect
TPMS sensor replacement costs vary by sensor type, vehicle, and location. Here’s a breakdown:
| Cost Component | Typical Price Range | Notes |
|---|---|---|
| Sensor (OEM) | $50 - $150+ | OEM (Original Equipment Manufacturer) sensors are the most reliable but priciest. |
| Sensor (Aftermarket/Universal) | $30 - $80 | Quality varies. Ensure compatibility. Some require programming. |
| Labor (Per Tire) | $50 - $100+ | Labor charges depend on the shop and region. This covers removal, installation, and relearn. |
| Total Per Tire | $100 - $250 | With typical total costs ranging from $100 to $250 per tire when including sensor, labor, and relearn. Replacing all four at once often gets a discount. |
Cost-Saving Tip: If your sensor is simply leaking at the valve stem (the rubber part), a TPMS rebuild kit (grommet, nut, core, cap) can sometimes fix the issue for under $10, avoiding a full sensor replacement. However, if the sensor’s electronics or battery are dead, a new sensor is mandatory.
Post-Replacement: The Critical Relearn Procedure
You’ve physically installed the new sensor. The tire is on and inflated. But that light is still glaring at you. This is the most common point of confusion. Understanding how to change a TPMS sensor empowers you to address issues promptly, but that empowerment includes understanding the final, electronic step.
The vehicle’s computer needs to learn the unique ID code of each new sensor and its position on the vehicle. This is the relearn or registration process. Methods vary widely:
- OBD-II Port Activation: A technician uses a scan tool plugged into the OBD-II port to register each sensor’s ID.
- Drive Relearn: You drive the vehicle at a specific speed (usually 50+ mph) for a set time (5-15 minutes) after the sensor is installed. The system automatically detects the new sensors.
- Manual Button Press: Some older vehicles have a dedicated TPMS reset button on the dash or under the steering wheel.
- Tool-Based Activation: A handheld TPMS tool is placed near each wheel valve stem to "wake up" and register the sensor.
Always consult your owner’s manual for the exact procedure for your specific vehicle. Failure to complete this step correctly is the #1 reason a TPMS light remains on after a sensor replacement.
When to Choose Professional Installation
While the DIY route is possible, this means it's often best to make an appointment with a trusted tire shop to replace your TPMS sensors and reprogram them to ensure that they sync with the vehicle and operate at its best. Here’s when professional service is highly recommended:
- Lack of Tools: You don’t own a bead breaker, TPMS socket, and especially a TPMS programming tool.
- Complex Vehicles: Some cars, like certain Hyundai Ioniq models or luxury brands, have proprietary systems that require dealer-level scan tools. To have your Hyundai Ioniq expertly repaired, count on the experts at your Hyundai service department.
- No Confidence in Tire Work: Removing and reinstalling a tire without damaging the rim or improperly seating the bead is a skilled task. A mistake can lead to a dangerous blowout.
- Time vs. Money: The process can take 1-2 hours per wheel for a novice. Professional shops can do it faster with their equipment.
- Warranty & Peace of Mind: Reputable shops warranty their work and sensors. They also handle the entire process—sensor choice, installation, and relearn—in one visit.
Choosing the Right Replacement Sensor
When buying a sensor, you have options:
- OEM (Original Equipment Manufacturer): The exact sensor your car came with. Highest compatibility and reliability. Crown Automotive continues to be the leader in quality replacement parts for Jeep® vehicles and is a prime example of an excellent OEM supplier. Crown has the largest stock of replacement parts for Jeep® vehicles, including factory discontinued parts. In fact, many of the older Jeeps are still on (and off) the road thanks to Crown parts.
- Aftermarket/Universal: Sensors from brands like Dill, Schrader, or Pacific. Dill TPMS sensors are designed to alert you when your tire pressure is low and are widely available. They must be programmed to your vehicle’s protocol. Quality is generally good, but verify fitment.
- Programmable/Cloning Sensors: These can be programmed to mimic the ID of your old sensor, which is ideal for vehicles that require sensor registration. They require a programming tool.
Conclusion: Knowledge is Power (and Safety)
Learning how to replace a TPMS sensor demystifies a critical safety component of your vehicle. You now know that a persistent light can mean dead batteries, sealant damage, or corrosion—not just low air. You understand the fundamental difference between direct and indirect systems and the mandatory electronic relearn step that follows any physical sensor swap.
While the physical act of swapping a sensor with the tire off the wheel is a mechanical task, the surrounding complexities—tire handling, precise torque, and mandatory electronic registration—make it a borderline job for most home mechanics. For that reason, you will likely end up replacing them at a professional shop if your car is over a decade old, especially if you lack the specialized TPMS tools.
Ultimately, understanding how to change a TPMS sensor empowers you to address issues promptly. You can now have an informed discussion with your mechanic, understand a repair quote, and make the cost-effective decision between a DIY rebuild kit attempt, a full sensor replacement at home, or a professional service. Whether you choose to get your hands dirty or trust the experts, maintaining a functional TPMS is a non-negotiable aspect of modern vehicle safety, ensuring your tires are always at their optimal pressure for handling, fuel economy, and tire longevity.